Still waiting for some replacement parts so that I can get it rolling and wheel it to and from my other garage but I got the steering hashed out.
   The cast UJ from Rally Design is poor. The holes are not in the right position to stop the splined ends from pulling out. :rolleyes: Ill try opening them up to allow a bigger bolt or buy the pressed steel version. Cheers Stot |
Looking good pal,
1 question the plate your steering column bearing is mounted to, is that still 1mm as per the book or have you beefed it up a bit? I'm just about to tackle that bit is all. Cheers Will |
Quote:
Cheers Stot |
Quote:
|
Quote:
Cheers Stot |
Quote:
|
Back to the dials...
I think the MX5 Nutz guy is stopping doing them as the emails went dry. So I did a little digging and found a guide on making them yourself, although the guide has been taken down now as people were stealing the guide writers designs. Laser print a front, middle and back on acetate and paper.  Stick them together with a spray glue.  cut them out. 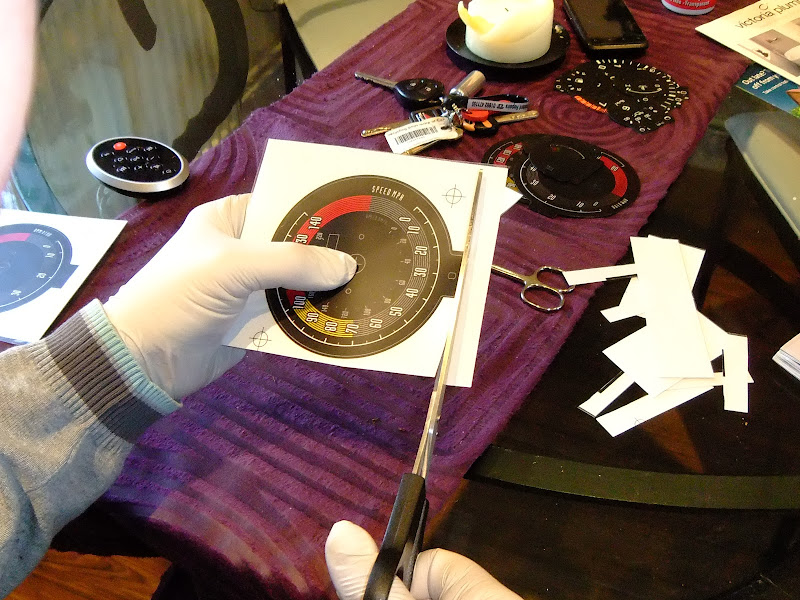  |
Add holes for the screws and locators
 Cut out the odometer window with a craft knife. 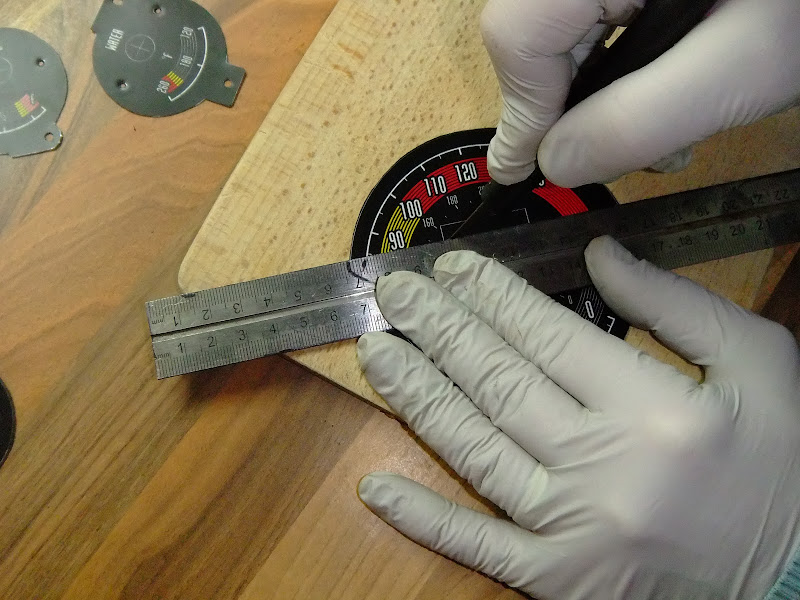 Draw round the inside of the window with a black sharpie to hide the white edge. 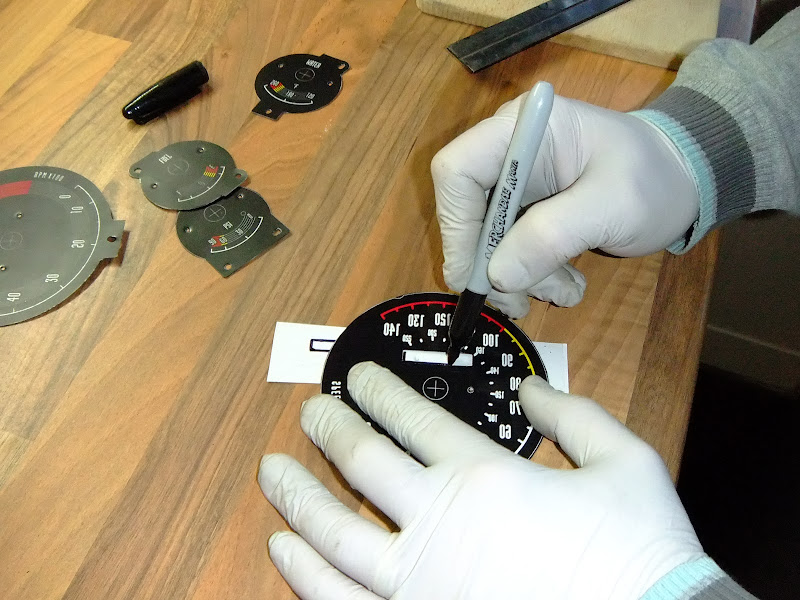  |
Don't forget to cut the middles out like I did.
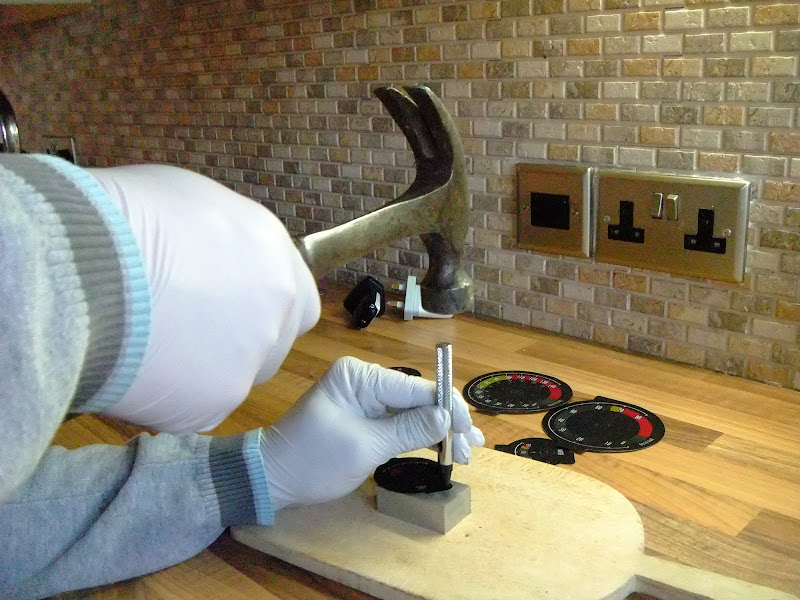
 This is how I popped off the old dial hands. levering against my fingers not the back of the dial.  As I changed where the 0 position was, I needed to remove the three tell tale lights so the whole tacho dial would illuminate.   |
Put the dial hands back on.
 Daylight  Night time  Came out nice I thought. :D Cheers Stot |
Them's the dogs danglies!
|
Very nice work indeed Mr Stot...:cool: :cool:
All I can say is you are a very clever chappy:) |
Im changing the numbers on my dial design based on the Smiths Mini Classic dials. I also wasnt overly happy with the amount of light bleeding through the background on the dials when illuminated so I have added an extra 'mask' layer to these ones that is silver foiled to block the light.
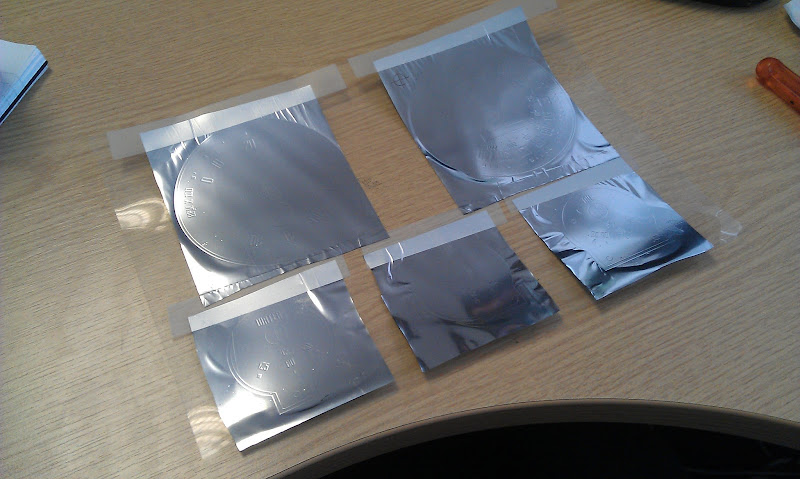   Cant wait to see how these ones turn out. :cool: |
I also had a go at making a new insert for the warning lights in the cluster because they would be upside down otherwise. Same process but omitting the paper layer.
The parts,  Layered up,  Light from behind.  I havent stuck these together yet but its looking promising. Cheers Stot |
MK2 dials. Based on the Smith mini speedo.
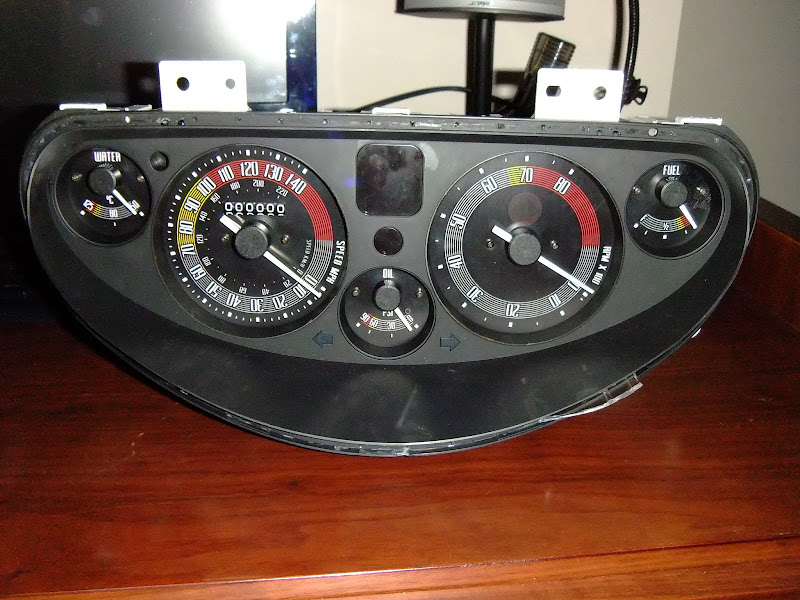 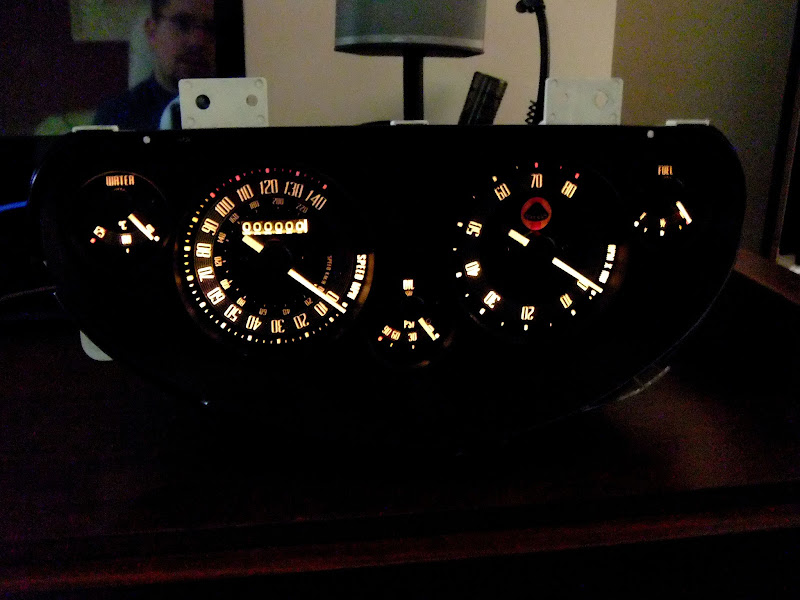 Much more retro looking I think, and the illumination doesn't bleed anywhere near as bad! And the warning lights work a treat. :cool:  Cheers Stot |
These are seriously good.
You could think about sharing your set up costs by making sets for other builders. A lot more cost effective than spending out on Smiths dials to achieve the same result. |
Am liking your build ethos Andy....you obviously like things to be "right" or nowt else will do:) .....a trait I also suffer from, can be a pita sometimes tho:mad:
|
Quote:
They cost me £15 for 50 sheets of acetate, £9 for the spray glue and £4 for a craft knife and hole punch set. MX5Nuts guy is doing them for £35 a set. Cheers Stot |
Very Very Smart.
TT |
Sticking with the KAR 120C theme, red seats are called for...
Couldnt find anything new at a reasonable price, but ended up getting this pair of RX1110 Full leather red seats, with runners, for the price of some black vinyl Mamba Baby Cubs! :cool:  I'm in 2 minds as to use them as they are with their 'patina' or do a full colour restoration on them. Happy days! Cheers Stot |
Those seats are the real BIZ!;) ;)
|
Quote:
 Click to Youtube. Cheers Stot |
Took advantage of the sun today and made up the seat brackets. I used some 25x25x3 angle and welded the nuts to the bottom so I dont need to get underneath to fit or remove the seats.
 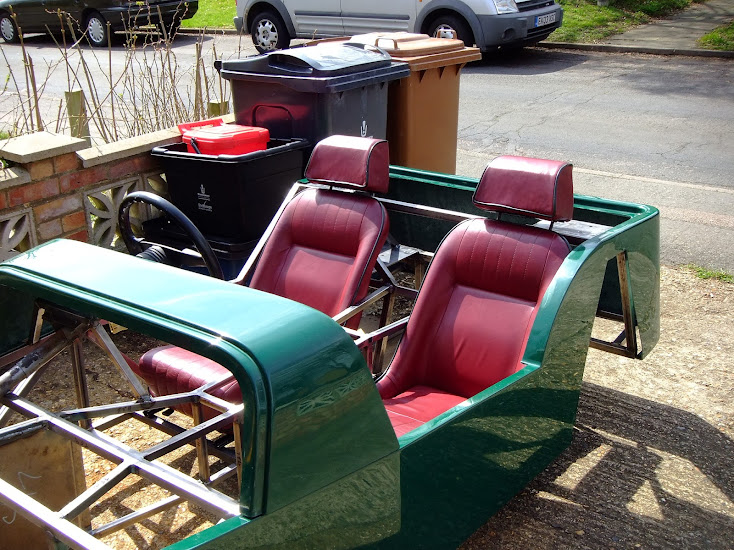  The seats look great. and fit perfectly, even with the flared back section of the transmission tunnel. :cool: I wouldn't recommend them for drivers taller than say 5'9". I'm 5'6" and the seat position for me is only 2 clicks forward from full back. Im gonna need a smaller steering wheel too! |
I also dusted off the CNC machine and cut out a dash surround from some MDF for the mx5 dials to sit in.
  A few Youtube seconds of the CNC machine cutting it. It will be cut with rounded corners and a taper to the trans tunnel then covered in a red pleather. Cheers Stot |
Can anyone spot the deliberate mistake here?
 Wear goggles whenever grinding! Cheers Stot |
Quote:
|
Quote:
Cheers Stot |
Quote:
Btw hope your eyeball is better- been there too,a steady handed doc yanked it out:eek: |
Quote:
It is a lot better now but was horrible for a couple of days. I think I would need to get 50 badges at around a tenner each to be able to place an order. Cheers Stot |
Back to the dash again...
I made a 3rd incarnation of my dials to try and get a better colour in them and also wanted better light distribution so on ebay I got..  ..a 5m length of 12V warm white LED strip and cost just £10 delivered. Bargain. I planned to stick it around the inside of the dash like this as it has adhesive back. Nothing will stick to that white plastic the dash is made of so I ended up drilling holes around the outside and it will be held in by thin white zipties. 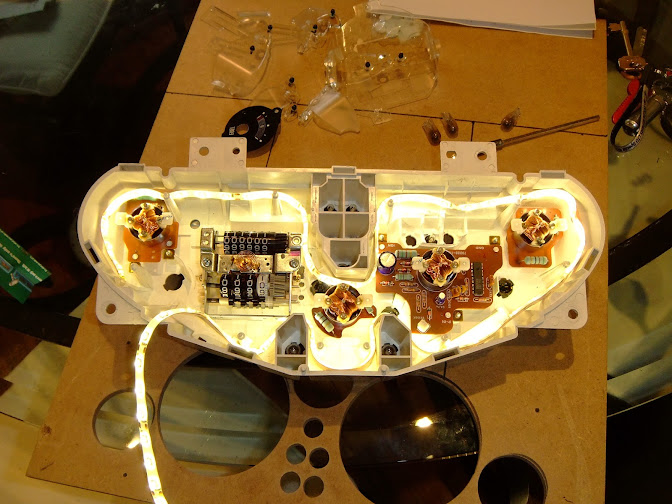 The light and colour is bang on now. I will be machining some individual dial surrounds that will block out all the excess light you can see around, as the electrical tape is doing here on the speedo and tacho.  Cheers Stot |
Milestone. :D
  Only on with threaded rod at the moment, and I need to weld in the front upper suspension mounts but it rolls to my other garage now. :cool: Cheers Stot |
Wishbones
Hi Stot been watching your build with interest and jealousy at how quick and cleaver you are, and what great ideas you have will be stealing some of them I think.
Question in your last photo it looks like your front bottom wishbones have a bend in them or is it just a camera angle?. Regards Mick. |
Hi Mick,
They do have a bend in them, they are Phil @ Talons design. The idea is to stop them fouling the steering rack at full steering lock and it certainly does that. There shouldn't be any real stress through the bend as most of the load will be at the two ends. The front will sit lower once I get the proper mounts welded in. Not sure about my rear shocks though. May need to send them back for some shorter ones. I ordered 14" Open 9.5 Closed which is fine for the front but I'm close to bump stop at the rear so may go for some 12" - 8.5"s Cheers Stot |
Looking good Stot..:)
Must say you seem to be cracking on with it. I see you have plenty of clearance with those front wishbones. Do you plan to use the wheels you have or opt for a new set. Awesome work buddy ....keep it going.;) |
Quote:
I have some nice 15" steel wheels to go on it to keep with that classic look but they are brand new so Ill keep with these for the build and swap them out when its nearing completion. Cheers Stot |
Got a tank made by Kev. Fitted the hardware to it last night but I might drill a hole and fit the MX5 breather also.
 Cheers Stot |
Quote:
|
Quote:
I read this post so ordered 4 x 14". Im sure Rally Design will swap them out. edit: Just looked through the Rev 3 Saturn guide and it doesn't mention shock lengths or shocks at all. Cheers Stot |
The specs I have were obtained directly from SSC/NTS. The lower damper mounting is slightly more inboard than the Sierra; the Sierra mounting is part of the upright, whereas the MX-5 version is part of the upper wishbone. Therefore, you would expect the open and closed lengths to decrease.
The rear spring, whilst we're on the subject, was specced at 7" open, 250lb. From what Nathan told me, Protech (who supplied SSC/NTS) have these specs on their database. |
Rally Design have kindly agreed to let me send them back and exchange them for some 11" x 8"s with 7" springs. :D
Cheers Stot |
| All times are GMT +1. The time now is 02:58 PM. |
Powered by vBulletin® Version 3.6.4
Copyright ©2000 - 2024, Jelsoft Enterprises Ltd.