Haynes Forums

Haynes Forums (http://www.haynes.co.uk/forums/index.php)
-   General discussion (http://www.haynes.co.uk/forums/forumdisplay.php?f=10)
-   -   Rosco's haynes Build (http://www.haynes.co.uk/forums/showthread.php?t=13517)

voucht 6th January 2015 02:47 PM

Hi,

Have look here:
www.haynes.co.uk/forums/showthread.php?t=13563

I just published 3D drawings of all the bodywork from Equinox with measurements in agreement with Dave @ Equinox Products.

Hope this can help you to mock-up :)

Good luck.

Rosco 6th January 2015 08:23 PM

Quote:

Originally Posted by voucht (Post 99585)
Hi,

Have look here:
www.haynes.co.uk/forums/showthread.php?t=13563

I just published 3D drawings of all the bodywork from Equinox with measurements in agreement with Dave @ Equinox Products.

Hope this can help you to mock-up :)

Good luck.

Cheers, very helpful!

Rosco 6th January 2015 08:23 PM

Engine position thoughts

Access to all areas of the engine, to save removing the engine if anything needs replacing

Keeping some weight upfront to help keep some heat in the tyres

Height wise, keep the sump flush with the bottom of the chassis, this means you can run the whole car an inch lower than if the sump was sitting below by an inch,
I thought this was really good advice and made a lot of sense

On the piss, just seems to fit better for the exhaust and loads are mounted like this so must be ok for the prop

I don't want to drop the engine down as I want the underside flush, and an inch wouldn't solve the problem, looks like I'm going to have to mod the bonnet with a scoop or just use a filter like you say and let it sit out the top, also I've got to refit the top injectors,


jps 6th January 2015 10:01 PM

Pics didn't come out so well - but I did get some measurements - taken from the Equinox scuttle front edge and the nosecone back edge (i.e. each end of where the bonnet will sit). I'd say that as a minimum you've got 260mm clearance at the scuttle end (above the level of the top chassis rails) and 200mm at the nosecone end. The Equinox nosecone comes back to just about where your left foot ends in the pic earlier on this thread - i.e. just behind where the triangulation is at the front of the chassis.

jps 6th January 2015 10:02 PM

Forgot to mention, those measurements were from roughly the centre of the chassis - both the nosecone and the scuttle are quite flat topped with relatively steep sides compared to some other 7-type bodywork.

flyerncle 7th January 2015 09:17 AM

Before you go to far think about oil surge and how to stop it.the engine is not meant to run fitted in the frame that way so the oil will run away from the pick up.


Could save you plenty hassle ;)

Rosco 7th January 2015 07:02 PM

Quote:

Originally Posted by flyerncle (Post 99594)
Before you go to far think about oil surge and how to stop it.the engine is not meant to run fitted in the frame that way so the oil will run away from the pick up.


Could save you plenty hassle ;)

Yeah, I'm going to run a billet sump that's baffled to stop any surge

Rosco 9th January 2015 08:00 PM

Well had a measure up for my engine cradle and made some paper templates


Looked ok so drew them up and got them laser cut out


So that's a job for the weekend, also got a polo rad to get mounted


SeriesLandy 9th January 2015 10:53 PM

Looking good so far.

Don't forget space for a fan between the rad core and front frame. I did!

Rosco 10th January 2015 05:40 PM

Quote:

Originally Posted by SeriesLandy (Post 99620)
Looking good so far.

Don't forget space for a fan between the rad core and front frame. I did!

Cheers, will do

Rosco 10th January 2015 05:41 PM

Got my radiator mounted today while I still had my borrowed nose cone, I will sort the top brackets later


Some rubber grommets off ebay


Rosco 10th January 2015 05:41 PM

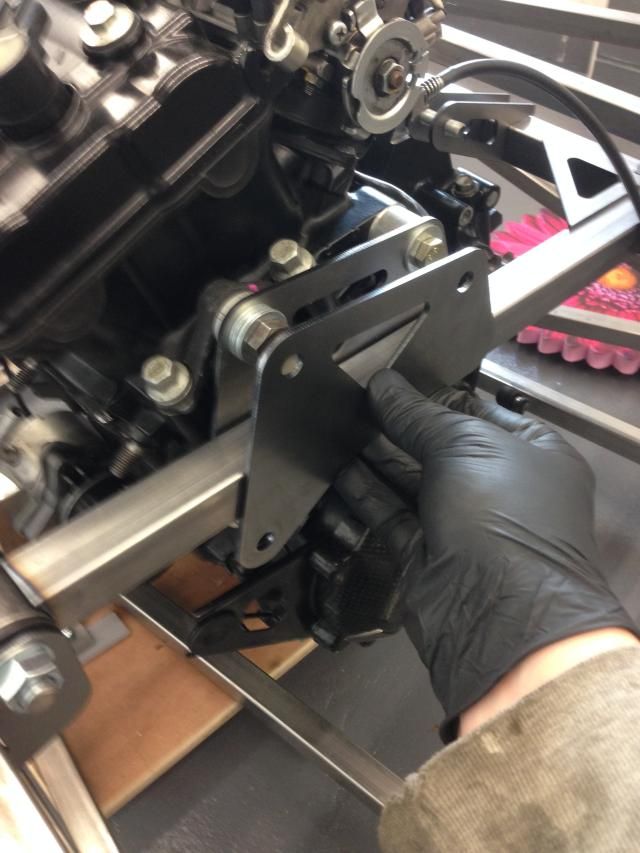
Then I set about making some spacers for my engine mounts, faced and centre drilled them in the lathe, then drilled
Them through on the pillar drill as my lathes a bit small for drilling


That's the rear mount offered up


And that's the front


Rosco 10th January 2015 05:42 PM

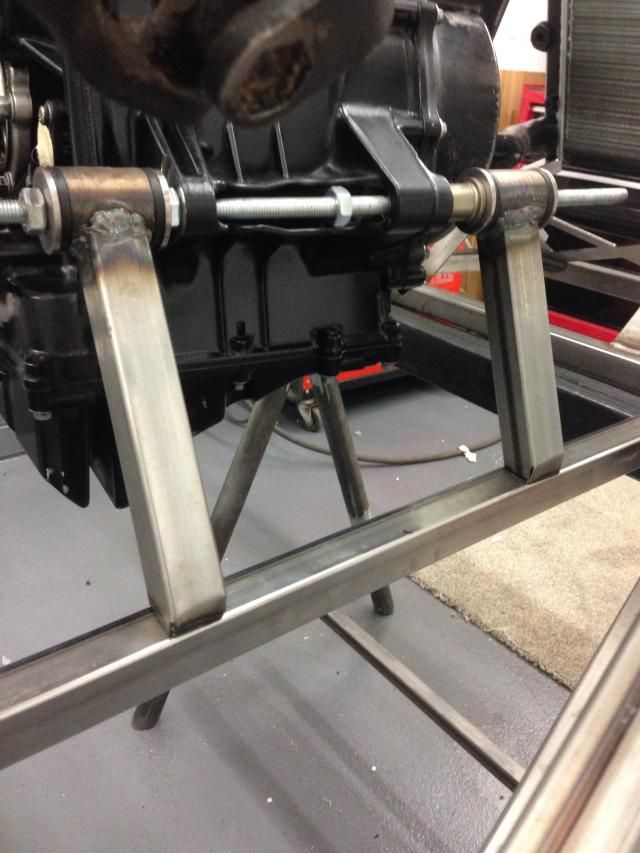
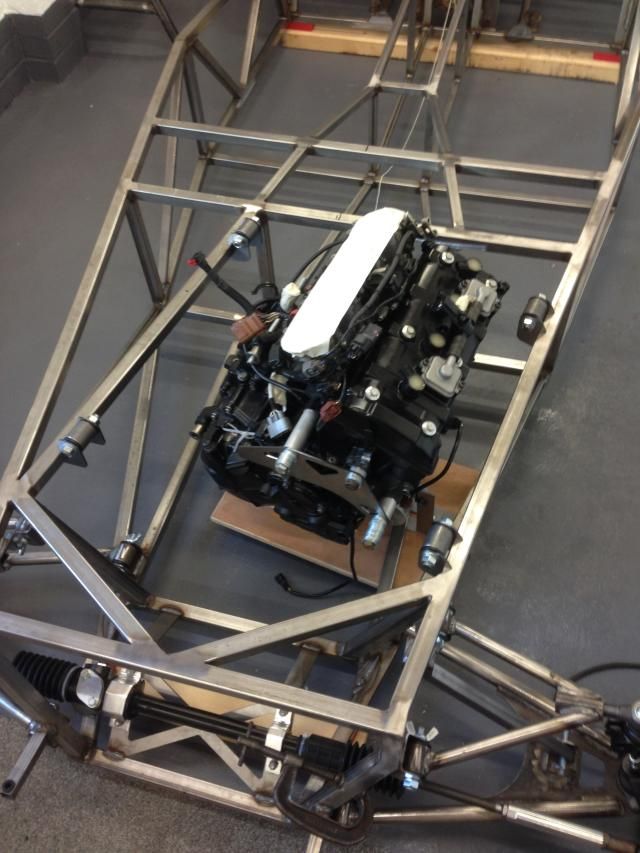
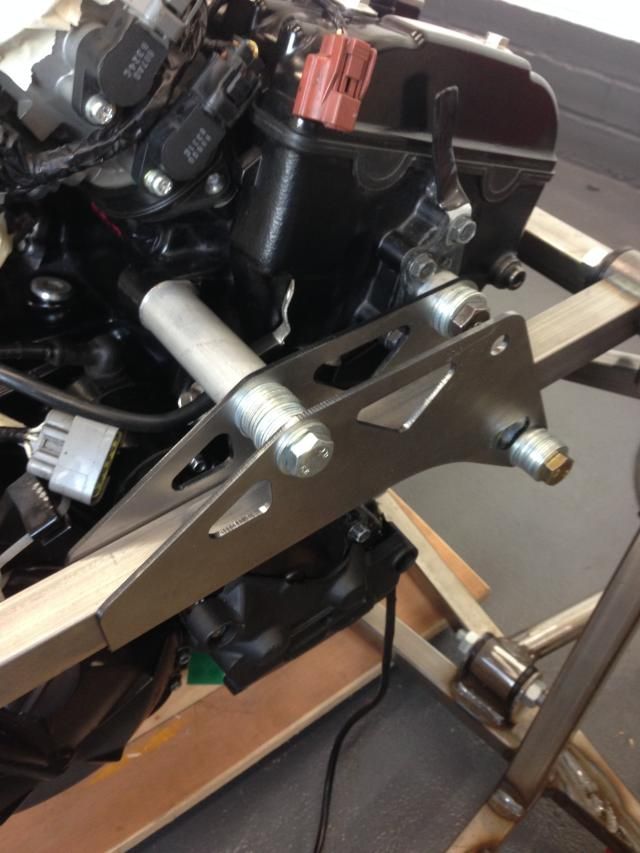
I decided to rubber mount my engine cradle, so have used some spare wishbone bushes I had left, I will see what it's like but could
Always make some softer bushes if I need to
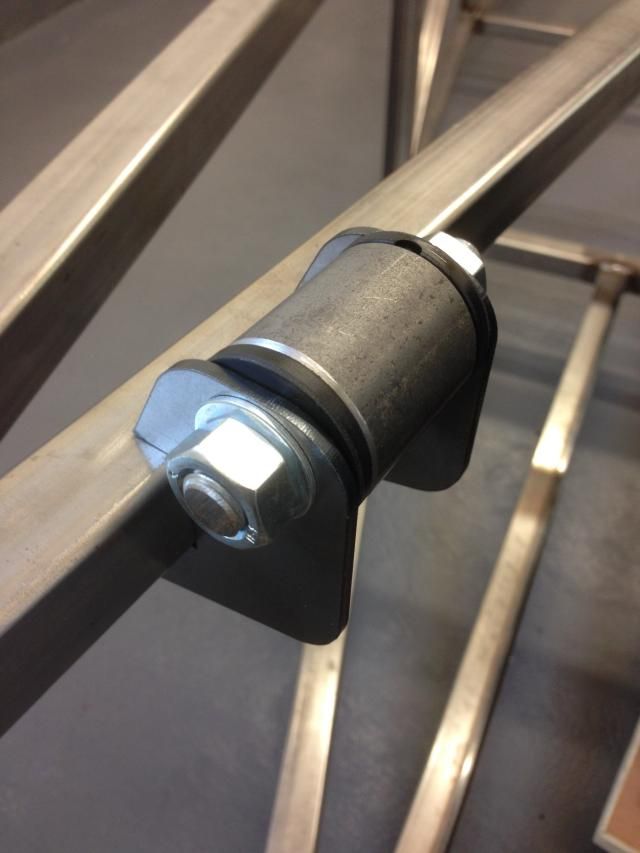


Struggling for bolts, hence the washers, there m10x1.25 so not really very comon


I'm going to weld spacer tubes In between the plates


Rosco 10th January 2015 05:42 PM

Side engine mount


Ready to tack up tomorrow


dubzter 11th January 2015 10:57 AM

That's some real tidy work there, looks fantastic.

Rosco 11th January 2015 04:43 PM

Cheers, pretty pleased with how it's turned out

I looked at other cradles and didn't really fancy mounting on just one bolt either side, I no it's going to be a bit heavier, but I will lose the weight elsewhere if I can

Got it tacked up today and worked out my coolant pipes


And one of the pooch


Rosco 12th January 2015 10:06 PM

Busy evening tonight,

My mate tacking up my wishbones


All welded


Rear end assembled again


Rosco 12th January 2015 10:06 PM


Might have to remake to top ones to, just because I made them to the book jig that hadn't been up issued although the wishbone drawing had! Argh!!

Popped and got some bits off my mate who runs an ebay shop


Then got it back on the stands and the engine bolted back in


Rosco 12th January 2015 10:07 PM


Got loads to do now, I've got everything to get my cooling hoses done, also going to start to look at making an exhaust manifold and a fuel tank
Also sort out my lower engine mount

Rosco 13th January 2015 09:15 PM

Got my coolant hoses on tonight


That's the oil cooler return T'ed into the out flow


Rosco 13th January 2015 09:15 PM

That's running from the lower rad to the back of the engine


I've used 25mm and 32mm stainless pipe to make the joins and runs, I might get the outside blasted and powder coated to keep it looking factory tho

Rosco 13th January 2015 09:17 PM

I just need to decide where I'm going to T my header tank into and make a few brackets to support the tube in places to stop the silicone rubbing anywhere!

Rosco 17th January 2015 03:35 PM

First job today make a dummy exhaust collector so I can mock up my exhaust, luckily my dads built a cnc router!


Then mocked up with four tubes of equal length


Rosco 17th January 2015 03:35 PM


Then started to draw it up on the cad to work out my bends


Then made a start on remaking my rear upper wishbones


flyerncle 17th January 2015 05:57 PM

You may want to add some sort of ridge to the pipe ends if you have not already done so,two builders were scalded when the pipes blew off when hot due to not gripping the pipe.

TheArf 19th January 2015 09:07 AM

I think you might find that they were also using plastic fittings from a vacuum cleaner

Arfon

Rosco 24th January 2015 07:41 PM

Got my seats from JK Composites this week


Really happy with the quality


Also got a column and got it mounted


Rosco 24th January 2015 07:41 PM


Just need to get a UJ joint that's fits the rack as the one I've got is to big

I've cut the steering lock off and I'm going to get the Ali bit turned town so it's nice a clean looking coming out of the dash


Got my lower engine mount sorted to!


Rosco 24th January 2015 07:42 PM


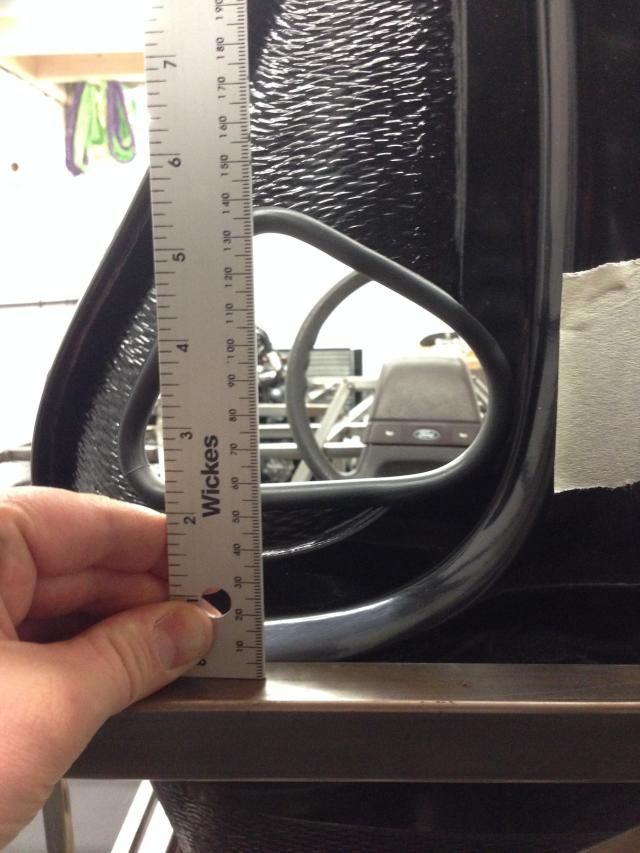
Here's a pic of where my upper harness holes fall, there a bit high up
i

I was hoping to have some welded bosses in the top chassis rail like most people do must looks a bit high, I don't really want a cross rail as I'm going to put
A diagonal across the rear hoop, what options do I have, anyone got any ideas?

rpjg1975 24th January 2015 08:29 PM

Looking good there, sure someone will come back with a bright idea about the harnesses......I may well be wrong but I was under the impression that the steering lock was one of the things required for iva?

Russ

SeriesLandy 24th January 2015 08:45 PM

You don't have to have a steering lock for IVA but you do need 2 forms of security. Just fit a key/ keyless ignition and an immobliser. That's why the ignition barrel and steering lock was handy.

Rosco 24th January 2015 09:19 PM

Quote:

Originally Posted by rpjg1975 (Post 99757)
Looking good there, sure someone will come back with a bright idea about the harnesses......I may well be wrong but I was under the impression that the steering lock was one of the things required for iva?

Russ

Quote:

Originally Posted by SeriesLandy (Post 99758)
You don't have to have a steering lock for IVA but you do need 2 forms of security. Just fit a key/ keyless ignition and an immobliser. That's why the ignition barrel and steering lock was handy.

Yeah you can use the steering lock as one of the two but then I would have to uses the sierra ignition switch, and I've got to use the bike ignition because of the immobiliser in the key, I'm hoping that will count as two but if not I will get a key fob too

rpjg1975 24th January 2015 11:52 PM

Ah cool, that's good then :D

Rosco 30th January 2015 07:48 PM

Got a bit done this week,

Cut the lock etc off and made a stainless tube, still need to secure it


Also made some top hat washers for the column bracket


Got my plates for the footwell back from my fabricators


Rosco 30th January 2015 07:49 PM

I've had these cut out of 2mm and a strengthening fold along the bottom where the pedal box bolts in


Also got a couple of front seat rails bent up, these will have nuts welded underneath


And sit somewhere like this, pedal box is next weeks job so then I can work out my seat position


Rosco 30th January 2015 07:49 PM

Picked up a cat today to, it's a 400 cel custom chrome one, there only down the road from me, could of got a 200 cell high flow but didn't want any problem getting through my iva


NeilW 31st January 2015 07:07 PM

Great build so far mate, nice clean look. Good motivation for me to pull my finger out

Rosco 1st February 2015 07:29 PM

Quote:

Originally Posted by NeilW (Post 99831)
Great build so far mate, nice clean look. Good motivation for me to pull my finger out

Cheers, yeah get cracking!

Rosco 1st February 2015 07:30 PM

Down my dads all day today, he's built a cnc router, works like a dream

Made a flange for my zx10 fuel pump today, this will be welded to a tube then to the bottom of the tank to make a swirl/ sump

Made a ply one first to check holes and oring grove


10mm Ali plate


Rosco 1st February 2015 07:31 PM


Took 25mins to cut this out


Then made a wheel with the correct offset so I can check clearance when we make the exhaust manifold

One side is a 205 tyre the other is a 185 tyre

12mins for this I think, it flys through timber!


All times are GMT +1. The time now is 05:40 PM.

Powered by vBulletin® Version 3.6.4
Copyright ©2000 - 2024, Jelsoft Enterprises Ltd.