I believe that pic is of the passenger side - The handbrake cable comes in at the top of the pic and attaches to the shoe towards the bottom.
On the sierra, I believe the cable goes in from the front and attaches to the shoe towards the back - If you were sitting looking at the passenger side drum, it would go in from the left of the drum and attach to the shoe on the right. You can see the cables in this pic:  This pdf will probably help you out a bit too: http://ford-sierra.misto.cz/pdf/10-Braking_systems.pdf |
Thanks Eddy,
Mananage to get my rear brakes sorted, still need to shorten the handbrake cable but other than that the rear brakes are sorted. I had to put a notch in the uprights to fit the rear flexis. I spend a good amount of time on my pedal box,its the OBP kit car one. I couldn't work out a good way of connecting the throttle cable, OBP weren't very helpful. In the end I completely changed it by raising the pedal and coverting it to a bottom pull arangement with the cable coming in through the lower chassis member. It has just enough pull to fully open the carbs, action is now smooth with no funny angles of the cable, very happy I got that sorted, I'll post some pictures when I get a chance. |
Hi Mike,:)
Any photos of your body kit fitted or are you keeping this under wraps? I'm interested as I also have an AGM bodykit. |
The ones a page back from 18th Feb are as good as it gets at the minute.
I've had issues with side panels and rear tub join, but from recollection you only went for the 3 piece kit so might not have run into those. It looks a bit knaff on its build wheels and no headlights so wanted to sort that before stunning you all with some nice shots! lol |
Build update for April!
Well I got a day or two in the garage this month. With the weather improving and lighter nights I might get in there in the evening a bit more.
Main task was starting to tidy up the engine bay and make the bulk head panel. I've done this in two parts to give access to the pedal box. I've installed the cooling system properly now and mounted the expansion bottle. I think the installation looks quite neet. The next step will be tidying the engine bay and scuttle wiring. Can't make my mind up where to have the fuses. Thinking of a drop down panel in the passenger footwell for the fuses and relays. 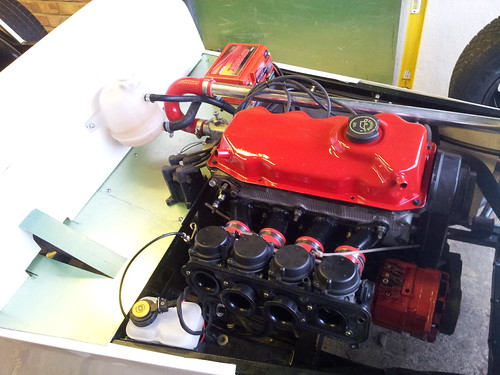 Untitled by mjb22001, on Flickr 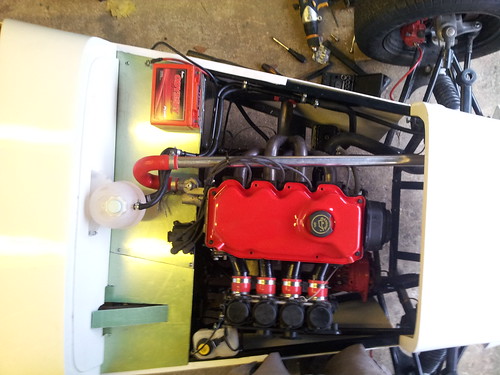 Untitled by mjb22001, on Flickr And heres the mod to the opd pedal box to convert to a bottom pull throttle cable.  Untitled by mjb22001, on Flickr 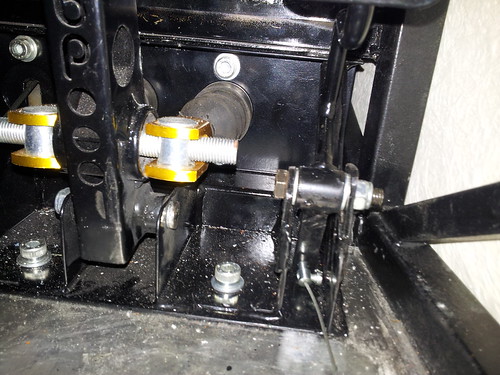 Untitled by mjb22001, on Flickr |
Your CVH looks good, who made the inlet manifold?
TT |
my own fair hands! its a laser cut steel back plate then I used my rage compound mitre to get the tube cuts close.
|
No progress this weekend but I've got my NODIZ on order.
It seems to be a step up from megajolt as it has bluetooth for mapping and a funky android app, think there may be some data logging add on functionality coming to. If you take out the cost of a EDIS 4 module it only a bit more pricey than a megajolt. Next step sorting out some of the wiring and running her up with the NODIZ :) |
Looking great!
Wish i had that much space in the engine pay as having loads of trouble trying to work out water pipe routes. Dont suppose you can remember where you got that nice chrome pipe stuff from? :D |
Trying to keep the engine bay install nice and neat with minimal bits.
Think I got all the red hoses and pipe from ASH http://www.autosiliconehoses.com/sil...eel-pipes.html I've got to run the wiring round the exhaust side yet, the inlet side has the fule hose and brake lines. |
Not much progress to report recently as I havne't really had much time.
I put a new start motor in which solved my cranking problems. I have wired in to a basic level a NODIZ ECU, it was easy (haven't connected teh TPS yet on the carbs) the engine starts first time now, but currently wont rev at all. I suspect the fuel pump isn't a good match to the carbs so I'm waiting for a proper bike one in the post so hopefully that will solve that issue. I've had this wheel a friend gave me for ages and I've finally found a boss kit for it that wasn't silly money. can't wait to put it on and pretend to drive! Hope to make a bit more progress over teh next month tidying wiring and starting the dash etc. Still got wheels, lights, clocks gauges as the big expenses to go!  Untitled by mjb22001, on Flickr |
Managed to get a couple of hours in the garage this weekend.
New steering wheel is on, looks really nice! Plumbed in a new fuel pump, engine runs nice now!! Will rev up now quite smoothly. Bike pump for bike carbs! (even though the one I had was meant to be compatible) Fixed my welder and added a few mounts for the rear panel so that can be poperly secured and rear arches fitted. |
Quote:
Thanks David |
Been a slow few months, haven't really made any progress with my car :(
Really need to wrestle with my wiring loom to get it in place. However I did make a dashboard yesterday, I'll get some pictures up when its sanded. I used some 9mm marine ply reinforced across the bottom, with some quadrant beading across the bottom edge, but typically I've just read the IVA manual again and I've got the radius wrong thinking it was around 19mm diameter not radius, think I'm 5mm short in the radius department, shame as I've glued it all together :(. I could cover it some compressible material rather than carbon effect I was going to do it in or just remake it again. |
Quote:
|
Trying to get back on with my build. Thought I'd try and sort my wiring out. Went to retrieve the diagram and pin outs that came with my loom.. that really safe place I left it in.. doh can't find it anywhere! So I sat in the car last night and worked out most of the lighting circuit and column switches for the sierra, I'll have a few queries to resolve but hopefully not too many.
First one is the side lights from the stalk, think its slate grey colour, all other lights go to a relay but no relay for the side lights, does this wire go directly to the side lights? Just ordered some dominators and front indicators so I can try a few things out. I used Furore, email russ on locostbuilders and if your nice they might give a discount. Will hopefully post my new headlights if they arrive this weekend all bright and shining! Along with my new (2nd hand wheels). |
Mike,
You are correct. The grey wire from the light stalk feeds the side & tail lights directly. I got my Dominators from Russ and they went through IVA no problems. Dave |
Headlights didn't arrive in time for the weekend but I put my new wheels on and gave her a clean up and took the chance to sweep out my garage (amazing how much dust and crud was in there)
Here she is, next shot will have headlamps fitted.... I was going to buy a new set of wheel in black but couldn't find the funds, found these cheap but was worried I wouldn't get the look I wanted with silver. However seeing it now I really like them, if not more so than what I originally planned. Think she'll look great when finished 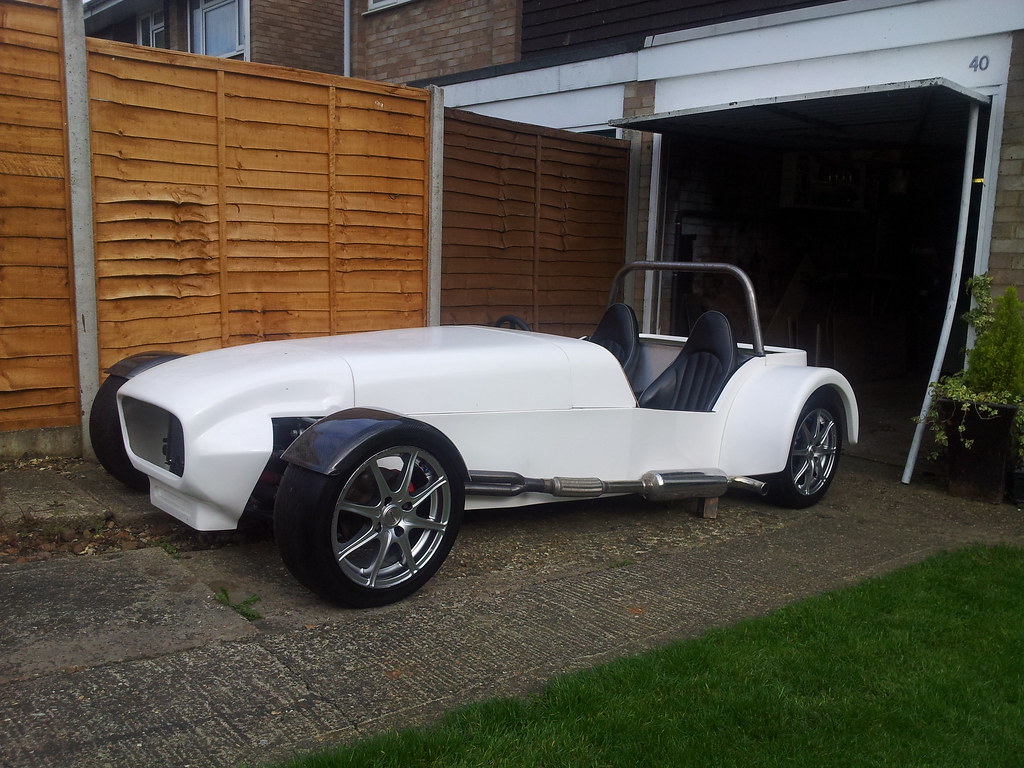 20140601_172850 by mjb22001, on Flickrtps://flic.kr/p/nQ2H5m]20140601_172850[/url] by mjb22001, on Flickr 20140601_172850 by mjb22001, on Flickrtps://flic.kr/p/nQ2H5m]20140601_172850[/url] by mjb22001, on Flickr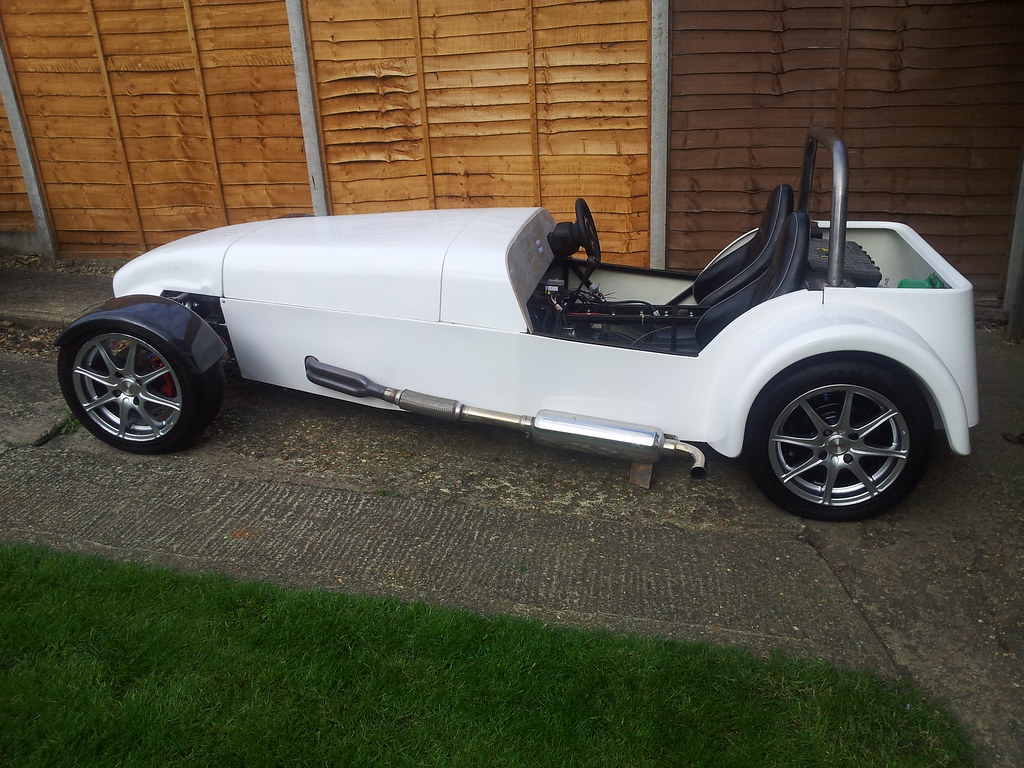 20140601_172548 by mjb22001, on Flickr 20140601_172548 by mjb22001, on Flickr |
Looks great! I would make the exhaust hole in the side panel larger.
|
Yep I thought that, I was admiring my accuracy with that hole but it does need to be bigger!
|
If you make a largish circle or oval in your case, out of sheet ally to go on the outside it will also act as a great heat sink to protect the fibreglass....that is certainly the case with mine as when I have checked it after a bit of a hoon then it is always touchable.
|
That's looking really good
You could always paint those wheels if you really want black ones |
A bit more progress, I couldn't get my engine running, it did in the past but lately wouldn't start with the odd cough and back fire.
I replaced the coil pack and leads to no effect, I cleaned the jets out etc Still no good. As a last resort I send my NODIZ ecu to be checked. As it turns out they just send me a new one as they have changed the connector design. Long story short once I had swapped the connections for the new plug to the loom and hooked it up it fired first time so there must have been a fault there somewhere. I've also started to tidy up my wiring loom and mounted the fuse boxes on the scuttle. Next job wire up the front lights. No she's running again I feel a spurred on to break the back of the wiring! |
Not strictly a first start but first in a long time
https://www.youtube.com/watch?v=667s...ature=youtu.be Really starting to make progress with my wiring now, fuse boxes now located on scuttle, routed main parts of the wiring loom and just connecting up my column switches. It it goes to plan tonight I might have a headlight light up! whoop whoop |
Made some good progress last night.
Bearing in mind I lost the wiring diagram and pin outs for my loom (doh) I managed to get my headlights working (mostly) using sierra stalks. It turns out there are two types of sierra stalks the late one are made for connection to switch negative relays. The old ones (pre 87 I think) were for switch positive (direct or via relay depending on light circuit). Long story short I had later type stalks but my loom is set up for switch positive relays on each lighting circuit (It took a while to come to this epiphany!) Luckilly I also had some old column switches as well from my TVR (but only the wiring from the new ones) It took a bit of time with a multi meter but once I worked everything out it was quite straight forward. For the front headlights I just need to put a perm positive to the full beam flash. One question when you click full beam should it turn off the dipped beam on my tin top both stay on but they are separate lamp not like the H4 bulb which does both. Still good progress! |
Seem to making progress on the build at the minute, beginning to think I'm not really to far away. Made two U channels to clamp side panel to chassis in the cockpit, would have been easy with a proper cutter and folder but made a reasonable job with an angle grinder and some wood. Fitted my other rear wheel arch and have fitted both side panels properly. Started on my bonnet catches, have one side done. Also made an exhaust hanger for the silencer to sit on. Overall the car doesn't look much different but its good to get all these little jobs out the way.
My To Do list is: Rear Lights (mount and wire) £80 Indicators (mount and wire) Rear Arch repeaters £20 Fuel sender and plumb in fuel tank with filler £100 Dashboard (gauges and wiring) £250 Handbrake (shorten cable and mount lever) Finish Roll bar (harnesses mounts, rear stays) £30 plus powder coat Mount Interior Panels (cover in 3m etc) Tranny Tunnel Finishing (gaiters and surrounds) £50 Bleed Brakes (New front discs and pads) £30 Front Grill £10 New exhaust link pipe (draw up and get made) £25 Front Wing Stays £35 Nuts and Bolt check (new bottom ball joint as gaters split) £20 Mirrors £50 IVA Trim So about £600 to go :( unfortunately funds are a bit tight so I think about 4 months away (that's nothing after 4.5 years currently building) So final push to get it finished over xmas (maybe sooner if funds allow) September - Rear Lights and Indicators, Bonnet Catches, Mount interior trim panels, cover and mount dash blank October - Roll Bar and Dash Gauges Phase 1, Hand Brake November - Dash Gauges Phase 2, Grill and Brakes December - Harnesses, Fuel Sender and Filler and Finishing That doesn't seem to bad! |
rear indicators
Put the filler in the tub cover. I had mine on the rear panel but I've had to move it to the tub cover to actually get fuel into the tank. With it in the rear panel it just went all over the petrol station floor. |
Thanks for the indicators links. Do I need a resistor or something to run LED's like these, the other indicators will be normal bulbs?
Interesting on the fuel filler, not quite there with that just yet! |
My LEDs are just tee-ed straight off the rear lights, no resistor and std ford relay. I did put a connector (superseal) in so I can disconnect the wing if I need to.
Also I had to remove the plug on my boltonbits rear lights and solder it straight to the bulb holder as the wheel rubbed on the light plug. |
Right I'm building up for the big push!
I have enough funds at the end of the month to get all my outstanding bits. I have a week off booked 24th November and another week left to take before xmas, surely I can get this thing finished! If anyone wants to come down for coffee and bacon butties let me know, major jobs are wiring up my dash, rear lights, interior trim, roll bar! Is the end is sight??? |
Are the led's ok to mount on the scuttle panel ie view angle etc ?
|
I didn't think they were hence the rear wing position.
|
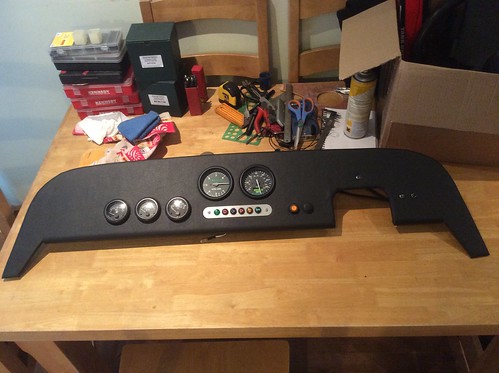
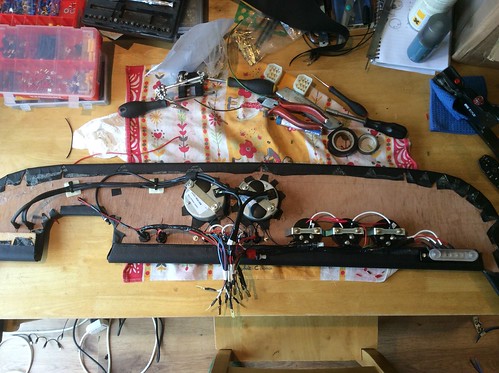
Dashboard
|
nice job looks neat and tidy
|
lookin good. just the pain of wiring it to the loom now ....
|
This wiring takes longer than I thought, have most of the dash wired in, its on multi blocks for easy removal.
Rear lights to install and indicators should see the back of most of it. Can't get my temp gauge working though, thought it would be easy! |
Interior Update
I have been tinkering away making small bits of progress.
I got bored of sorting out the wiring (still have indicators, speedo, brake and reverse lights to sort out). But I have made some progress with the interior, I've carpeted the back panel and under the seats, made and trimmed my tranny pannels. And cut and tack welded the back stays for my roll bar.  image by mjb22001, on Flickr image by mjb22001, on Flickr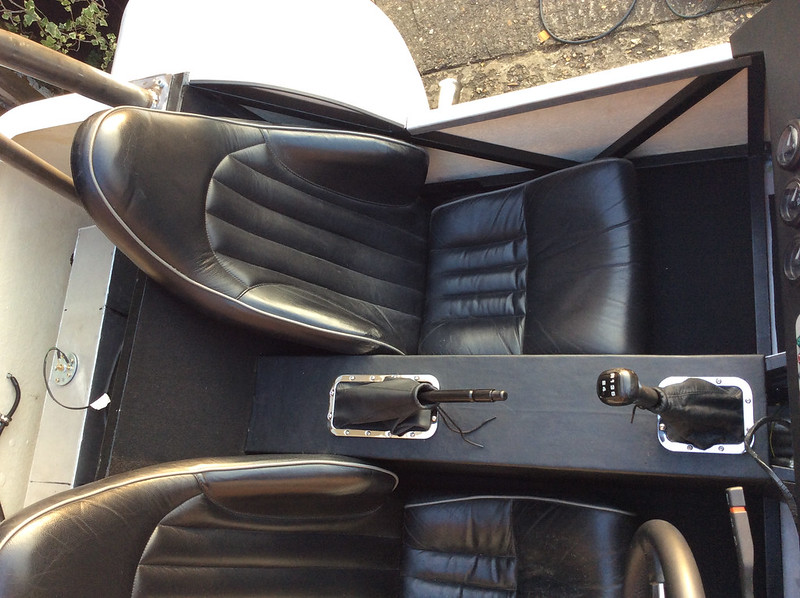 image by mjb22001, on Flickr image by mjb22001, on FlickrIts just a case of sorting the rest of the wiring and small tidying up/trims jobs that seem to tage ages! But really not far away, will get some more time next month. |
Mike where did you get handbrake and gear surrounds from?
Terry |
Car builder solutions, not sure if they will IVA, is there a radius limit for the centre console?
|
It was a long winter break Mike :) !
Your interior looks very nice, and I love the seats. Keep up the good work! |
| All times are GMT +1. The time now is 04:12 PM. |
Powered by vBulletin® Version 3.6.4
Copyright ©2000 - 2024, Jelsoft Enterprises Ltd.