its a doofer that allows devices to comunicate to each other without a "host" computer....if i remember back to my college Mechatronics course !!
|
Quote:
Not a huge problem though as you can replace the cable with a Mk2 vehicle speed sensor. The fluid level sensor is just a switch in parrallel with the handbrake switch, so that's easy enough. I' not sure what you could do about oil pressure and engine temp. If you're lucky the levels might be compatible with aftermarket gauges. I plan to monitor them and light up one of the lamps in my cluster if they go out of normal operating range (or hopefully display their values on the cluster LCD if I can work out how to talk to it). |
Modern cars use a network interface to talk to different parts of the cars computer controlled system. I'm sure skov has a better explanation!
edit: So if you can fiddle the clocks you maybe able to get the warnings from it, like for handbrake, fluid, oil, temp etc? |
CAN "Controler Area Network"
Is a way to simplify wiring. If you think of it in it's most most basic terms, imagine the sierra wiring with tones of wires all over the place goign to lights, door locks, clox, engine management, stereo, etc.. Now.. replace that with 3 wires. Data send, Data receive, +12V .. Add a localized ground and all your big wire bundles disapear. You have lots of intelligent localized controllers that listen for signals relating to them. They then process the signal and do what they are required with much shorter local wiring. TT |
Yep what he said :cool:
I'd been struggling to think of how to explain it simply! |
I replaced the liner in my welder this evening after it got completely blocked last week. What a difference it's made!
It had always had a slightly erratic wire feed, but now it's silky smooth and making it loads easier to get decent welds :cool: I'm just kicking myself for not doing it 6 months ago! |
Just ordered a teflon one off the bay, think mines ok for now but when I change the weld wire real I'll fit the new one see what happens. How are the clocks coimng along, could be interested in running these myself with your help.:)
|
It's well worth changing. Only problem is I need to figure out all my wire speed settings again as it feeds the wire quicker for a given number on the dial now :rolleyes:
I think I read somewhere that teflon liners for for aluminium wire, and will wear out very quickly with steel. I could of imagined that though. Haven't got too much further with the clocks yet. I've figured out how to control everything I need to on the cluster (speed, rpm, and all the warning lights), but I can only make the two LCDs display random cr&p at the moment. I've made a start sketching out a design for the cluster interface box, but I'm a bit undecided on how complicated to make it, and whether to incorporate some other features. If I can get it all working nicely I'm sure I could be convinced to make two of them ;) |
Ahh bugger I've contacted the ebayer apparently they have said it is good for mild steel but I'd prefer to play it safe.
Yeah those clocks look more inkeeping with the car than the mazda items which will be a little awkward to mount and still be within IVA standards and viewable. I take it the vehicle speed will come from the mk2 speed sender and go both to the box of tricks and the ecu? I guess the LCD is for the tachometer, I think you have to have one of them for road legality don't you? |
My thoughts exactly on the MX5 clocks. I like them in the 5, but I think they'd look a bit gash in the roadster, and would be a pain the proverbial to fit!
I was going to use individual after-market gauges and warning lights, and was browsing ebay for some when I saw the mini clocks. It would have been easier taking that route, but I like a challenge, and it gives me an excuse to design some electrickery :D That's right about the Mk2 speed sensor. Although it doesn't appear to go into the ECU on my wiring diagram, maybe they only did that for later models? Do you mean 'odometer' on the LCD? I'm not sure if you need one or not to be honest :confused: I can't remember seeing anything about it in the IVA manual. I do want one though, and I'm pretty sure I can get it displayed on the LCD with a bit of work. |
Quote:
Yes sorry Odometer. Wouldn't there be some sort of protection against clocking a modern mini. Do the clocks store the mileage or is that the mini ecu's job? |
Quote:
I've been playing around with clusters from current model Korean cars for a client recently and they're nice and basic - the odometer is stored in a little EEPROM in the cluster (which incidentally you can change quite easily!) The mini is rather more complicated. From reading up on them, you cant just swap clusters from one car to another as they are coded to each individual vehicle. Apparently you have to get a replacement cluster reprogrammed by BMW before it will work in your car. A bit more research required I think! |
That's enough of electrickery for now... Back to the metal bashing!
This week I have mostly been sorting out my seat mounting. I won these on ebay a few weeks back for the princely sum of £27 each: 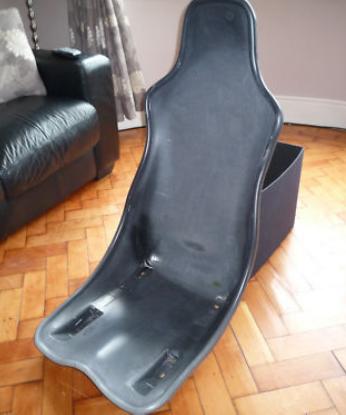 After nearly a month of excuses from the seller they finally arrived (much to my joy and surprise!). In the meantime I'd been trying to win some cheap runners, after many failed attempts I finally bit the bullet and bought some new ones from kitparts direct. Again, they took ages to arrive, but not nearly as long as the seats thankfully (why is it so hard to stick something in the post once you've sold it???). The mounting holes in the runners were well off where I needed them, but a spot of drilling soon fixed that.  I had originally intended to weld 50mmx3mm flat strips into the chassis to mount the runners on and had them cut to length ready. As it happened I couldn't mount the runners flat on the floor as the adjusters got in the way so I used 25x25mm box section instead: 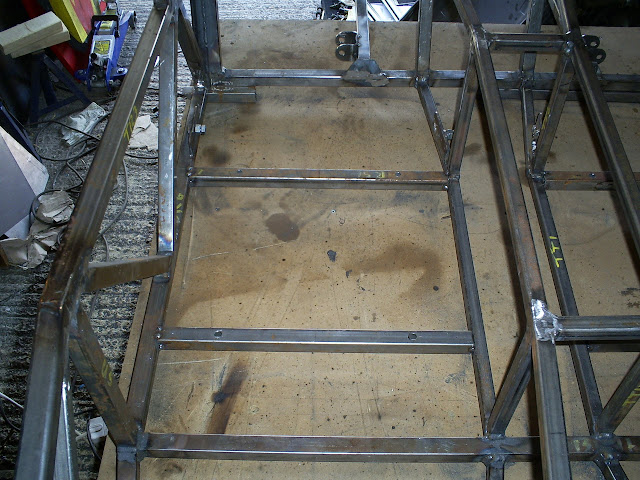 I'm actually glad I didn't mount them as I had planned as after fitting the seats I popped my scuttle on top of the chassis. I didn't realise quite how high it sat - if the seats were any lower I doubt I could see over it, and as it is it's going to be marginal. Might have to borrow one of the kids booster seats. The seats themselves are a very tight fit in the chassis. They only just squeeze between the rails, and I think I may have to trim a little off them once I've added the ally panels to the tranny tunnel. One potential issue with using the MX5 for a donor is that you have to flare the back of the tranny tunnel out as the input to the diff is offset. This means my seats won't go all the way to the seatbacks, stopping a few inches short. Luckily for me I'm a bit, erm, vertically challenged, so not a problem. I suspect most of my mates are going to struggle to drive it though. Nevermind!  |
Another pic:
 |
I think I won't bother with seats then!:D Nice progress post, inspiring.:rolleyes:
|
More progress tonight.
I've been studying Saturns build pics and shamlessly knicked their idea for how to do the steering wheel/column support. It feels great having seats and a wheel in the chassis, it makes sitting in it and going brum brum very satisfying indeed :D   Ideally I would have liked the steering wheel a bit lower, but that blooming TR9 gets in the way. I tried putting the column below it first, but then there was no room for my knees :rolleyes: |
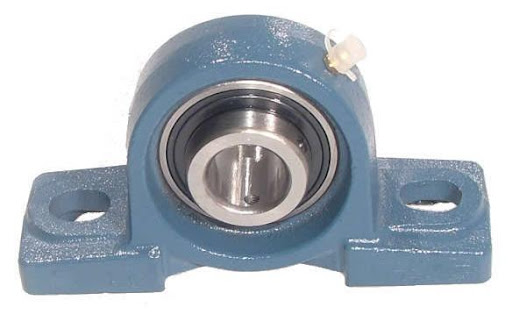
Looks good where did you get the bearing from?
|
Skov, The rhs you have got to mount the seats on will need crush tubes through the rhs so the bolts can't crush the tube..I'm sure IVA will want evidence of it even if it's only a photo while the chassis is being made.
Mark |
Thanks Mark, didn't think of that.
Any idea how thick the walls of the crush tubes need to be? |
skov i cant belevie you scrapped your donor in that state. the roof/wings bumpers and boot lid would have netted you another £400 then the lights and loom plus the subframes another £250 odd. your a mad man!
|
forgot to mention your steering wheel is way too high its almost at eye level looking at it.
|
Quote:
The donor looks loads better in the pics than it really was too. The bonnet was full of dents, the wings full of rust, the hood full of holes, and the bumpers full of cracks! Plus it was all badly painted by what I can only assume was a monkey with a rattle can. I paid £500 for it and got £750 back so I'm happy enough :D Still got a few bits I could sell, but I've lost interest now. I might get round to it next time build funds are running low :rolleyes: I'm not quite happy with the steering wheel height either. Not sure how to get it lower though :confused: If I go any lower the column hits TR9, and if I go below TR9 there's no room for my legs. How high is the sierra steering wheel? Can someone measure from the centre of the wheel down to the floor for me please? |
Build it as it is for the IVA then lower it and use a smaller wheel and get rid of the thick mx5 steering column and switch gear. Maybe then you can use a removable steering wheel to get in and out.
|
go above tr8 by putting the bearing above tr8 :D that will bring it down and give you enough deflection in the steering shaft not to worry about having a collapsable mechanism in the column. i would do it now as it will be a pain in the ass to sort out later. how it is now will never pass iva as your column is dead straight from the steering rack up to the wheel which is lethal in a crash
there is about 3mm between the column on mine and tr9 so i think you can still get it a bit lower without mods |
Quote:
 I've got about a 5 or 6mm gap between the column and TR9 at the moment, so could drop it a little more without mods, but not enough to get the wheel where I want it :rolleyes: |
I popped out to the garage last night with the intention of spending 20 minutes or so playing with the steering wheel position.
I may have got side tracked, and emerged a couple of hours later with my build looking like this:  I'd been speaking to Spud earlier that day about moving the whole steering column above the top rails and he made the very good point that I need to be careful about the shaft interfering with the alternator and engine mount. So I thought I'd better stick the engine in there! If anyone is wondering: Yes - you can put the MX5 engine on the table, then drop the chassis over it. No - I would NOT recommend doing it that way! Particularly if you're short on space to manoeuvre, and don't have anyone to help... It did go over the engine just, but involved a lot of faffing, swearing, grunting, sweating, and removing bits off the engine with one hand whilst holding up the chassis with the other :rolleyes: Hopefully I'll have time to fabricate the engine mounts, then finalise my steering system over the next few days. All the recent MX5 talk on the forum is really getting my enthusiasm going :cool: |
Bloody Hell John!!!!:D
|
Is that the engines installed height and position?
|
Quote:
I'll take some more pics when I've finalised it and made the engine mounts. |
Time for a quick update.
Since getting the engine in the chassis a couple of weeks ago I've made a start on the engine mounts, and added some plates for the handbrake lever to bolt on to:     |
Looks really good, my mind is back on the build now after a little break. I was thinking as I still have my donor I was going to cut out the section of tunnel that the handbrake mounts to and weld it into my chassis tunnel with a bit of fetling. But failing that it looks really simple to mount otherwise!
Have you got the engines final install height now? |
Yep, I've got the sump flat on the table and raised the chassis 40mm above it.
I don't like the idea of the sump being that low below the chassis, but if I raised the engine any higher it wouldn't fit under the bonnet. Height-wise it's going to be pretty blooming tight as it is. I haven't got a bonnet yet, but if I put the scuttle and nose cone in place and put a straight edge between them it looks like the bonnet will just skim the intake manifold. I'm guessing/hopeing that once the engine mounts take the weight of the engine they'll compress slightly leaving me a mm or two clearance! |
If there is any clearance whatsoever then your engine isn't big enough!! :D
|
Quote:
In fact there's tons of clearance on the passenger side of the engine bay, I'll have to fill it with a mahoosive turbo :D |
Ooooooooh Good Plan..... I was thinking post SVA of a Supercharger? Ex BMW '0 Series' aka Mini....
|
Eaton M45,
I used to have an M62 sitting on my desk many moons ago. TT |
Stop planting ideas into my head, I just spent a couple of hours looking at different charger options.... must resist... at least until after IVA anyway!
|
Quote:
Bob |
Thought I'd have a go at mounting the gearbox last week.
I'm not sure I'm quite happy with what I've done, but I can't think of a better way... After a lot of umming and arring I made something sort of like the main engine mounts, but smaller, and using a rubber engine mount from a classic/original mini. First I tacked a plate onto the base of the tunnel with the mini mount attached:   Then I bolted a plate onto the top of the mini mount, and another on onto the bottom of the gearbox, and tacked in a couple of plates between the two. Finally I removed it, added some sides and fully welded and this is what I ended up with:  And here it is back in the chassis:  Does that look like a vaguely sensible way to do it? |
Quote:
|
| All times are GMT +1. The time now is 11:25 PM. |
Powered by vBulletin® Version 3.6.4
Copyright ©2000 - 2024, Jelsoft Enterprises Ltd.