Busy day
Eventually made some progress today, spent lots of time doing other odd jobs this weekend. It's nice to get jobs done, especially when you have a list you can cross things off :D
Eventually got the rear end tacked into place; tooks lots of measuring, heaving, altering, shimming and more hands than I had available. got it done eventually though :cool: Error = 1mm difference between diagonals thank you very much. Also managed to get the SW's in place yesterday, meaning the bulk of the structure is nearly done. Yay! |
More progress!
Started adding more bits in the rear end, got cp 12 and 13 fully welded, front flexible brake pipe mounts welded and a few more ends capped on tubes. :cool: Also tacked 2 of the rear suspension mounting points in place tonight, amazing how al these small bits add up! And tomorrow I'll try and make time to upload some more photos, cos piccys make stuff look nice :D |
More progress:
Rear suspension area nearly done, no curved poles yet, need to buy them still! CP 15/16 (I think-with rear shock mount?, need to get a second book for leaving by the computer!!!) and surrounding plates all in place and almost completely welded. Steering rack support frame welded in place. Steering wheel supports welded in after I finally found the rest of the tube! Also, wages went in today so will soon have tubing for wishbones! Yay :D Not planning to race so thinking of getting non-seamless but thicker walled tube for bones. Discuss... Also, pictures! Many taken just haven't gotten round to uploading them yet. Sorry :( |
Photos!
Setting up the Steering support frame for MT75 chassis: The improvised Jig 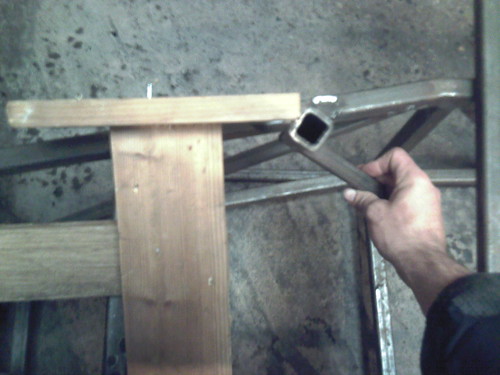 Tacked in place 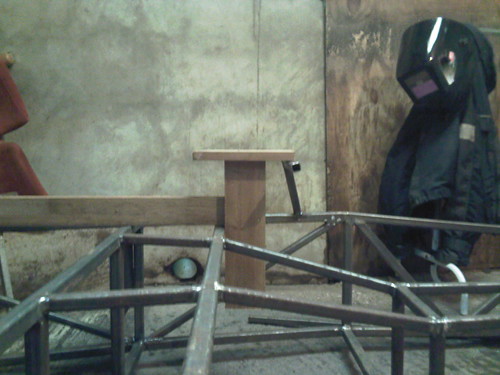 Bar set to make bespoke element! 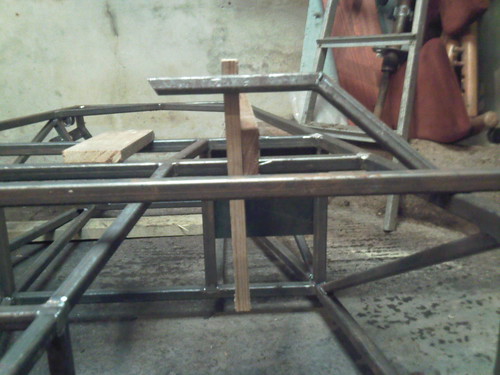 Final setup 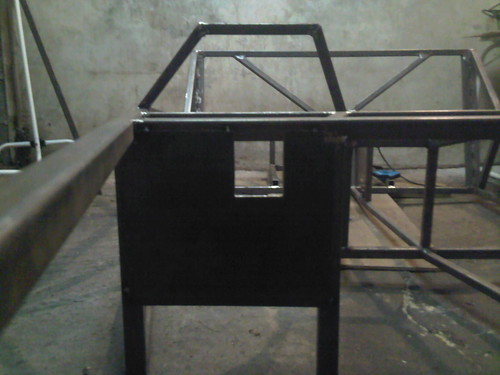 See next post for more! |
Full chassis a couple weeks ago:
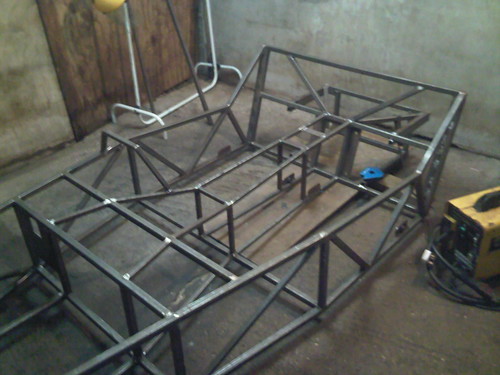 Bends on the steering plates, not great but everything measures up right: 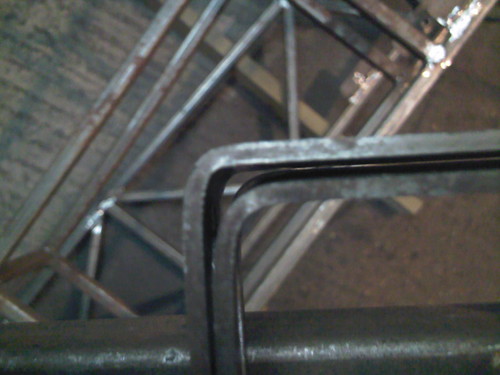 So lots of progress, and even more that I haven't got photos of yet! (sorry) Also, questions that you lot haven't given advice on yet :mad: : 1: Bones, non-seamless with thicker wall (not for racing)? 2: Different lower steering column support (ala-Tatey)? (and here's me thinking we all love any excuse to "give advice"! ;) ) Will try and get some photos of the new back end and steering column in place. |
Bump!
Oi! Where is everyone? I need advice!!!
No-good bunch of useless car enthusiasts... Anyhoo, insults aside, I'm just waiting to see what you guys think before I order any more parts/steel. Question 1: If I use non-seamless tubing for the wishbones, what size thickness should I be looking for? Are there any positioning reccomendations? Question 2: Roof for floor. The roof from the donor is around 1mm thick steel. I will most likely add some box section to bolt the seat runners to. Will this be ok? Any advice? Will stitch welding be enough or should I try for continuous welds? Question 3: Tatey uses a different mounting system for the lower part of the steering column. Any reason/advantages? PLEASE ANSWER ME!!! Someone, anyone, even if its just to mock my poor dress-sense. Acknowledge me!! Oscar |
hi......bye:p
|
Quote:
My chassis had box added for the seat runners so deffo a good idea. ATB Dan |
Cant answer your questions but just stopped to say hello in case you get too lonely:D :D
|
Quote:
Bob |
I'm also thinking about how to do the floor. Can't decide whether to go aluminium (apparently Westfield etc do) which runs a risk of corrosion because of contact with the steel, or steel - which doesn't - but does run a risk of good old fashioned tinworm.
Seems people have done both - and no-one can make a great case that one is better than the other!!! It looks like putting extra support for seat runners is a good idea - although if you have box section I think you then need crush tubes - so I will just be using some strips of 3mm steel. |
I've gone for an Aluminium floor with sealed rivets and sixaflex. I'ts going to take decades before it suffers galvanic corrosion, after all you need to add salt water for this to take effect! So don't drive your car during rain on salted roads.
As for the Tatey lower steering support, give us a clue as to what that means. |
Right, had a look and assume you mean the bearing. I've done that on my car as the sierra bush is a load of crap and wobbles like hell. The proper bearing is a much nicer solution to supporting the shaft. Mine is bolted onto some box section. Then to avoid any IVA whining about the edges I made an little aluminium cover and even trimmed the edge. In the end they never checked it....
  |
Regarding ERW wishbones, it's a taboo subject. Not many people on here are structural engineers. The general mindset is that wishbones are a safety critical component, so compromising on their strengh is not something we laymen want to give advice about.
As a *cough* software engineer *cough* I would say that most probably you will be fine with ERW wishbones, and you should look at a thickness of 2 or 2.5 mm. The quality of your welding will probably be a more important factor than the ERW/seamless choice. |
I used 3mm aluminium floor sealed rivets and sika with regards the seamless tube for wishbones I would go for seamed tube as the little seam inside grips the polybush and stops it from spinning
|
2 Attachment(s)
Quote:
Attachment 1501 If you chose this option, you will also need to machine an insert (bush?) to adapt the triangular shape of the steering column to the 30mm bore of the bearing: Attachment 1500 May be not the best solution, but at least it is another option:) Good luck! |
Fantastic! Cheers for the info guys.
After that I will definately be looking into other bearings, seems like its almost the norm to improve this (I have noticed the poor quality of the old bush). And yes Deezee, that's the bit I meant! My main reason for wanting to use the roof for the floor is to keep costs low. and large sheets of Ali are a little on the pricey side :o I'll keep my options open on that one for now. I am a Mechanical Engineer and the only reason I can see for ERW beeing bad is for its reduced fatique resistance due to the grain hardening caused through the application of heat (Harder = Brittle). Around 2.5mm wall thickness sounds about right, need to double check what I had in my notes (when I find them...) Thanks for all the advice so far guys, I'll think some more on it when I'm more awake! |
Progress! Of a sort...
Had some wages so decided to spend out on the tubing for the wishbones. Got seamless in the end (after all my questions on using ERW) due to an inability to find ERW in the right size. So, I'm now starting to make the jigs. Gradually. When I find time... One question, Is there an easily available tubing for the ends of the bones? (where the bushes are inserted) I couldn't see any on the bay and I've read various references to reaming tube out for these so... Any about or easier to buy them ready cut/reamed? |
|
I've been watching these,
Just wanting to keep prices down where possible. Cash injection means that I may very well be ordering a few bits from Talon in one go! |
Why does all action seem to come in spurts?
Did nothing for over a month, and now I've suddenly made great progress! - Ordered wishbone ends, diff hanger brackets, rear end tubes and rear uprights from Talon. - Started tacking first wishbones together - Bought bearing for steering column (pressed steel version like Deezee's) - Restacked all the donor parts in my shed (had a large clear-up) - And ordered the Tap-spanner I need for the other wishbones... At this rate I might have a rolling chassis before the end of the year! :cool: I might get round to adding some more photos at some point... |
Even more work!
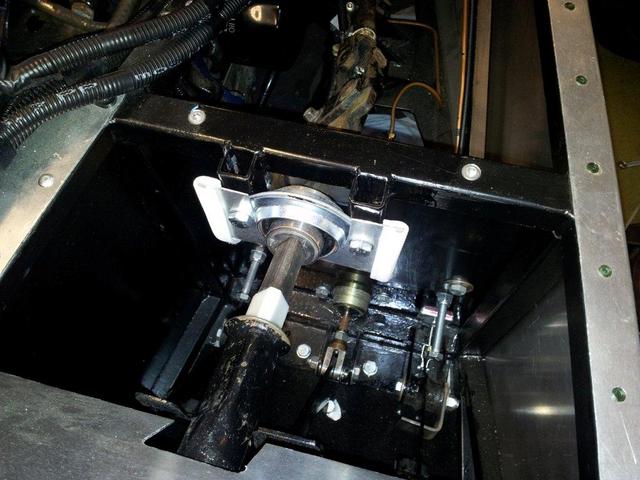
After a parts injection from Talon, I've fully welded my front and rear lower wishbones. Painted the fronts (one coat to keep the red fuzz at bay) and double checked that all the dimentions are spot on. Must say, all the parts from Talon are top-notch, the bush tubes are even cleaned along one side to show where the join line is! Have also made up some spacers from 2 lengths of 19mm box to hold the new steering bearing in place, and have sanded around 1mm off the plastic triangle-to-circle adapter so it fits in. Once all bolted in place it should provide a much stronger steering system. Oh yes, also recieved my extra large tap spanner and tapped the large thread for one of the upper wishbones. So they'll be next made! |
Still slogging away. Making progress here and there...
Now have all rear bones fabbed and painted, various parts of the chassis undercoated, a floor on the back half of the cockpit, rails in for the seats to mount to etc... etc..... Most recently, cleaned and painted the font uprights, painted the rear uprights and cleaned one of the rear hubs ready for painting. Off to the local motor-parts shop tomorow for some more high temp paint and might have some parts bolted together by the end of the week! Oh yes, might take some photos at some point too... |
Pictures!
Well, I keep promising and not delivering but with any luck these will provoke some feedback! ;)
The current state of my chassis, back end almost complete and mostly painted: 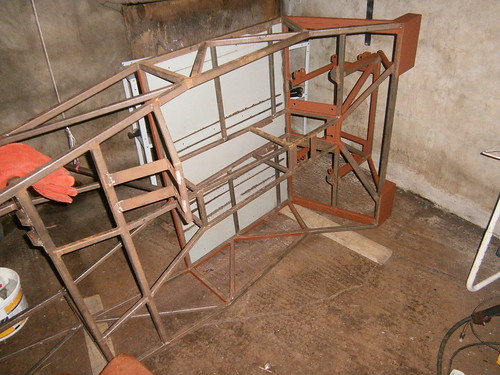 And my rear bones fully painted, bottoms: 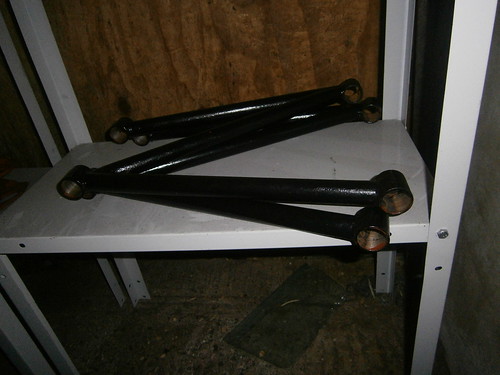 And tops: 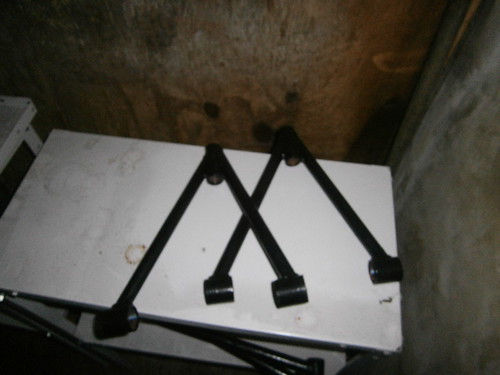 See next post for more. Yes, more!! |
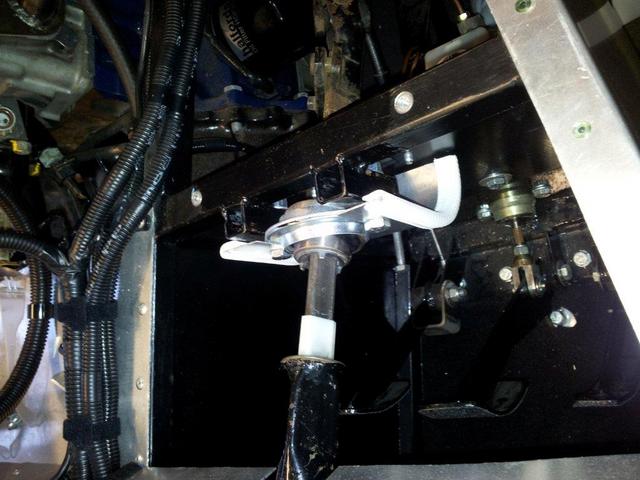
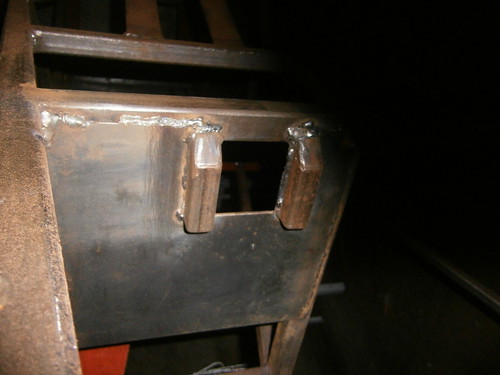
Heres a close-up of my modded steering bearing mounts:
 And, as I believe they're meant to be (though I'm still te be confirmed), the drivers side rear upright/hub/brake arrangement: 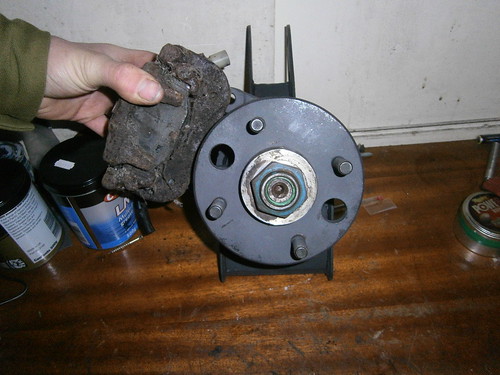 Also where the bleed nipple will be as there was some debate about this:  This should be OK as the process of bleeding will push any bubbles out of the bleed pipe, which extends form the top of the cylinder. Calipers are going to be stripped, electrolisysed and put back together with new rubbers. Think I'll wait to rebuild them untill I'm nearing the point of plumbing all the brakes in as I don't want the internalls to start rusting up before I've filled them will brake fluid. Please feel free to discuss all elements so far in a polite, sensible and non-judgmental way. (Leave all projectile weapons at the door, hand weapons are fine.) :D |
Bit more work over the last few days:
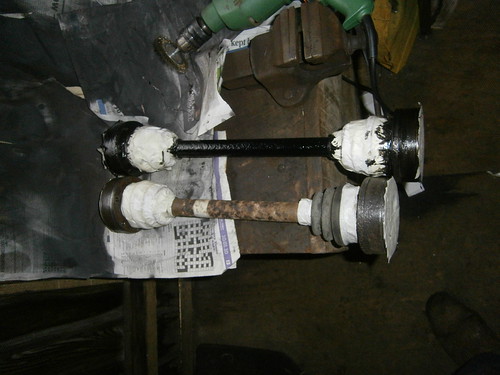 Cleaned up and painted both rear driveshafts 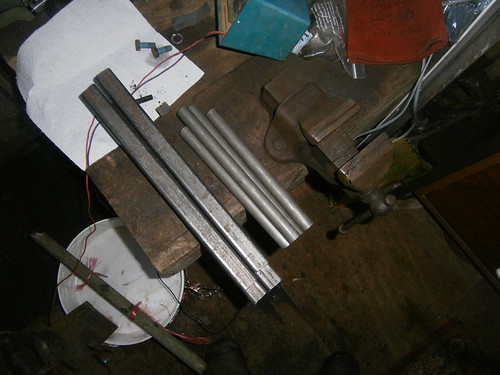 Cut the steel for the top front wishbones (last left to make) and 4 "shocks" Then tried to set up some electrolysis: 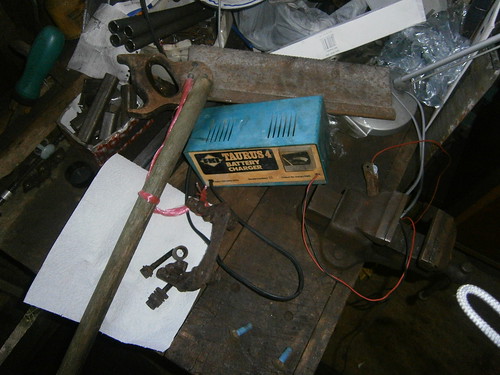 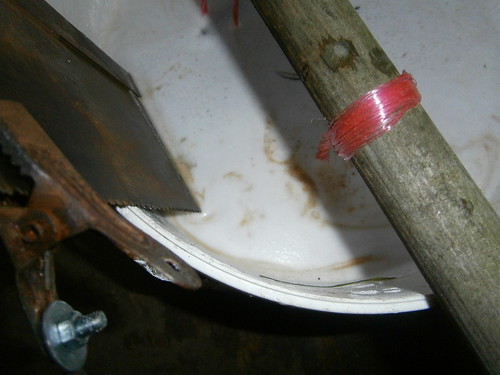 Only running at 0.5A, so need to tweak it a bit! |
Oscar,
I cleaned my Sierra parts by electrolyse a few months ago. Watching at your pictures, I just noticed the position of the electrode. From what I've read everywhere, current circulation is better if the electrode does not touch the walls and the bottom of the bucket. It is also better if you can make an electrode in a "cage" shape, surrounding the part to clean, cleaning will be more even (electrolyse is also function of the distance between the anode and the cathode) Just thoughts. If you want more details, you can read this page of my blog (forgive my English) about that: I didn't come back on the electrolyse process that everyone knows, it would have been useless, but thanks to a lot of informations I gathered on Internet, I tried to describe what to think about to make it efficient, and what to avoid to keep it safe. Hope that can help. Good luck for the messy job (because it is :) ) |
Oscar, I've been playing with the electrolysis quite a bit over the past 3 weeks with some quite good results, i'm planning on a bit of a write up but there's some pics and bits here
http://www.roadster-builders.co.uk/f...php?f=16&t=181 Mine was running anywhere between 5.5 and 9 amps and everything so far has taken no more that 24 hrs I found its best to take the piece out and give it a quick pressure wash/hose/brush to remove the softened bits every 2 - 4 hrs or whenever your passing it. Give me a shout if you got any questions, after a while of using the battery and charger I butchered an old 250w Atx PSU which worked just as well. |
Some more pics here, I've got a load more still on the camera I've not uploaded yet.
http://s1157.beta.photobucket.com/us...postlogin=true |
Just been outside to check the progress, wasn't sure if it was working till I checked the negative contact.
Big lump of rust on the old saw-blade! :D Current setup is a nackered battery charger drawing a tiny current, and a mixture of washing powder (just ordered the soda crystals). Plans for tomorow: have a go at adapting an old PSU thats lying in the shed, and see if get a better current. Cheers for the offer Dad-of-seven, really need to sign up to the new roadster forum, get the feeling I'm missing out on a few bits of info and gossip! :eek: |
I suspect your charger isn't up to the job, mine wasn't either which was why I ran the battery with the charger connected, only trouble with that is over a couple of days the battery goes flat cos the charger cant keep up, hence my move to a psu.
If you want a really fancy PSU conversion then there's a guide here http://www.wikihow.com/Convert-a-Com...b-Power-Supply I just cut all the yellow wires and joined together (+) and all the blacks (-) in a terminal block, the 250w psu is rated at 16amps continuous over 12v and never even got warm plus it has built in overload and short protection so gives a bit more piece of mind when leaving unattended. Oh your going to enjoy cleaning the electrodes :D and if that saw blade is stainless make sure its all ventilated and wear gloves with the electrolyte as the chromium released from the stainless is apparently quite nasty. |
Just off out to try cleaning now, fortunately its an old tennon saw, plain steel blade. I'm staying well away from stainless ;)
Will let you know how the PSU conversion goes, trip-switch on standby :o |
More done!
Been spending the snowy weather (in between sledging on our far hill with the rest of the village, 3 landrovers and a quad :cool: ) in my shed working on the rear calipers! Old PSU in the shed turns out to be a dud, so will drop by the local pc parts shop tomorrow when I'm in town, see if they've got an old one for beer money. Will then look at putting some form of cage together. I have noticed a lot of silt in the bottom of the bucket. Is this just old rust or is it soda crystals that need stirring back up? Now have both calipers electrolysiesedsded (or something like that), one is waiting for brushing off and stripping and the other has been stripped, cleaned, painted and put back together with new seals and oil. Haven't touched the handbrake maechanism as it looks like an absolute sh1t to deal with :confused: . Also had real problems putting the final dust protector in place :mad: after the piston was in place. Gonna try a different order on the nect caliper; put the dust in place and then slide the piston through it. Piccies to follow! |
Oscar just a quick thought and apologies if you did but did you connect the green wire to the case to simulate the on button? I forgot to mention it earlier.
The sediment I've always noticed has been crud basically, but one other thing I did find was a small pump located in the top giving a very gentle circular motion seemed to help a little. Here's a pic of mine after a couple of pieces have been done so waiting to be cleaned and showing the pump:  |
Hey V8,
Yeah, read the link about building a power suply and connected the green to a black. Asked my dad after I'd spent time sorting it all and he confirmed that as far as he knew, it was a dud. Thats a lot of rust built up on your cage! For some reason mine is mostly green... Gotten round using a cage by turning the piece frequently. Nice idea using the pump, could easily add a large coarse filter to clean the surface a bit at the same time! Will have to be investing some time into this before cleaning up more parts. |
Hmm a filter, I played around with that idea, it needs an extremely fine medium such as sand or ideally DE powder (0.5 micron filter rate), I have both and I tried with the sand but found I needed a sealed filter cannister to be pressure fed by the pump, gravity couldn't push the water through quick enough. Tried also with standard filter mediums but the suspended sediment was too fine so was fairly ineffective. In the end I figured for a one off it was going to be too much effort or I was going to end up with a floor full of skanky water
  |
Here be some pics as promised...
Cleaned and painted caliper next to "Unclean!" one:  Caliper being put with sliding-bit-that-holds-the-pads, Threadlock in picture to keep Mr IVA happy:  And the effects of the electrolysis on my scrap saw-blade! 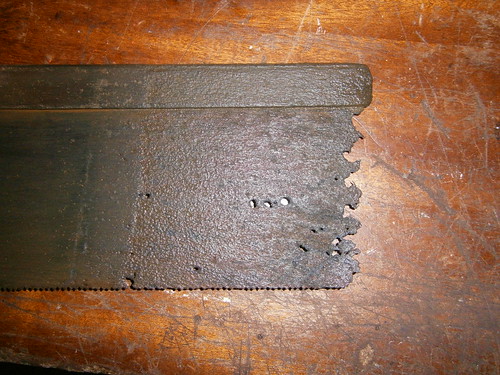 Holey mother of god! (sorry, couldn't resist :D ) Went into town today, got a brand new, unboxed PSU from local computer fixers for £5. Can't get grumpy at that price! Also picked up some bucket seats that I won on Ebay, 2 seats for £40 and he even threw in a pair of brand new 4-point harnesses that he didn't want! The mounting holes are 16" apart and the seats are about 18.5" wide to go in my gap of 17.5" between the rails. Hoping they'll squeeze in, will find out tomorrow. |
Just read your build thread looking good
I cant jump in and comment as I have yet to start mine hopefully will be early next month (goto wait for payday lol spent a fortune on tools welder etc already) |
Odd bits and pieces
Still making progress on and off. Kinda stalled a bit over the spring, lost enthusiasm and time was used in other matters (helping Mother sort out the farm inheritance, looking up all the old family history we're finding out about through old papers, can trace one branch back to 875!)
Since my last update: -Both brake callipers cleaned, painted, rebuilt and stored -Was much easier to push the piston through the final dust seal, still a pig though... -All rear and front hubs cleaned, greased and painted -All wishbones made and painted, also stored! -Picked up a 2wd mt75 gearbox, cheap off ebay, stored in the back of the shed -Made the last 2 panels for the floor and welded them in place on Thursday/Friday. Made them out of the rear floor panel that covered the spare wheel of the donor, so come with a nice corrugated shape for grip. -Entire chassis (except the parts not yet built(not enough room for them!)) has one coat of red primer, and most has one coat of black hammerite for protection. -Got a couple bucket seats off ebay for cheap, had to reduce the width by 70mm to make fit. have done one with great success so far! -Sorted seat mounts/brackets, all fits bootifal! Hmm, only just realised how much I've done. Knew there was a good reason for keeping a build log on here ;) Immediate Plans: -Finish headlight mounts (tube came in post yesterday) -Finish first hammerrite coat -Get chassis out to locate positions of engine and gearbox mounts -Weld mounts and rest of rear end -Finish painting chassis -Start plugging the puzzle together! Long term plans: Drive around in a home made car in more of this gorgeous weather! :cool: |
More work over the last couple days, this warm weather is a curse and a boon; really want to get my build moving, but just dont have the energy for full on progress...
Anyhoo, cut out the box and replaced it with beams in the passengers side for the seat mounting (badly thought out initial idea I've now replaced). Cleaned the Diff and put a coat of etch primer on it. Painted various beams on the body, used up my Hammerrite so cant do any more untill I get to the shops. And half an hour ago I fi8nally got the Chassis out of the shed so I can finish fabb'ing the back end! As soon as I've worked out how to with my new phone (5 months!) I'll upload more photos. |
| All times are GMT +1. The time now is 03:11 PM. |
Powered by vBulletin® Version 3.6.4
Copyright ©2000 - 2024, Jelsoft Enterprises Ltd.