Dont forget to weld some tabs around the chassis to create earthing points;)
|
Bank holiday progress
Managed to make a bit of progress this long weekend.
Finished all the welding (capping off open ends, rad mounts, Roll bar stay mounts, brake tabs etc) and painted with etch primer on the bare metal, followed by undercoat. Whilst that was drying I cut out the floor panel from a template I had made. Here it is offered up to the primered chassis:  Then I applied the top coat, waited for that to dry and started fitting the floor - 164 4mm holes drilled, floor removed, sikaflex applied, floor replaced and rivets installed:    |
Then I spent today reassembling up to a rolling chassis:
    Thanks to everyone on here and LCB who provided info about capping ends, which jigsaw blades to buy for cutting ali, advising buying a lazy riveter etc - All this information made the jobs this weekend as easy as possible |
Looks very nice and tidy Eddy, congrats! Looks like you're on the right track :)
|
Ive been making a bit more progress lately.
Got a set of brake lines with (a lot of!) help from Sylvain Excellent service and thoroughly helpful chap. The brake lines, despite seeing some very positive reviews on here, exceeded my highest expectations. Everyone that has seen them has commented how nice they are. Ill get some decent pics when they are fully fixed in place. I finally made a start on fixing them in the transmission tunnel along with the fuel line at the weekend: Put it on its side to get access around the diff area to run the fuel line.  Clipped to ali strip in the tunnel  Then a diagonal towards the rear to run the fuel line around the bottom rails to the corner of the rear tub where the pump and filter will go  Ive got plenty more p-clips to add, but its a start! Also, bought AshGs old bodywork/tank/dash etc off him, so its really starting to look like a car now:  None of it is fixed in place yet, but it makes me smile when I open the garage door! Next up will be side panels, I think. Or maybe loom. |
That's all looking rather splendid, keep up the good work.
|
looking good. nice to see the bodywork on are you going to keep it black or paint it another colour?
|
Whilst building, I'm going to keep it black - The garage is pretty small and it is constantly getting knocked/moved around. Its nice to not have to worry too much about damaging it, like I would with new fibreglass (or if I painted or wrapped it now).
When its finished I will look at options for paint or vinyl wrap. I'm quite liking colours similar to Porche's riviera blue at the moment, like this: http://2.bp.blogspot.com/-aB6duV_lng...0/_DSC1647.jpg But I do change my mind a lot! |
In my experience the abuse the bodywork got during the build is nothing compared to what it gets during normal driving!
|
Hello all,
I havent updated for a little while, but have been steadily making progress in the background. Since my last post I have: Made the side panels Made the rear panel P-Clipped the front brake lines Put the engine back together after having the head skimmed with new gaskets and a shortened sump Finished off a few bits of welding Added dowels to the column extension, a couple of bits on the peddle box, and made the inlet manifold Mounted the radiator/fan and most of the plumbing When I got to this point, I couldnt resist the urge to bodge a few wires on, chuck in some fuel and see what happened when I turned the key. Aside from being a bit of a child and wanting to hear my toy make some noise, it was quite important for me to give this a go The engine hadnt been started for 3 years and 5 months and it had been apart for 3 of those. It was also now using bike carbs with a bike fuel pump and running EDIS/Megajolt for the spark, both of which were untested. I really just want to know if it was all OK before going any further with the CVH lump. So.... I wired up the crank sensor, coil pack and EDIS (I am waiting on a TPS connector and usb to serial adapter for use with the MJ, so limp mode only for now). Took a lead out and used it with a spare plug to see if it was sparking Nothing. Scratched head before realising Id missed an earth off! With this attached there was spark. Wired up the fuel pump. Gallon of fuel in the tank. Ignition on, fuel pump was initially loud, then quiet when it had primed the new lines. Turned the key only to have it turn over and backfire loudly. After this happened a few times, and following some more head scratching, I swapped the two wires to the coil pack over and turned the key. IT STARTED!!! Obligatory video: https://www.youtube.com/watch?v=EEb1-lLYD0I Since the video I have fitted the side panels, made an under scuttle panel to mount the loom to, fitted the nosecone, and fitted the proper exhaust. The next steps for me are going to fit the rest of the bodywork and roll bar, tidy/permanently fix the wiring, and get back to the position where it starts again. Then Ill be on the hunt for some shocks, a prop and some rear lights! As it sits now:   Cheers Eddy |
Afternoon all,
Another long gap since my last update. Ive continued to make progress: Fitted the front wing stays Drilled and tapped the front hubs/mushrooms for a second fixing point Fitted the rear arches with p trim Fitted a prop P clipped rear brake lines Heat wrapped the exhaust manifold Installed the rear lights Roughly cut out the dash and boot panels Made the rear bulkhead panel Made a panel for the front of the scuttle Probably a few other things I've forgotten! A couple of reasons for this update though .. I picked up some black Team Dynamics alloys (used to belong to Ben on here, who sold them to Bob on locostbuilders, who I got them from) and had them fitted with some Toyo T1Rs. I was hoping they would be a bit lighter than the Escort alloys they were replacing . Escort alloy with worn Camac tyre 14.7kgs, Team Dynamics Monza with new T1R 16.1kgs. I was a little disappointed that they weigh a little more, but I guess they are 6.5J wide as opposed to 6J and a little bit of weight in the trye. I do think they suit the car a lot better though. I wrapped the side panels and rear panel in gloss black vinyl. The rear panel didnt go too well It was the first thing Id ever tried to wrap. I pulled all the backing off in one go before placing it, which made it a bit of a nightmare - I have ended up with a crease under the fog light and another that will be hidden by the rear arch, but I think it is good enough for now. I am very happy with the side panels though They came out really well and were surprisingly easy to do. I stuck a bit of the vinyl on towards the back of the car and left the backing on the rest, and once I adjusted the angle so I was happy that it was lined up all the way to the front of the car, I pulled the backing back on itself and the vinyl stuck to the aluminium as I went. After that it was just a case of smoothing out any bubbles with a felt edged bit of plastic before cutting and folding over the edges. It may have been easier with better quality vinyl and if my heat gun didnt decide to set fire to itself at the start of the day, but for a total cost of £40, Im chuffed with the results. These are the pics I took as I was going, and one with the car reassembled, Ill get some better ones when I can roll it out of the garage:     Next up, Ill be making the transmission tunnel panels, finishing the roll bar, securing the tank and properly wiring everything up ready to start AND move under its own power. |
Japers that looks good fair play
I also like the wheels. |
Getting some time to work on the car at the moment.
I have changed the main jets in the ZX6R carbs to 160s, checked the needle height and the circlip is sitting in the middle slot of 5, and adjusted the air/fuel screws to 2.5 turns out. Megajolt is connected up running a map I found online for a 1.8 cvh and bike carbs and the TPS has been calibrated. It seems to start pretty well, especially when using the choke, but it boggs down a bit if you open the throttle quickly. It does get there if you open it slowly though. From reading some bike forums, this could be dirty idle jets - Anyone got any other ideas? I did fill the cooling system, but had a load of leaks. I have bought a few new gaskets and blanked off a couple of take offs I no longer need, so hopefully I can have that sorted and get it running up to temperature to see if it is any better then. In the mean time, a video: https://youtu.be/J8b4KOHnzss |
Another few months since my last update.
I have made some more progress: Brake system filled with fluid (and inevitable leaks fixed!) Short shift fitted Bracket made for acewell speed sensor (magnet still needs to be fixed to prop) Made a bracket for the bottom of the radiator and underside of nosecone Fitted some 25mm hubcentric spacers/extended studs to the rear Fitted some shocks purchased from Matt (rapidtornado) Some pics as it stands now:     |
Try dropping the needles a notch/raising the needles a notch and dirty/blocked idle jets will give you no progression on to the main jet.
Nice car |
I can't believe it has been 4 years since my last update. I had been living and working a long way away from the build, but finally managed to buy a house with a garage (albeit very narrow!).
Following the widening of the garage door opening to its maximum to allow the car to fit in, I had the car transported up:   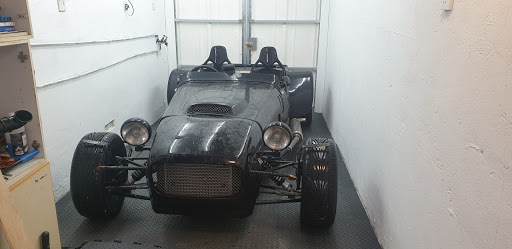 I have also written a 'to do' list to get the car finished as follows: Roll Bar Finish rear stays Finish holes in roll bar Drain and vent/remove fuel tank Bolt roll bar to chassis – open up holes where needed Tack weld rear stays in place and check bolt locations/aesthetics Fully weld back stays Use die grinder set to smooth all welds, then sand flush Flapwheel/Acetone prep Etch primer Black Paint Dash T nut bolts through dash panel and fill any holes Fit acewell and fog light switch aluminium panel with the right sized hole glued to dash panel Router/rasp/sand edges Seal with paint or varnish Cover Install Alternator Bolt on pulley to alternator Measure belt size and buy Electrics Sort out fast indicator flashing – LED relay or higher wattage bulbs Rivet ali to frame and rivet cable tie mounts to ali Cable tie electrics to mounts Tidy electrics under scuttle Create Earth points where required Check reverse light switch and wire up handbrake switch Redo fuse/relay panel – Maybe relay blanks in between the relays to spread them out for mounting Work out horn with IVA steering wheel Fuel gauge wiring should be checked Check orientation of speed sensor Araldite magnet to prop and cable tie Wire in wideband lambda sensor Properly route and shorten crank sensor Shorten alternator cable Wrap everything in conduit and loom tape Interior/Panelling Make panel for passenger foot well Finish Riveting panel behind seats to chassis with tiger seal, and tiger seal any exposed bits near diff Fit transmission tunnel top and sides with gear and handbrake gaiters Rivnut transmission tunnel sides Make panel over pedal box, rivnut on to allow access Work on panel under megajolt Make engine side panel for scuttle fit nicely over fuses and relays/cabling/steering column Remove Steering Wheel and fit Ford one Fit battery tray Rear tub tray – Make cut outs for roll bar, round edges with sander, make fixing points with countersunk screws and t nuts, seal with varnish/paint, cover Tether fuel cap Fit edge trim to seat belt holes Running Put battery on charge Clean out carb jets – Soak in carb cleaner overnight Install alternator belt Drain water, rinse through and replace with new Drain old fuel and dispose Get new fuel in Jerry can Top up oil Get megajolt working on laptop Check TPS and map on megajolt Wire up choke to bonnet release Get it started, idling and up to temperature Check for leaks and fix them Check thermostat works Check fan works Balance carbs with syncronometer Adjust needle height if necessary Test charge from alternator Fix fuel pump and drain out old fuel, leave lid off to vent tank Fill gearbox and diff with oil (Gearbox oil - 75/90 semi synthetic GL4, Diff oil - GL5 "Hypoid" Gear Oil Ep75/90) Mechanical Fit lock nuts on diff mounts Try and fit coil pack bracket or make new one Add brace bar to engine bay and weld vin number on Check brakes are working and bleed again if needed Loctite on rear upright to hub bolts – Take a photo for the IVA man Lock nuts on maxi ball joint etc Adjust holes on alternator mount to clear inlet manifold and sit straight Make further bit of alternator mount bracket and buy and install a belt Bolt on front wings Finish mounting rear arches with p trim and silicone, cut mounting bolts off with dremel Fix seats in place Make boot lid and cover Bolt in place and fit lock nuts on pedal box Drill hole in floor for brake pedal stop and install Cut out and fix panel over pedal box and passenger footwell panels Install battery tray and lock battery down Pull through extended wheel bolts further Second fixing point drill and tap on front left Lock nuts to ball joints on front suspension (check thread on maxi ball joint with thread gauge) Swap to lock nuts on all suspension including camber adjuster and rack extensions Add Lock nuts to bottom of engine mounts Adjust geometry and set ride height - Front: 5.5° caster, -2° camber, ~1° toe in. 110-120 mm ride height. Rear: 0 caster, -0.5° camber, 0 toe, 120-130 mm ride. Have prop shaft balanced/tested Plenty to be getting on with, but hopefully having the car at home will make it easier to get the little bits done when I get a spare hour here and there. Cheers Eddy |
Looks like the garage was just about wide enough for an Austin 7, which used to be the minimum standard long after they had passed away.
|
The car is looking good, it is always nice to move the car into a new home so you can actually work on it!
My car has now been in 5 different homes and moved 6 times... I have seen people use wheel dollies when space in the garage is a bit tight as it allows them to push the car right against the wall to give some space to work around it: https://www.sgs-engineering.com/wd4000-450kg-wheel-dollies-set-of-four?gclid=CjwKCAjwzvX7BRAeEiwAsXExo41JVRszyLcTnfK c0zCrcwhDGgzTy48KXPm80U0VjYR-EQYjH2FUahoCPhcQAvD_BwE |
A good list! I've got a similarly long list, and I think it's good to
a) work through ticking things off so you can see you're making progress and b) plan so you're not endlessly duplicating - at least any more than you do..! Quote:
With the engine, box and diff now in I suspect it would struggle with the weight - but it's certainly a bit of a pain to push it in and out sometimes! |
mine has a little 4 wheel trolley under the rear. I have more room but it makes moving it much easier.
|
| All times are GMT +1. The time now is 09:05 PM. |
Powered by vBulletin® Version 3.6.4
Copyright ©2000 - 2024, Jelsoft Enterprises Ltd.