Gingea1pom's Build Diary
ROADSTER BUILD DIARY
3 Oct 09 I was actually watching paint dry! So I decided to start the build diary. I need to go back a few weeks, I was in Halfords and saw the Bible by Chris Gibbs, I have wanted to build my own car for a few years now and Chriss book looked like it could be in reach, financially. I stuck my CBR 600 track bike project on Ebay and also the bike lift to raise some cash as Miss Ginge, rightly so, said it was to be self funding. The bike went for £360 and the bike lift for £185. I spent £104.50 taxing the Range Rover then on Thursday the 1st of October things really got started, I took a load of rubbish from the garage down the tip and picked up an 8 x 4 sheet of MDF and some soft wood to brace the base board, on Friday I ordered the Steel box section from a place in Kent, 7 lengths of 25 x 25 box and 3 lengths of 19 x 19 delivered to Tidworth Wiltshire, including the VAT was £115 which I thought was really good. The only down side to the whole steel thing was they cant deliver until Monday 12th when I will be away, on the upside Nicky will be having her first day with the kids at school all day so she will be able to sit around waiting for my steel to rock up then stick it in the garage! I also got a moped through its MOT so that will go soon raising more cash. Yesterday Friday 2nd I spent the afternoon and evening constructing the base board, at about 9pm I employed Nicky to help me flip it the right way up and I started to mark out the BRs. I started with BR 12, 5 and 6, I measured in from the edge of the 1220mm board 51mm either side then, when I was checking my diagonals realised the board is actually 1222mm wide so BR12 was 1120mm long first lesson learnt. I sat back and had a brew and decided I need a square as drawing 3 4 5 triangles at every 90º angle would take ages, I needed to paint the base board white and I need the longest rule I can find. Finally I am up to today. I went to Wickes and purchased a 1m rule, 2m plasterers feather, a new expensive hacksaw frame and some blades, a small tin of white primer and some red oxide primer. The red oxide is for the steel when it arrives as any steel in the garage will oxidise in 2 weeks. The white primer has already been applied to the base board and I am waiting for that to dry and will apply a second coat. I couldnt find a square I liked! So once the second coat has dried I will make one out of some L section steel I have lying around. It is now 8pm and the kids have gone to bed. I spent all afternoon constructing my 3,4,5 triangle to give me a true 90º, it was good practice in cutting accurately and a chance to dust of the welder, all went well. The primer on the base board has not really dried so it is not getting a second coat and I dont think I will get to mark out tonight, I have all week as no steel, then I will be away during the week for six weeks so only work at the weekend BUT I then have the whole of December off work so I should be able to plough ahead. I have my lap top in the garage playing radio two whilst reading the forum as Strictly is on and it does my head in. A bit of a rambling first instalment, I shall try and keep it to the point when I actually start building something. I am going to take some pictures of a white base board and a 3,4,5 triangle! I was going to embed the pictures in the post but couldn't work it out so they are on photobucket in the link in my signature, dont get exited there is only 5 pictures!:D |
:D sounds like you have a great Mrs , don,t tell me she,ll be applying the red oxide paint whilst you,re away is she ???:D
seriously... the very best of luck with your build, :cool: cheers andy:) |
Cheers Andy,
I hope she sticks it in the garage. I can see this 'me working in the garage all weekend' honeymoon ending soon, especially when I am away all week and only here for the weekend. |
simple solution :D
your mrs cuts the steel , kids bring each bit to you & you weld it together :cool: quality family time together & the Roadster gets built double quick ;) i must admit it does help to get the "other half onboard", my mrs is creating the dash panel ( covering it in vinyl etc ), she chose the material/colour/texture , just hope its not pink fluffy stuff:eek: all the best andy |
My misses has this miss guided idea that she will be sat in the roadster wearing a head scarf as we bumble along the lanes,:D it is not quite the image I have.:eek: She is happy at the moment because the garage and the loft got cleared out and she has total control of the TV all evening.
James my eldest (6) keeps popping in the garage with his eyes shut as I have told him I have to weld the chassis together and he knows not to look at a welding arc, then he looks at the big white board and my triangle and leaves. We will se how long the harmony lasts. |
Quote:
Although that does help when I explain her posh dinner went on a set of alloys:D Sean |
:D Hey Ginge....
i,ve just looked at your build photo,s, can you come to my garage & keep all my tools that tidy please , i always lose the 17mm socket :eek: cheers andy |
Andy,
Honestly I cant see it lasting,:( every one who has see the board of tools and knows me has laughed.:D Wait for a picture two months down the road.:eek: |
Quote:
its a good start tho & it,ll help i,m sure, i keep telling myself to make a tool board but never seem to have time, maybe cos i,m too busy looking for my tools :o :D andy |
4 Oct 09
It is Sunday and I am on duty at work, what with the GP to watch and a band saw I am watching on ebay ending today I cant see me doing to much plus I have no steel to work with I might get some marking out done. Watched the Grand Prix and had roast lunch then spent the next four hours marking out my new base board, all done now and diagonals checked (spot on). 13 days to wait until I am able to get to work on cutting and welding. This course I am on for six weeks has a week at the start that I might not have to do so I shall ring up on Monday and see if I can get out of it then will be here when the steel turns up and will be able to work on the chassis for a week and a weekend, fingers crossed. Bit more tiding |
5 Oct 09
I have just got back from Bracknell after picking up my band saw off Ebay £155.00. I employed Nickys (wife) help, she was willing if no able, to get it out of the back of the Range Rover, which by the way, is 11 years old, I wouldnt want any one to get any ideas that I am something I am not! I have done some practice cuts using some 15mm box section I have lying around and first results are good. I scribed the angles, a 45º and a 10º, then set the vice accordingly and then measured the finished cut and they where spot on. I am going to get a new blade as I have no idea on the age of the one in the machine; I am working on the cam belt theory, piece of mind really. I was getting weekend clearance from Nicky for the Exeter Kit Car show and she drops the bomb shell that she is away on a hen weekend in Manchester, a quick phone call to my mother and arrangements have been made for her to look after the kids for the Saturday. So I am saving my pennies now and selling anything I can so as to take advantage of the 3ge 15% of offer for orders taken at the show. |
6 Oct 09
I have modified my band saw. The nut and bolt used to adjust the angle of the cut was a slow and cumbersome way of doing the job and I had read on the forum someone complaining how slow it was when there are lots of changes of angle to be done, so, I have welded the bolt head to the guide and welded a nut into a round piece of tube that has a T handle welded to it. Much quicker to change angles now. 7 Oct 09 I have made two of the three hangers that will hold the steel from the roof of the garage when the steel arrives. They are wonderfully over engineered and are turning into a work of art IMO. All good practice for the build. 11 Oct 09 I am on a course in the sunny Medway towns, my steel turns up tomorrow (Mon 12th) and I am stuck here. I finished the hangers for the roof to take the steel. Marked out the base board and checked my diagonals, everything seems spot on. When I next get home the first thing I will have to do is paint all the steel before it starts to rust in my damp garage, then finally I can start construction. 12 Oct 09 Hooray. Firstly I am back home and dont have to do the first week of the course, secondly me steel turned up at 9 am this morning, I got back around the M25 and in the garage by lunch time. I have cut all the BRs and tacked BR 5,6,11 and 12 together, BR 8 and 9 where interesting doing the 74° cut but some judicious filing and it is spot on. I am going to attempt the FFs after dropping the kids at school which gives Nicky a lie in and gets me right in the good books! I will up-date the photo-bucket pictures later. A fantastic first day.:D :D :D :D |
Ginge,I have been happily married for nearly 40 years,my wife has allways "got stuck in" so if Nicky sees herself "bumbling along the lanes with a headscarf on" see you do it
or you will get more grief than its worth!!With my old clubman my wife burned her leg on the side exhaust,so make sure you take care of that. We see your country lanes on programs such as Midsomer murders,looks wonderful,wouldnt mind bumbling along them with a 7 myself. Put Nicky on a pedestal,worship her and good luck with the build.Your son will just love the car.David:D |
Cheers ACE.
I brought my son some coveralls off Ebay but now he is asking for a welding mask as I make him go out of the garage, turn around and shut his eyes at the moment! |
13 Oct 09
Prepared all the mating faces of the base rails then jigged them in place with plastic kitchen cupboard fixers then tacked them all together.:) I moved on to the front frame this afternoon. I am pleased with the progress so far, I only made one mistake:( which was to cut FF2 and 3 too long to start with (miss read the length in the extra tutorial and cut them both the same length as FF1!):eek: Had it not been for this little over sight I would have got the front frame finished today. At least, eventually, I worked out where I had gone wrong, and know what needs to be done to correct it. Of to Salisbury with my good lady tomorrow so there will be no progress. My old man is interested in the build, to the point he is coming over on Thursday and has asked for the forum address so he can keep up with what I am doing.:D |
the front frame can be a tricky little bu@@er :D
glad you got it sorted. :) andy |
Quote:
Patience is a virtue...If it was easy it wouldn't be fun |
looks like a good start. if your coming back to medway feel free to give me a shout and you can come and see my buid if you like.
|
Quote:
I am back in Medway on Sunday night for five weeks and would love to come over for a quick brew and a nose at your Roadster. I have perchased an iternet dongle today so when I get back down there I can still check the forum, told the wife it was so I could do reserch whilst on course. I will pm you early next week if that is OK. Cheers Ginge |
It's coming along
14 Oct 09
The trip to Salisbury only took up the morning so I got the front frame completed and cut some of the top rails, also brought a ‘3’ mobile broadband dongle! So I can get the ‘tinter’ web whilst on course for the next 5 weeks. 15 Oct 09 Had a full 9 to 5 day in the garage today and the chassis has risen from the base board. [IMG]  [/IMG] [/IMG]No major problems, a little fettling here and there. The seat back was interesting, got it lightly tacked then measured all the angles before adding the first diagonal which stiffened it up nicely. Looking forward to a second 9 to 5 in the garage tomorrow, probably won’t get as much done at the weekend as the kids will be popping in the garage and I like to encourage them which slows the whole process down a touch. A question, which I vaguely recall being raised previously, is there a definite time to start fully welding everything together? Only there seems a lot to weld and grind back down. |
Nice one Ginge, looking good, the seat back is fun as you feel you need three pairs of hands all at the same time :eek:
i hope you don,t mind me asking but has the build table dropped slightly under the nose area of the chassis? as there seems to be a small gap between the table & the bottom rails at the front end , might be the camera angle too, as for fully welding, its best to leave it until you have all the diagonals & the "RS" parts tacked into place, also make sure you alternate where you fully weld, go from side to side/front to back etc to minimise any heat distortion from fully welding ;) when you "think" its all fully welded i,ll bet you a pint you,ll find one you missed :D i know i did :o nice progress, i bet the kids & Mrs are impressed. cheers andy |
Andy
I am glad you noticed the gap under the front rail. I went for the obligatory sit in your Roadster picture:D and the legs on the sh**y plastic A frame spread and I nearly ended on the floor,:eek: also when we had all the wet weather the board wasnt supported properly so as you said it has now got a gentle curve on it.:( On a positive note, although it has now warped the chassis (as you can see) has remained straight. Ginge |
can just imagine the scene :D and don,t lean back as you,ll end up on the floor with your legs in the air, i know that from when i had my "sit in my Roadster "moment :D
also , just noticed you have "U7" in the wrong place, needs moving towards the passenger side a tad ;) , hope you don,t mind me saying, but wouldn,t want you to get too far before you realised it:) cheers andy |
You can imagine what I have just done. Rushed out to the garage flipped to page 39 Fig 4.9 to ascertain which upright is U7 and immediately see my mistake, I was thinking it would be a bit tight fitting three pedals in that space.
This is why the forum is indispensable; I would have carried on blissfully unaware of my mistake and probably cut BR10 out as well before realising. Please feel free to comment any time on anything you think looks wrong, it can sometimes be the camera angle but if it is not the implications are huge. Thank you. Ginge |
no prob Ginge ;) , like you say "this is what the forum is there for",
sometimes its easy to get carried away with the eagerness to get "something done" & miss a small dimension check without realising it, :eek: :D like me fitting a new clutch, ended up installing the engine/gearbox back into my chassis then realised i,d not fitted the sandwich plate between engine & gearbox... result= engine out AGAIN:o andy |
16 Oct 09
First job today was to move U7, then I tacked on D9 and 10, moved on to SB3 and 4 which where straight forward then SB 5 and 6, I couldnt get my head around the drawing in the appendix so decided to cut them over length and then fettle to fit. Once I had the first one in the right place I could see the cut required and the drawing made sense! Whilst fitting TR 6 and 7 I noticed that the top of U2 was in the wrong place by 8mm, glad things are only tacked at the moment, moved it into the correct position and fitted TR 5, 6 and 7. I am going to fit the diagonals that run down the side of the car tomorrow so have flipped the chassis over to fully weld some of the joints that will get covered by the diagonals. I have only fitted 10 pieces today but corrected some minor mistakes and the seat back diagonals took a while. |
thats the beauty of just tack welding until you,re sure everything fits as it should, nice one Ginge :)
and just think when you are driving your Roadster you,ll know every single inch of it & how it went together, a total sense of pride . when you come to fitting the suspension brackets make sure you check & re check all the dimensions, i spent ages getting mine "just right", worth it tho ;) all the best for the rest of your build. andy ps... what engine are you going to install? |
With reference to the engine.
I was going 2l pinto or nothing but after checking out a web site that gave different engine sizes, power, weights etc I am not fussed if I end up with a 2l or 1.8, anything that is straight forward to get me through the IVA. I am watching a 2l pinto powered 1984 sierra estate on Ebay at the moment. http://cgi.ebay.co.uk/ws/eBayISAPI.d...=STRK:MEWAX:IT It is in Kent which is where I will be when it ends. It will have to be cheap as my priority is chassis plates for the next big purchase, if it goes any higher than £150 I will walk away. The ironic thing is about 9 years ago I was the proud owner of a nice 2l SOHC sierra, it only cost me £300 and lasted me for a year. I would like to try a bike engine conversion once the IVA is out of the way. |
the reason i asked what engine you are planning was to do with you saying you have tacked the TR5 into place, i,m using the 1.8cvh engine & had to cut the TR5 tube out as it fouls the carb/manifold, not sure if it causes a prob with other engines, but as the book was written using a pinto engine then i presume it,ll be fine if you do get the pinto,d sierra, :)
i would think hard about changing from car engine to bike engine after IVA, lots of things to change, maybe go bike engine from the beginning??? speak to Slimtater & Tilly as they have bike engines in their Roadsters, Slims is already been SVA,d & Tilly,s is a current build, maybe they could give you some advice on bike engined Roadsters. cheers andy |
17 Oct 09
6th day of the build and Sophie and I are of for a drive! [IMG] 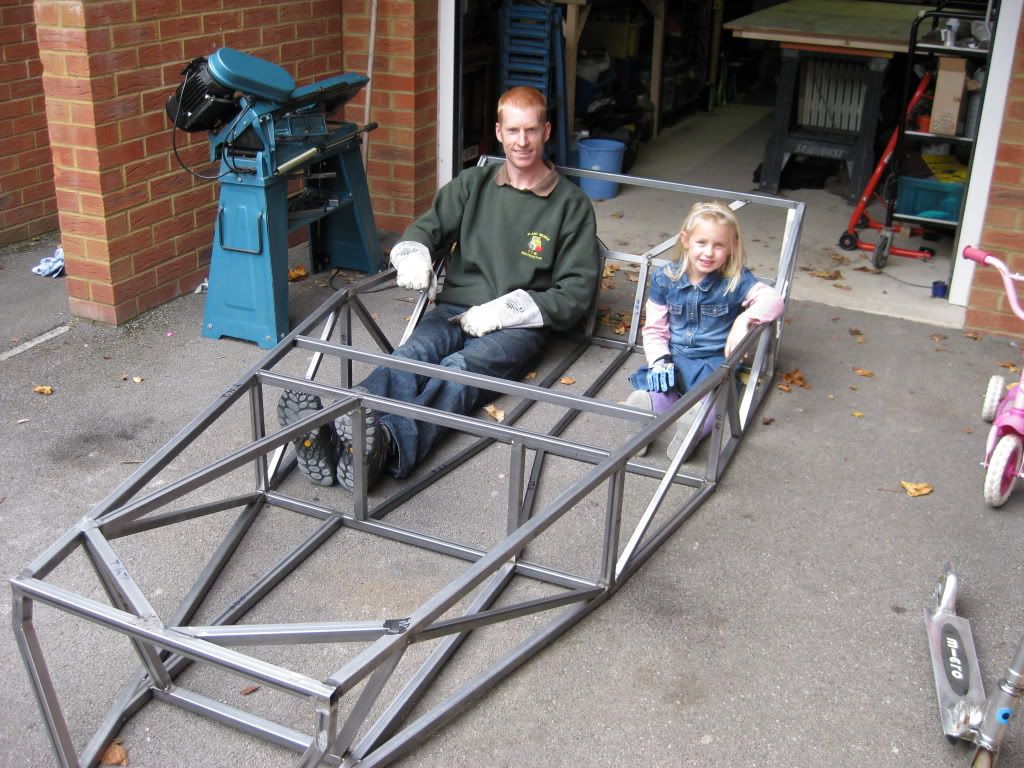 [/IMG] [/IMG]First job was to fit the six diagonals, D1 and 2 are an interesting fit so my tried and tested method of cutting a little over size and fettling for a snug fit worked a treat, also a quick look at some forum members build pictures helped. Moved on to the transmission tunnel next instead of the rear section as you need a few chassis plates for the rear and I wont be getting them for a while. The TT4/5 hoop was constructed on my welding table. I have only tacked on TT 1s and 2s and should get the rest done tomorrow, then a 5 week gap in construction before the big 5 weeks of. I have updated the pictures on photo bucket, it does annoy me that they appear in reverse order, ho hum. |
Transmission tunnel
18 Oct 09
I have had a pretty good Sunday all in all. Got up late then straight into the garage, stopped for a Sunday roast, back in the garage until the start of the GP. I have now completed ¾ of the transmission tunnel just the near side top rails to do (TT7, 9, 10), the cuts on either end of TT11 are compound cuts again, they should have a warning against them, took my time with the hand saw and they turned out OK, if they had been standard angles I think I would have finished the transmission tunnel, no rush, I am not setting a time limit, it will get finished. Pictures are updated here is one of todays work. [IMG] |
On course
Evening,
Despite being stuck in a 6’ x10’ box that the Sergeants mess call a room, I have made contact with the outside world. The technology in my ‘box’ is quite impressive I think.:cool: I have managed to bid, win and pay for a mk2 escort steering rack which was brand new and in the box for £26.66.:) I am getting a little ahead of my self, however. I had this, slightly, and misguided may be, miss conception that Mk2 escort steering racks are rare, so I brought it. I have been following a few Steering Rack (SR) threads and believe if I use standard Sierra track rod ends with my new Mk2 Escort SR and a set of 130mm extensions from Rally designs that that will be a working solution. Or am I way of the mark?:confused: I am looking forward to getting home at the weekend to sit and look at my part build chassis to take my mind off this websters course. The forum is light relief at the end of the day too. Bleating on now I’ll get my coat. |
Hi Ginge,
sounds like you got a bargain on the rack, as for the extensions i haven,t got the info with me at the mo but i too bought the extensions/tre,s & upper & lower ball joint/drag links etc from rally design & they where spot on & look great, i also bought my rack from them too, but mine was more than 26squid.....£65 :eek: got carried away at stoneleigh show:D andy:) |
Since my last post I have placed my order for £150 worth of chassis plates, which I will be picking up at the Exeter Kit Car Show.
31 Oct 09 First time in the garage for two weeks and it took me 5 seconds to get back in the groove. What with getting up late and having a kids Halloween party to go to at 4pm, I only got to finish the transmission tunnel. 1 Nov 09 I made a start on the RSs and after asking a few questions on here decided to just weld up the RS1,2,3 frame and the RS4,5,6,7,7a,8,9 frame square on the welding table and wait for the chassis plates so I can get the fames in the correct position. I dont think it will hold me up as I wont get in the garage next weekend and possibly not the weekend after (work load on this course is fantastically unrealistic) and the following weekend is the show and the end of this course. Sorry bleating again |
25 Nov 09
The whole of November without an update, thats bad! I have managed a little work in the garage at weekends whilst on course and have now updated the pictures in my signature. The transmission tunnel is now complete, although when I look really closely the near side TT6 is like 1 mm to long and there for pushes the corresponding TT7 up a little, so I will remove it and get it to the correct length. I made a start on the rear suspension framework, welding up the two U shapes of RS1,2,3 and the top one of RS4,5,6,7,7a,8,9 all on the bench to ensure they were both square then spent ages attaching the two RS10s, fully welded up, ground down and dressed (if that is the correct word) with a flap disk they look good. I was going to fit the frame to the Seat Back assembly but decided to wait for my chassis plates from 3GE. So I moved on to welding the chassis up fully, took my time and rotated the chassis so I was always welding downwards, I am not that good. I must point out at this juncture that over the past 5 weeks I have put some time in on AshGs Roadster. Using his proper welding machine (mine is a Clarky 150 something) I have ramped the power right up on my machine and weld faster and deeper now. Learnt load of stuff whilst working on Ashes car so a big thanks for the experience Ash. Ash and I had a little accident whilst running his car up to temperature see the full story here. so I am taking it easy for a bit an hope to get back at it on the first day of leave on Monday. I have started a car build bank account complete with debit card so now MY build money, from selling MY stuff wont get swallowed up by the current account. Cheers Ginge |
Quote:
Top tip there Ginge ;) Almost my entire build costs to date have come from the sale of classic car parts, well that & clearing a mountain of scrap !!?? :) I have lost count of the amount of times that money has been transfered to the household account, then promptly swallowed up by day to day costs. :( Following your build progress with interest mate :cool: |
27 Nov 09
Just had to make a entry. After missing out on a sierra on Ebay that I was willing to spend £300 on I have found one in Swindon (only an hour from me) for £150. It sounds like the battery or alternator has gone as it only starts with a jump start. The woman selling it is away until Monday, we have exchanged text messages watch this space. 28 Nov 09 Spent half a day in the garage this afternoon. I started by cutting of the offending TT6 and made it 1mm shorter, it will get welded back in tomorrow hopefully. I have finally welded the rear suspension frame onto the chassis. It took a while to line up five reference points then tacked it all together; I think it had got slightly out of line when I welded it up as it required a little pull on one corner before welding. Pictures have been up-dated [IMG] 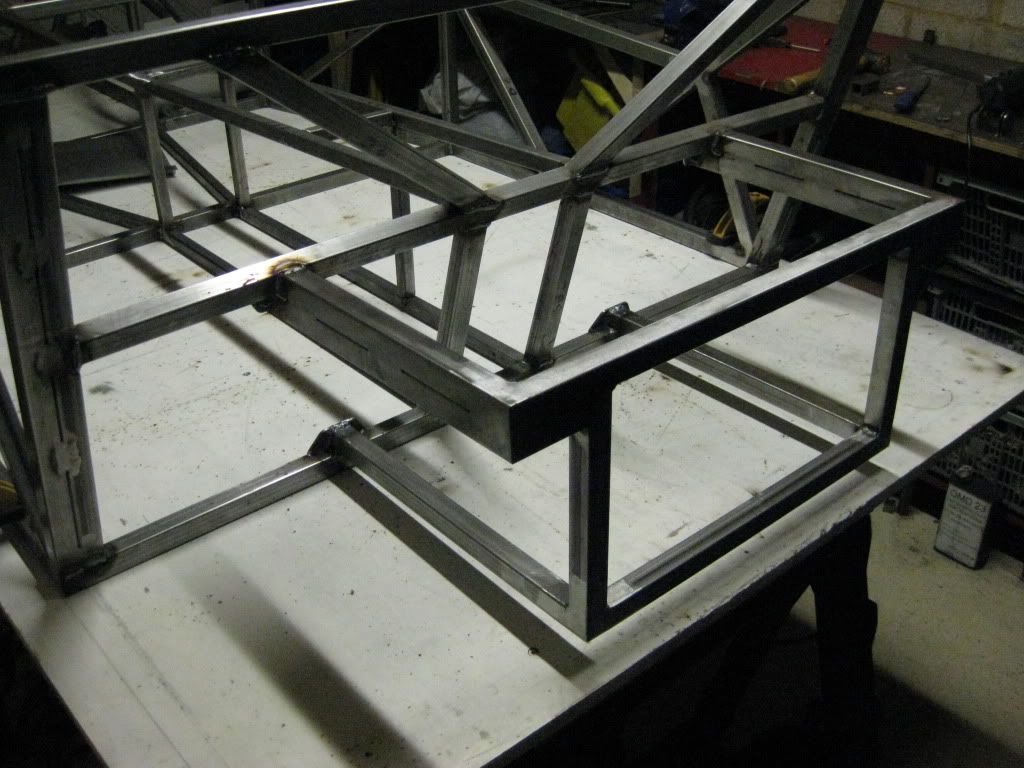 [/IMG] [/IMG] |
Looking good, very neat :)
Just a word of advice though, be carefull when grinding welds flush even with a flap disc as it can (in my opinion) be very easy to go a little too far without realising and take some of the strength out of the weld Personally i would leave them alone, apart from the areas where they do need to be flat to fit panels etc |
looking good that is mate. if you have them to hand weld on the rear suspension brackets now as its easier without the rest of the rear in the way.
|
Cheers Mark, that makes sense, I will calm down with my flap disc.:D
Ash, I have all the suspension brackets, just need to make the jigs and get some threaded bar.:rolleyes: Hows your hand? My arm feels like normal just looks odd now.:D |
| All times are GMT +1. The time now is 01:03 AM. |
Powered by vBulletin® Version 3.6.4
Copyright ©2000 - 2025, Jelsoft Enterprises Ltd.