
|
|
#201
 21st February 2010, 11:50 PM
|
||||
|
||||
|
When you say "two coats of primer" does it imply spraying with a spray gun and a compressor, then cleaning up the spray bottle afterwards, or do you use aerosol cans for things like this?
Also, did you make holes for drainage in the mounts, or do you think there's no need?
__________________
Albert Haynes Roadster FAQ | Haynes Builder Locations Gallery, build thread in Lithuanian / via Google Translate. 
|
|
#202
22nd February 2010, 07:42 AM
|
||||
|
||||
|
Quote:
Quote:
Cheers Ginge
__________________
Sent from my iPad, from who knows where in the world I was building but I am not now!  Build Pictures Build Thread
|
|
#203
28th February 2010, 04:36 PM
|
||||
|
||||
|
28 Feb
Things have moved on a little, although I need to build up motivation to start cleaning some parts, as this will hold me up soon, also I need seats and seat runners so I can weld the cross bars the seats mount to until I get this done I cant fix the floor in etc...... All my wish bones and rear uprights turned up the other day so today I fitted all the bushes and crush (or anti-crush) tubes then fitted all the wish bones to one side of the car. Next I loosely fitted the front upright and wheel which made it look better, and then promptly gathered the family in the garage to have a look. Surprisingly Nicky and James were quite impressed (I had the rear wheel on aswell) Sophie my youngest just asked if we could go for a drive! The wheels are 14 and dont clear the rear lower long through bolt. Not sure whether to make up some spacers to get the chassis rolling or wait for 15 alloys. The following pictures show the front and rear suspension. You will notice I have gone for the cheap shock absorber option for now, thats another big purchase to get the proper suspension! I have used full nuts for mocking up and will swap them all for nylocks later. [IMG] 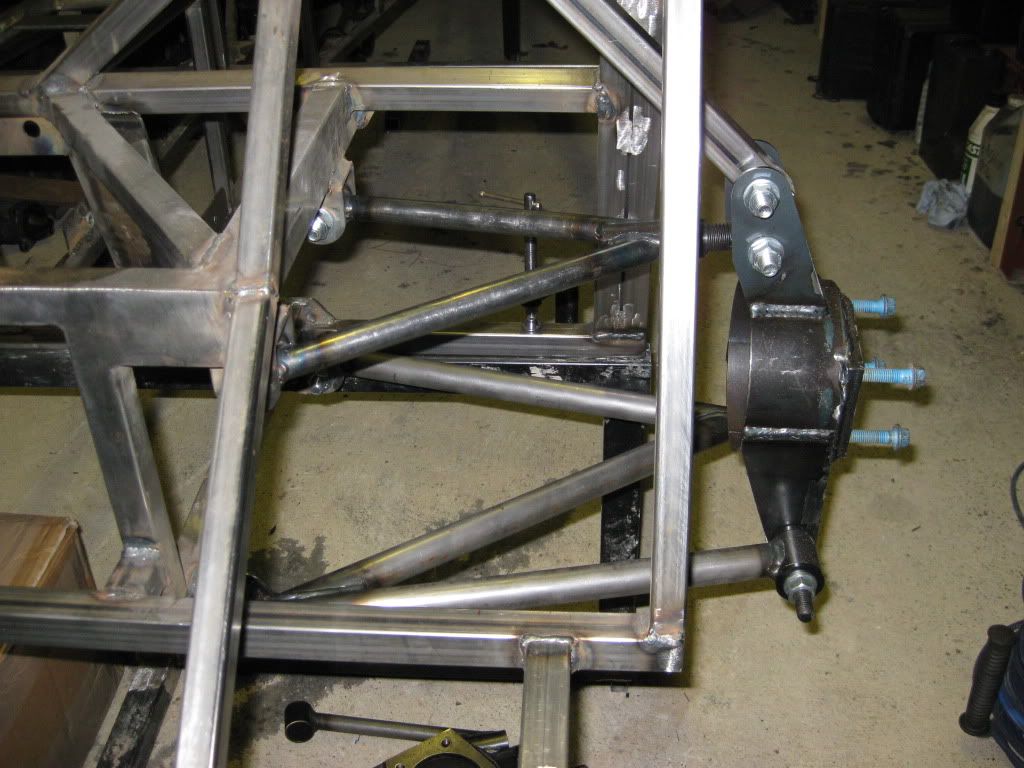 [/IMG] [/IMG][IMG] 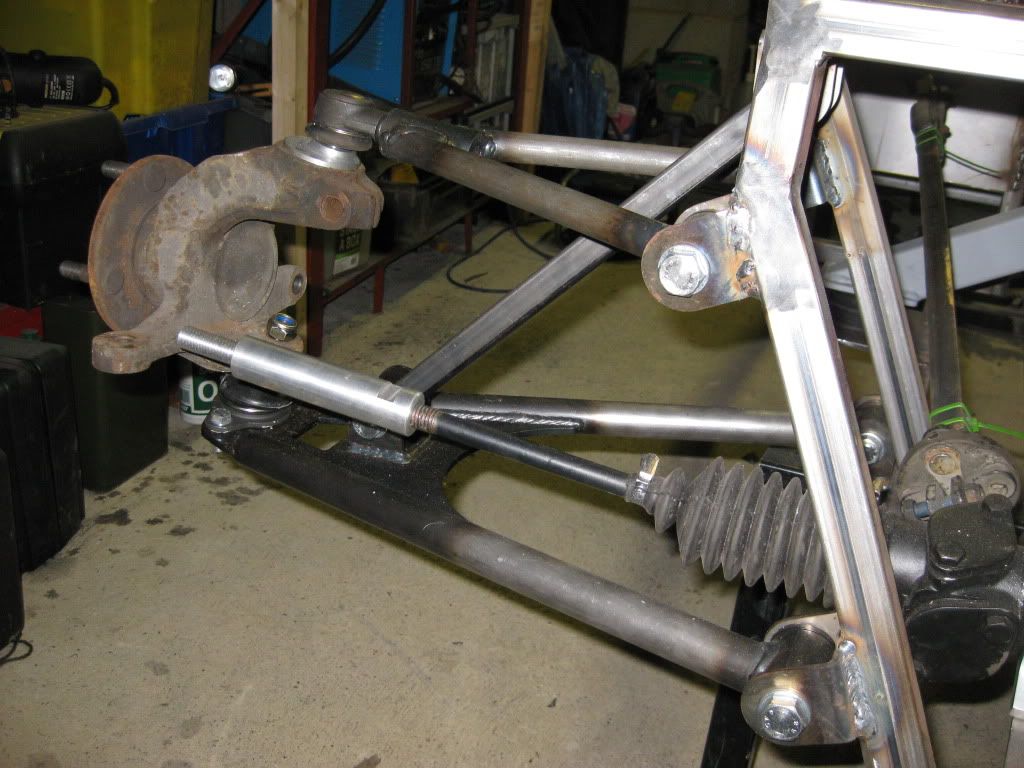 [/IMG] [/IMG]I need to get the 42mm socket as I started to strip the front hub carrier to remove the bearings before cleaning and found the big nut under the dust cover! I might start painting Wish bones and rear up rights also some electrolysis during the week. Could be tricky as I am on exercise for a couple of days. Ordered my reamer today as well Enough drivel for today thanks for reading. Cheers Ginge
__________________
Sent from my iPad, from who knows where in the world I was building but I am not now! Build Pictures Build Thread
|
|
#204
28th February 2010, 05:03 PM
|
||||
|
||||
|
Excelent, I can't wait to get a rolling chassis. I will probably brake my rulles and get the chassis rolling before getting my other car finished for the show season....
The chassis is not in the way realy at the moment so best leave it where it is whilst collecting all the fina bits for the first build phase.. It's very tempting when you see others making progress though  TT
__________________
You only get a woosh with a dump valve Build Thread Man Cave Mantiques Cecil Street Auto Repairs Garage Carlisle Build Cost £4181.65 - Last - Wheel Cylinders
|
|
#205
28th February 2010, 05:26 PM
|
||||
|
||||
|
looking good ginge. im guessing you got some more money for your build fund.
little thing i noticed on that picture of your front suspension. you need to calm down with that grinder. there is no meat left in that top corner on your front frame. its so thin that you can see the cut line between the two pieces. i don't like to criticise but that's a really highly stressed area of the chassis and i wouldn't want to say nothing and it fall apart later, then regret it. Hope you dont think that im trying to knock your workmanship as the car is coming together really nicely.
|
|
#206
28th February 2010, 05:34 PM
|
||||
|
||||
|
Ash,
Just back in from the garage after having a closer look at what you were saying. All is not as it seems in the picture the line that looks like the cut line of the two pieces of steel rubbed off with my finger and the join there runs horizontally. But point taken, someone else mentioned my over exuberance with a flap disc a while back and since then I have only ground down welds that have something mating to it. Cheers Ginge
__________________
Sent from my iPad, from who knows where in the world I was building but I am not now! Build Pictures Build Thread
|
|
#207
28th February 2010, 06:07 PM
|
||||
|
||||
|
Looking great ginge
 You must be really excited seeing the Roadster with the suspension fitted for the first time .... For me, it was a real milestone of the build
__________________
I am not a complete idiot...........Some of the parts are missing !! Ronnie www.roadster-builders.co.uk
|
|
#208
28th February 2010, 08:05 PM
|
||||
|
||||
|
nice progress there Ginge,
sort of a cute / proud moment when kids ask to go for a drive , aww bless its a big milestone when you start getting to the stage of putting wheels on, nice one mate. cheers andy
|
|
#209
28th February 2010, 08:19 PM
|
||||
|
||||
|
Great work Ginge, also great motivation for me as I'm at a similar stage (a couple of steps behind).
__________________
Albert Haynes Roadster FAQ | Haynes Builder Locations Gallery, build thread in Lithuanian / via Google Translate.
|
|
#210
28th February 2010, 09:06 PM
|
||||
|
||||
|
Way to go Ginge, I got my rear bones sorted a week or two ago and it really does give you a buzz. Dying to get the front end done but after six days at the NEC we've now got a chock-a-block diary for at least the next two weeks so its on the back burner again
 . .D.
__________________
visit my website at www.cossie.davenewell.co.uk
|
 |
| Thread Tools | |
| Display Modes | |
|
|


 Linear Mode

