
|
|
#1
 7th April 2011, 06:04 PM
|
||||
|
||||
|
I have been meaning to make a post on this topic for a very long time.
Been a nice day today and having nothing pressing to do, I thought it was time that I did. This post is very relevant to a recent thread elsewhere but I guess this is the correct place for this post as it is mostly relevant to building the chassis. Spent an hour or two this afternoon making a few welding test pieces. The test pices were 25mm X 25mm, 16 gauge ( 1.6mm ) ERW square tube off cuts. The welder used was a Lincoln Powertech 191C ( 180 amp ) .8mm wire & sheilding gas was, BOC Argoshield Universal All of the test welds were un-prepped & but welded with no weld gap. None of the material had been subjected to heat & all welds were started from cold. Once the test sections were welded, the welds were cut out from the square tubes to produce, flat test strips. Here is a sequence of photographs. 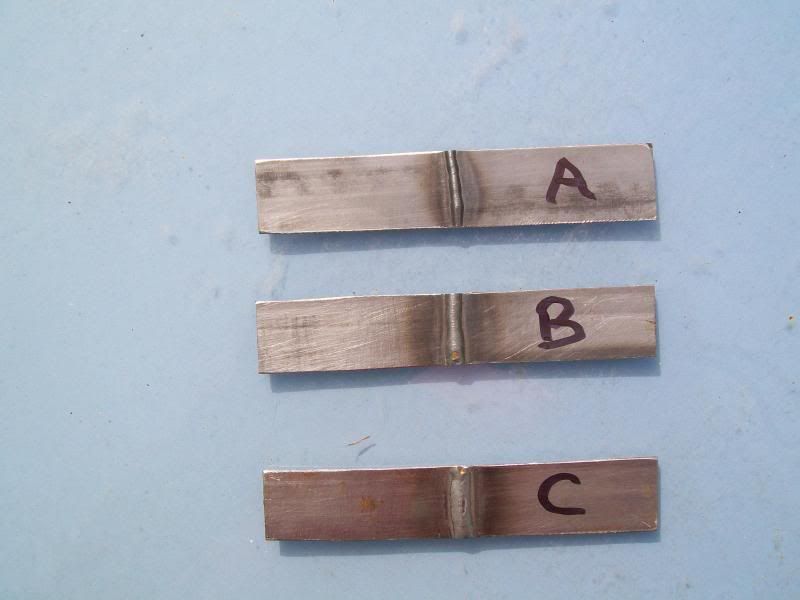 For ease of identification the test pieces are marked A, B & C Looking at weld A you may think it looks reasonable. Nice narrow weld bead that will not take too much work to fettle & make flat. However, looking at it with a trained eye, allarm bells start to ring & the weld looks cold. Weld A used a low current & wire speed setting. Weld B looks fine & used a sligtly higer current setting with increased wire spped Weld C looks fine with exception of visual evidence of being a tiny bit on the hot side !!?? This was performed with another increase in current & wire speed. Now we flip the samples over to reveal the truth. 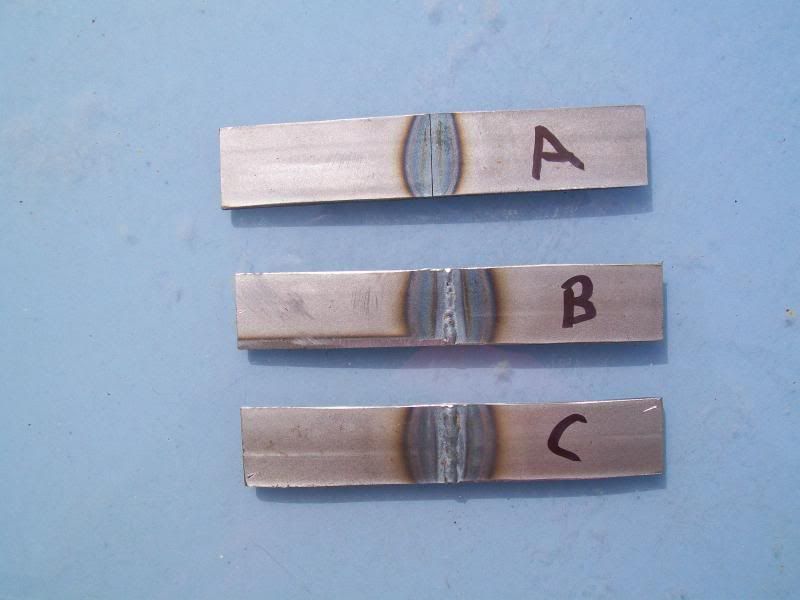 Instantly it is evident that weld A lacks any form of root penetration. Weld B has a full root penetration ( A tad shallow ) Weld C has a good root penetration ( A tad too much ) To be ideal, a weld setting in between B & C would produce an ideal weld, one that I would be happy to submit to any form of testing. That said, in my humble view, either weld B or C is more than suitable for the Roadster chassis & would easily pass BS standards testing. More to follow in part 2 , just as soon as it is typed in a few moments from now 
__________________
I am not a complete idiot...........Some of the parts are missing !! Ronnie  www.roadster-builders.co.uk 
|
|
#2
7th April 2011, 06:37 PM
|
||||
|
||||
|
Here we go for part 2 of this post.
Here is a picture of welds A, B & C after the weld cap has been removed ( Fettled flat ) 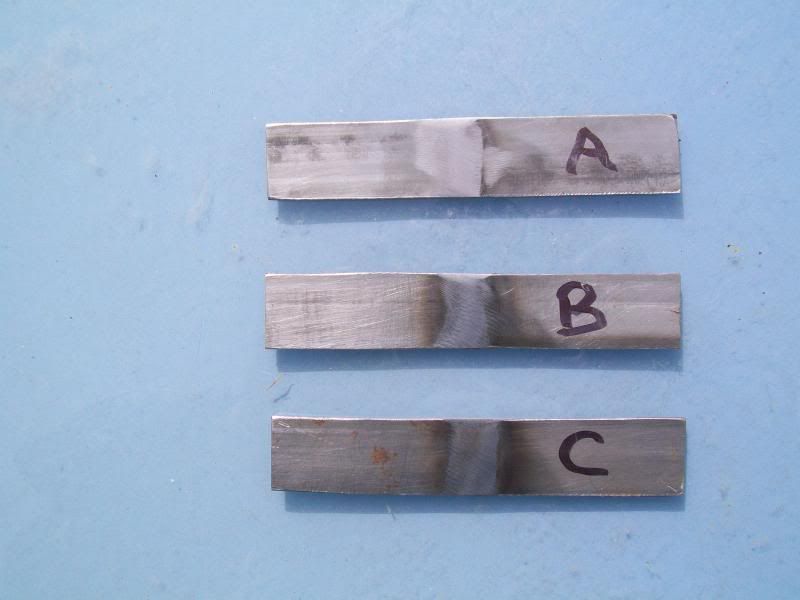 On close visual inspection of all 3 welds, from the outside face of each joint there is nothing visualy to distinguish any one from another. No porosity evident, no inclusions evident. Without polishing & etching, all welds appear to look as they should do when making a simple visual inspection of a weld. Now here is a picture of wels A, B & C after they have been subjected to a very mild bend test of about 100 - 120 degrees A true test would be made by bending the sample through a full 180 degrees, with a radius appropiate to the thickness of the material being tested !! 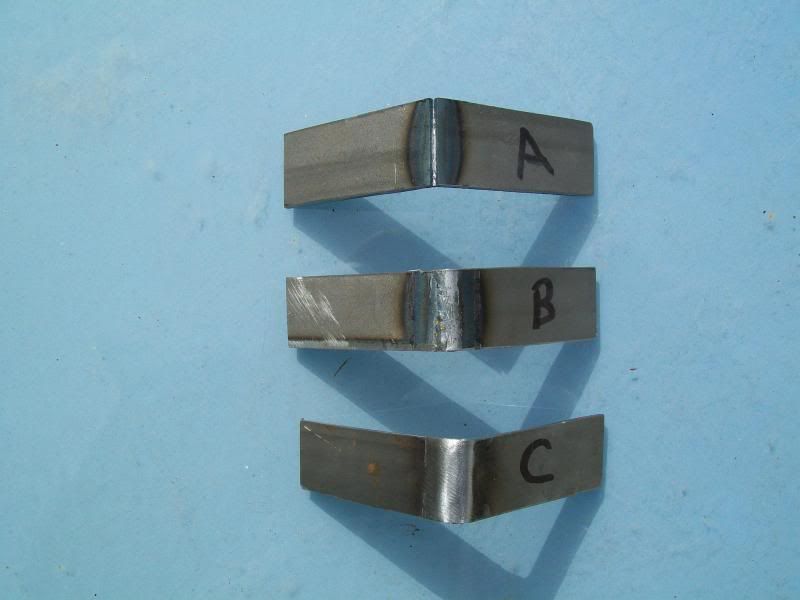 It is self evident that sample A has failed the bend test miserably & is a totally unsuitable weld joint for the Roadster  As there was really nothing to choose from between the next 2 samples, I chose to test the strength of the root weld sample B ( Could be argued that it looked the weaker of the 2 remaining samples ) Tested sample B buy bending pressing the dressed face to put maximum stress on the welds root. The root held firm & I am confident that it would bend to 180 degrees without showing any signs of stress fractures. Sample B was tested in the other direction to test the front face of the weld. Nothing undue was observed. In sumary, if you are unsure of your welds, keep practicing & don't be afraid to test your welds frequently .... It won't take long & will give you peace of mind, knowing that you will be building a safe, sturdy chassis I hope this helps some of the novice welders on the forum.
__________________
I am not a complete idiot...........Some of the parts are missing !! Ronnie www.roadster-builders.co.uk
|
|
#4
7th April 2011, 07:53 PM
|
||||
|
||||
|
Ronnie,
Thats a really useful thread , very informative & with pictures that actually shows what we,re looking for in a good weld ( a picture tells a thousand words so to speak ). Nice work Ronnie  cheers andy
|
|
#6
7th April 2011, 08:55 PM
|
||||
|
||||
|
Very nice work there Ronnie, perhaps you could put what rough amps you used to weld A,B and C.
__________________
Website http://www.talonmotorfabrication.co.uk/ Direct email phil@talonmotorfabrication.co.uk talonmotorfabrication@gmail.com Mobile office hours 07514098334
|
|
#7
7th April 2011, 09:19 PM
|
||||
|
||||
|
I thought it best that I completed a full bend of the test pieces
Here is a picture of the fully bent pieces. 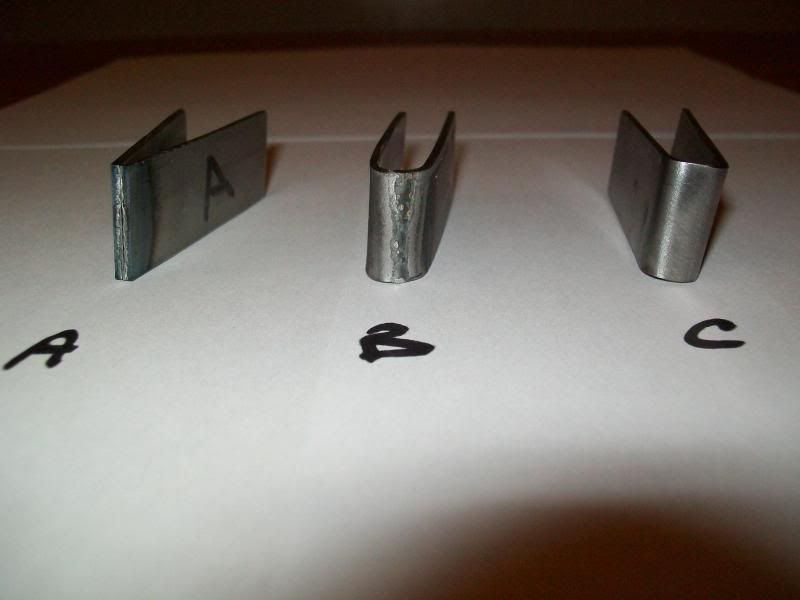 Test piece A folded in half by hand !!, if I were to try & straighten it again, one piece will become two again. The other two samples exhibit absolutely no signs of stress fracture, if test piece B looks a bit iffy, I can assure you that it is only a bit of mill scale as the test pieces have not been cleaned/polished Basic testing of a weld sample is quite simple to do at home, well for thin material anyways. If you do not have a press, a simple vice and an appropiate piece of round bar will do the job fine. Open the vice a little, place the piece of bar directly over the centre of the weld on the test piece & strike with a suitable hammer. This will allow you to bend the test piece a fair way. To complete the bend, just pinch the piece in the vice until fully bent, when I say fully bent, I don't mean squished flat  Once bent, examine the surface of the welded area for signs of stress fracture. If you want to examine in more detail, fettle & polish the weld with emmery paper, this will help to highlight any imperfections in the test piece I have not gone into fine detail of the weld settings used for the test pieces because. A: My welder does not have any digital read out of the weld current. B: The settings will vary between welders, even identical machines !! Hopefuly I have a least covered the basics of testing your welds. Setting up the welder & weld prep is another story waiting to be told.
__________________
I am not a complete idiot...........Some of the parts are missing !! Ronnie www.roadster-builders.co.uk
|
|
#8
7th April 2011, 09:43 PM
|
||||
|
||||
|
Quote:
To be honest, the settings I chose for the test pieces were deliberately askew in order to produce test pieces best suited to ilustrate this particular thread .... Came out quite well considering that the 3 pieces done were the only ones I did My welder is a 180 amp set with power settings of 1-8 & a wire speed range of 0-10 Sample A was using power setting 2 with a wire speed of 1.5 ish ( Blatantly too low a setting for the material thickness ) Sample B was using power setting of 3 & a wire speed of about 2 1/4 ( not that far off the mark for 1.6mm, I would say ) Sample C was using a power setting 4 & a wire speed of just over 2.5 .... A tad on the hot side for a down hand butt weld. My personal preference is to weld a tad on the hot side, in my view, there is no worse sin than a cold MIG weld I also hold the view that a properly set up weld job will do more to aid the war on distorton than trying to reduce the heat put into the job .... The propper weld procedure/sequence will help greatly in the fight against heat build up
__________________
I am not a complete idiot...........Some of the parts are missing !! Ronnie www.roadster-builders.co.uk
|
|
#9
7th April 2011, 10:06 PM
|
|||
|
|||
|
Thanks for that, very informative and great pictures. Although I bought my chassis complete I still need to weld a lot of brackets and such like. At least now I know what my welds should look like, even if I cant achieve it !
|
|
#10
7th April 2011, 10:42 PM
|
||||
|
||||
|
Well done ronnie im sure this will help lots of people with their welding.
its hard to make the welder misbehave once you know what your doing isnt it ronnie i remember writing the welding articles for ckc and i found it really hard to do bad welds on purpose.
__________________
My Roadster Is Finished NerNer....... Pigs can fly, you just have to carry them onto the plane. My Pictures http://s707.photobucket.com/user/ashgardiner/profile/
|
 |
| Thread Tools | |
| Display Modes | |
|
|


 Linear Mode

