
|
|
#1
 30th August 2010, 09:00 PM
|
||||
|
||||
|
The way i've been going about my build is "if it looks wrong, it probably is". So guys, what have i done wrong with my handbrake cable?
Also, i plan on cutting it just before the handbrake lever, but what's best to join it back together? 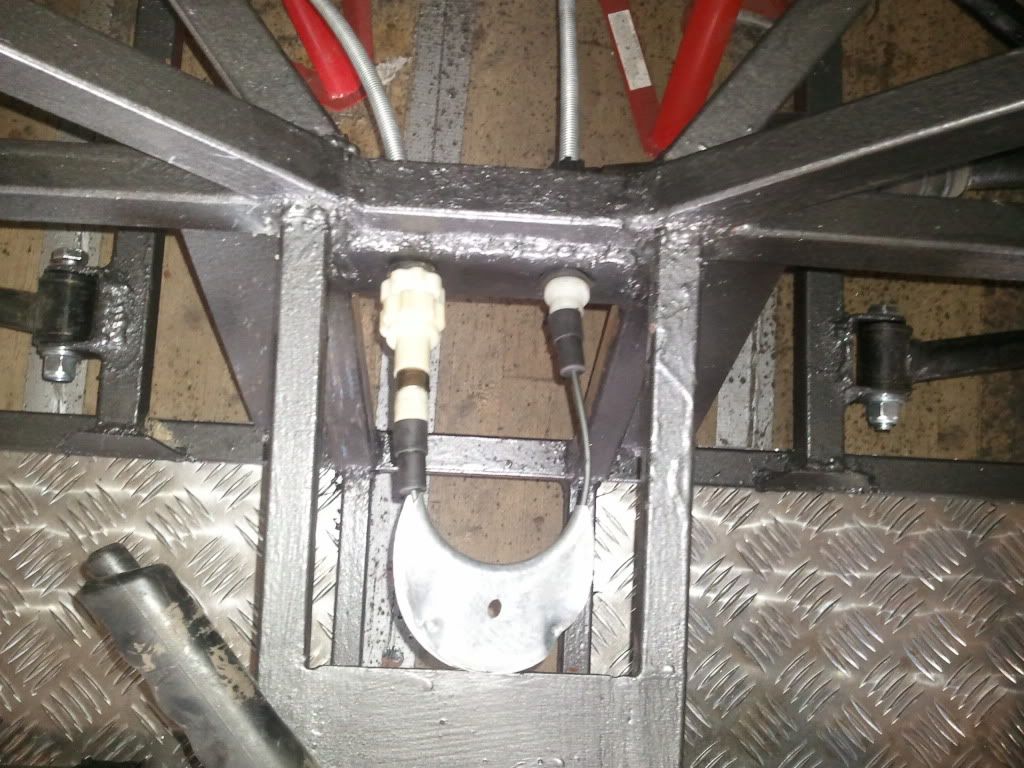 Cheers Dave
__________________
~ My Build Diary - http://davesroadster.blogspot.com/ *updated 7/6/11* Best bit so far: Getting it running Worst bit so far: Cutting steel for wishbones and engine mounts. Most annoying bit so far: Generator packing up half way through welding. 
|
|
#2
30th August 2010, 10:20 PM
|
|||
|
|||
|
The adjuster goes behind the plate, so you adjust the cable from the diff area. If you cut the cable at the handbrake end, cable clamps can be used to rejoin the two halves.
Cheers Adrian
|
|
#3
30th August 2010, 10:24 PM
|
||||
|
||||
|
Makes sense, thanks for the reply.
The reason i had it this way is the rubber grommets were already on the cable in that position (obviously more room in the sierra) 
__________________
~ My Build Diary - http://davesroadster.blogspot.com/ *updated 7/6/11* Best bit so far: Getting it running Worst bit so far: Cutting steel for wishbones and engine mounts. Most annoying bit so far: Generator packing up half way through welding.
|
|
#4
31st August 2010, 07:45 PM
|
|||
|
|||
|
Suggestion,and it has been made before. Set the cable up on one side brake and fit cable to other side and shorten only one side by pulling the excess out of one side.
Dont forget to remove any lip on the drums and this will make setting up the brakes easier after pressing the pedal to adjust them and then a few clicks manually they will be spot on. Last edited by flyerncle : 31st August 2010 at 07:47 PM.
|
|
#5
1st September 2010, 08:35 AM
|
|||
|
|||
|
hi guys not sure if it is me or if ive had a long day, but the above answer has me totaly confused
 could someone please if possible take some pics for me in regards to how the handbrake system is set up at the rear. cheers guys Tony 
|
|
#6
1st September 2010, 07:59 PM
|
||||
|
||||
|
Basically he means instead of cutting a bit off each end, pull the slack through then just chop the one end.
I think instead of doing it that way, i'm going to pull the slack through to the handbrake lever, then cut it and join it back together with the slack removed. Make sense?
__________________
~ My Build Diary - http://davesroadster.blogspot.com/ *updated 7/6/11* Best bit so far: Getting it running Worst bit so far: Cutting steel for wishbones and engine mounts. Most annoying bit so far: Generator packing up half way through welding.
|
|
#7
1st September 2010, 08:06 PM
|
||||
|
||||
|
Thats the only pic i've got showing the slack coming through (where i'm going to cut and rejoin shorter).
The eagle eyed amongst you will notice i got my diff, driveshafts, drums and rear wheels on today, thanks to the guys at Saturn 
__________________
~ My Build Diary - http://davesroadster.blogspot.com/ *updated 7/6/11* Best bit so far: Getting it running Worst bit so far: Cutting steel for wishbones and engine mounts. Most annoying bit so far: Generator packing up half way through welding.
|
|
#9
1st September 2010, 08:37 PM
|
||||
|
||||
|
you don't pee about David - before we know it you'll be making brmmm brmmm noises.
Keep it Up......AndyH
__________________
Haynes Roadster / Saturn GRP Bodywork. Now available direct through http://www.gillhamonline.co.uk/ or contact me direct on andrew.hugill@ntlworld.com Regards..........AndyH
|
|
#10
1st September 2010, 08:43 PM
|
||||
|
||||
|
haha. Too busy building to make brum brum noises.
 ...Honest ...Honest  Thanks for this morning
__________________
~ My Build Diary - http://davesroadster.blogspot.com/ *updated 7/6/11* Best bit so far: Getting it running Worst bit so far: Cutting steel for wishbones and engine mounts. Most annoying bit so far: Generator packing up half way through welding.
|
 |
| Thread Tools | |
| Display Modes | |
|
|


 Linear Mode

