
|
|
#1
 9th July 2012, 09:11 PM
|
|||
|
|||
|
Hi all, I am just about to finish welding rear uprights and I seem to remember that there was an issue with getting handbake cable into hole in backing plates with drum brakes. Was the solution of just trimming the plate RU1 the answer?
I cannot find thread relating to this so would welcome any answers from those who have already done ther's. cheers tony 
|
|
#3
9th July 2012, 10:48 PM
|
|||
|
|||
|
hi ozzy, it looks like it will be a really tight fit to get the cable in and I don't want to finish welding before checking. I could do with clrarification before taking to college tomorrow, last nite as well!
cheers
|
|
#4
10th July 2012, 12:07 AM
|
|||
|
|||
|
__________________
Total cost so far Materials £3,150 Tools £855
|
|
#5
10th July 2012, 12:30 AM
|
||||
|
||||
|
It is a bit tight, but I guess you can grind out some space if you want a bit later, before painting the uprights. Or you can do without it, the backing plate will flex and conform anyway.
__________________
Albert Haynes Roadster FAQ | Haynes Builder Locations Gallery, build thread in Lithuanian / via Google Translate.
|
|
#7
10th July 2012, 11:20 AM
|
||||
|
||||
|
Hi Tony
Have a look at this photo ( Not the best I know ) 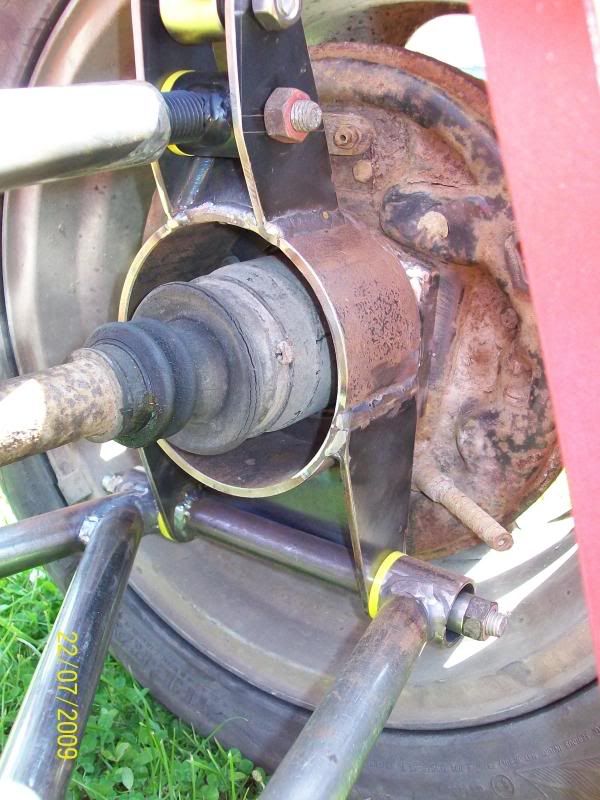 You should be able to see where the handbrake cable enters the drum backplate. With an " as per book " upright, you may need to fettle a notch in the uprights lower mounting lug to allow the handbrake cable ferrule to fit into the drums backplate. I had to cut a notch in the first set of uprights that I made. It was also noticed that the drums slave cylinder was very close to the upper upright mounting lug, this may make it a little tricky to get the solid section of brake pipe fitted. Just to clarify to all This photograph is of my revised rear upright.  Reason why I changed it ? In the first edition of the book, it was stated that the driveshafts were shortened by 10mm & that it was probably best to make the rear wishbones 10mm longer to allow the use of standard driveshafts. This never really sat with me very well, from a fabricators view, why would you shorten a driveshaft by only 10mm, when it would have been far easier to allow for the extra length elsewhere. ? The book shows that RU7 fits inside & flush with the end of the piece of 5" pipe ( RU5 ) Having convinced myself that this was wrong & that's where the missing 10mm went to, I then took the personal choice to fabricate the rear uprights slightly different. Here's how I made the rear upright pictured. I sat RU7 on top of the 5" pipe ( RU6 ), taking great care that it was level in all directions. Tacked RU8 on top of the assembly & fully welded the whole thing up. This allowed 10mm extra distance from drum back plate & the mounting lugs of the upright. I gained extra clearance for both handbrake cable & solid pipe to master cylinder. The same effect could have been achieved by simply making as per book & adding an extra RU8 to each upright. Impotrant If making the rear uprights the same way as I did, the length of the rear wishbones will need to be as per original book spec. Hope all of this makes sense
__________________
I am not a complete idiot...........Some of the parts are missing !! Ronnie www.roadster-builders.co.uk Last edited by Bonzo : 10th July 2012 at 05:46 PM.
|
|
#8
10th July 2012, 11:44 AM
|
|||
|
|||
|
Proof that a picture says a thousand words
bob
__________________
When The Results Disagree With The Theory: Believe The Results And Invent A New Theory If I had two brains I,d still be a halfwit The cave http://s1116.photobucket.com/user/my...deshow/mancave The build http://www.haynes.co.uk/forums/showthread.php?t=12669
|
|
#9
10th July 2012, 01:14 PM
|
||||
|
||||
|
Hi,
You can also weld RU8 like on Talonmotorsport's uprights. Here is a picture of the ones I bought from him. I guessed the upper part is leaning backward, and lower part frontward, so you have room for the hand-brake cable, and the bleeder of the wheel cylinder is still higher than the port. It also allows you, I think, to fit flexible brake lines with a straight male fitting (drum end) without any other transformation, extra bracket/copper pipe, and so on, which actually a big upside too. Hope this will help. Bye. Sylvain RearUprights.jpg
__________________
Sylvain Pictures of my completed Roadster https://www.flickr.com/photos/994983...7646799525542/ Build blog: http://vouchtroadster.blogspot.se/ https://cafrazx550.blogspot.com/
|
|
#10
10th July 2012, 01:18 PM
|
|||
|
|||
|
Correct me if wrong Slyvain,is that not for a disc setup in that picture.
__________________
Cost : Little as possible. Thanks : To those who by their generosity my build has progressed. Its a handmade sports car not a flaming kit car !!! If at first you dont succeed,avoid skydiving... No parachute require to freefall,only if you want to do it twice.
|
 |
| Thread Tools | |
| Display Modes | |
|
|


 Linear Mode

