
|
|
#71
 13th January 2013, 11:07 PM
|
|||
|
|||
|
I suspect your charger isn't up to the job, mine wasn't either which was why I ran the battery with the charger connected, only trouble with that is over a couple of days the battery goes flat cos the charger cant keep up, hence my move to a psu.
If you want a really fancy PSU conversion then there's a guide here http://www.wikihow.com/Convert-a-Com...b-Power-Supply I just cut all the yellow wires and joined together (+) and all the blacks (-) in a terminal block, the 250w psu is rated at 16amps continuous over 12v and never even got warm plus it has built in overload and short protection so gives a bit more piece of mind when leaving unattended. Oh your going to enjoy cleaning the electrodes  and if that saw blade is stainless make sure its all ventilated and wear gloves with the electrolyte as the chromium released from the stainless is apparently quite nasty. and if that saw blade is stainless make sure its all ventilated and wear gloves with the electrolyte as the chromium released from the stainless is apparently quite nasty.
|
|
#72
14th January 2013, 02:04 PM
|
|||
|
|||
|
Just off out to try cleaning now, fortunately its an old tennon saw, plain steel blade. I'm staying well away from stainless
 Will let you know how the PSU conversion goes, trip-switch on standby 
|
|
#73
20th January 2013, 08:01 PM
|
|||
|
|||
|
More done!
Been spending the snowy weather (in between sledging on our far hill with the rest of the village, 3 landrovers and a quad  ) in my shed working on the rear calipers! ) in my shed working on the rear calipers!Old PSU in the shed turns out to be a dud, so will drop by the local pc parts shop tomorrow when I'm in town, see if they've got an old one for beer money. Will then look at putting some form of cage together. I have noticed a lot of silt in the bottom of the bucket. Is this just old rust or is it soda crystals that need stirring back up? Now have both calipers electrolysiesedsded (or something like that), one is waiting for brushing off and stripping and the other has been stripped, cleaned, painted and put back together with new seals and oil. Haven't touched the handbrake maechanism as it looks like an absolute sh1t to deal with  . Also had real problems putting the final dust protector in place . Also had real problems putting the final dust protector in place  after the piston was in place. Gonna try a different order on the nect caliper; put the dust in place and then slide the piston through it. after the piston was in place. Gonna try a different order on the nect caliper; put the dust in place and then slide the piston through it.Piccies to follow!
|
|
#74
20th January 2013, 08:37 PM
|
|||
|
|||
|
Oscar just a quick thought and apologies if you did but did you connect the green wire to the case to simulate the on button? I forgot to mention it earlier.
The sediment I've always noticed has been crud basically, but one other thing I did find was a small pump located in the top giving a very gentle circular motion seemed to help a little. Here's a pic of mine after a couple of pieces have been done so waiting to be cleaned and showing the pump: 
|
|
#75
20th January 2013, 09:21 PM
|
|||
|
|||
|
Hey V8,
Yeah, read the link about building a power suply and connected the green to a black. Asked my dad after I'd spent time sorting it all and he confirmed that as far as he knew, it was a dud. Thats a lot of rust built up on your cage! For some reason mine is mostly green... Gotten round using a cage by turning the piece frequently. Nice idea using the pump, could easily add a large coarse filter to clean the surface a bit at the same time! Will have to be investing some time into this before cleaning up more parts.
|
|
#76
20th January 2013, 09:44 PM
|
|||
|
|||
|
Hmm a filter, I played around with that idea, it needs an extremely fine medium such as sand or ideally DE powder (0.5 micron filter rate), I have both and I tried with the sand but found I needed a sealed filter cannister to be pressure fed by the pump, gravity couldn't push the water through quick enough. Tried also with standard filter mediums but the suspended sediment was too fine so was fairly ineffective. In the end I figured for a one off it was going to be too much effort or I was going to end up with a floor full of skanky water
 
|
|
#77
21st January 2013, 05:46 PM
|
|||
|
|||
|
Here be some pics as promised...
Cleaned and painted caliper next to "Unclean!" one:  Caliper being put with sliding-bit-that-holds-the-pads, Threadlock in picture to keep Mr IVA happy:  And the effects of the electrolysis on my scrap saw-blade! 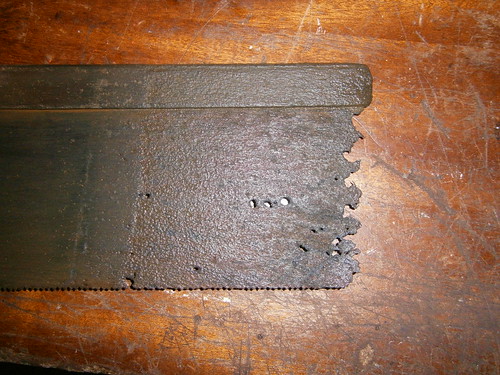 Holey mother of god! (sorry, couldn't resist )Went into town today, got a brand new, unboxed PSU from local computer fixers for £5. Can't get grumpy at that price! Also picked up some bucket seats that I won on Ebay, 2 seats for £40 and he even threw in a pair of brand new 4-point harnesses that he didn't want! The mounting holes are 16" apart and the seats are about 18.5" wide to go in my gap of 17.5" between the rails. Hoping they'll squeeze in, will find out tomorrow.
|
|
#78
22nd March 2013, 09:48 AM
|
|||
|
|||
|
Just read your build thread looking good
I cant jump in and comment as I have yet to start mine hopefully will be early next month (goto wait for payday lol spent a fortune on tools welder etc already)
|
|
#79
14th July 2013, 02:34 PM
|
|||
|
|||
|
Still making progress on and off. Kinda stalled a bit over the spring, lost enthusiasm and time was used in other matters (helping Mother sort out the farm inheritance, looking up all the old family history we're finding out about through old papers, can trace one branch back to 875!)
Since my last update: -Both brake callipers cleaned, painted, rebuilt and stored -Was much easier to push the piston through the final dust seal, still a pig though... -All rear and front hubs cleaned, greased and painted -All wishbones made and painted, also stored! -Picked up a 2wd mt75 gearbox, cheap off ebay, stored in the back of the shed -Made the last 2 panels for the floor and welded them in place on Thursday/Friday. Made them out of the rear floor panel that covered the spare wheel of the donor, so come with a nice corrugated shape for grip. -Entire chassis (except the parts not yet built(not enough room for them!)) has one coat of red primer, and most has one coat of black hammerite for protection. -Got a couple bucket seats off ebay for cheap, had to reduce the width by 70mm to make fit. have done one with great success so far! -Sorted seat mounts/brackets, all fits bootifal! Hmm, only just realised how much I've done. Knew there was a good reason for keeping a build log on here Immediate Plans: -Finish headlight mounts (tube came in post yesterday) -Finish first hammerrite coat -Get chassis out to locate positions of engine and gearbox mounts -Weld mounts and rest of rear end -Finish painting chassis -Start plugging the puzzle together! Long term plans: Drive around in a home made car in more of this gorgeous weather!
|
|
#80
21st July 2013, 10:48 PM
|
|||
|
|||
|
More work over the last couple days, this warm weather is a curse and a boon; really want to get my build moving, but just dont have the energy for full on progress...
Anyhoo, cut out the box and replaced it with beams in the passengers side for the seat mounting (badly thought out initial idea I've now replaced). Cleaned the Diff and put a coat of etch primer on it. Painted various beams on the body, used up my Hammerrite so cant do any more untill I get to the shops. And half an hour ago I fi8nally got the Chassis out of the shed so I can finish fabb'ing the back end! As soon as I've worked out how to with my new phone (5 months!) I'll upload more photos.
|
 |
| Thread Tools | |
| Display Modes | |
|
|


 Linear Mode

