I've been playing with the sewing machine again this morning :o
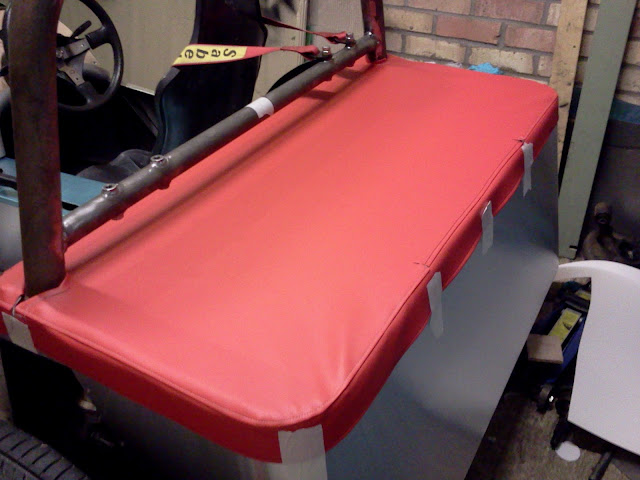
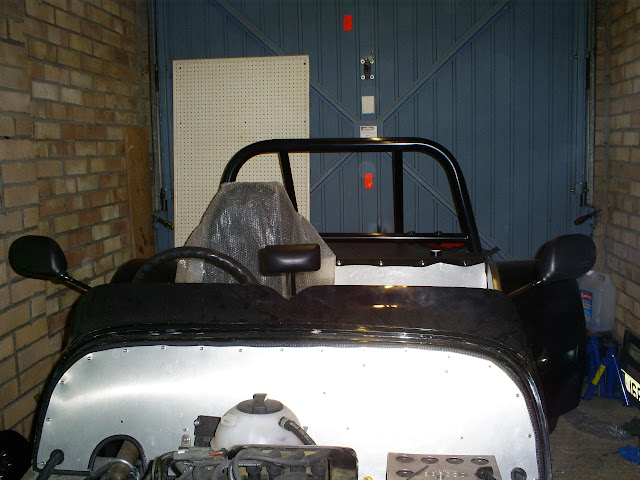
Thought I'd have a go at doing some diamond stitching:  I do like a bit of diamond stitching, but I'm not quite sure whether it's going to look right on the roadster or not :confused: My current thought is that I'd make panels like this to go between the rails on the chassis sides, and also run it down the sides of the tranny tunnel (with plain black vinyl along the top of the tunnel). Is it going to be worth the effort, or just look stupid? |
I like it, especially as I was looking at the Lucra cars this morning. The 7's are a little plain on the inside, but this I like :)
|
You could earn some dollar doing that John :) it certainly looks rather professional.
|
New Lucra on the drawing board with silly HP,tunable Corvette engine's I believe.
|
That looks really good. Very morganesque. I was planning on carpet triangles in there! Will the tubing be ok for Iva ? Ie are the corners not too sharp?
David |
Thanks guys! I think I might make a couple more panels before I decide.
It's never going to look anything like as good as that Lucra though :eek: I'm sure plenty have passed IVA with the frame tubes exposed on the inside haven't they? |
Spent the last couple of weeks fitting and wiring my headlights and front indicators.
That took a bit longer than I expected...  Turns out I had originally welded my headlight brackets on in the wrong place and the front wheels hit them on full lock :rolleyes: After umming and arring for months on what to do I ended up just cutting the end of the brackets off, and drilling new holes in them for the headlight bolts to go through. To cover the resulting sharp edges I pushed on a couple of rubber end caps before fitting the headlights (still need to put some trim around the headlight bases). 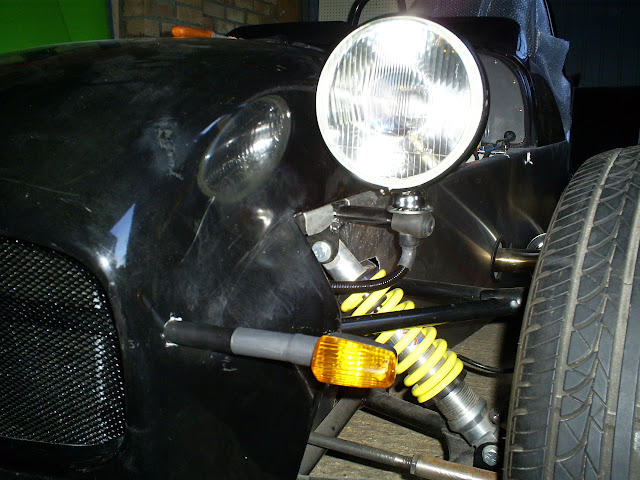 For the indicator extensions I went locost and used a metal tube from my old bed frame (I kept hold of a couple after dismantling it, thinking they'd come in handy for something!). Rather than two individual extensions I went for a single tube running the whole width, with a couple of nuts welded into the end to screw the indicators into. To hold it in place I just used sikaflex on the inside of the nose cone (and sikaflexed my front grill in place while I was at it). Also fibreglassed some cable tie bases in to the nose cone to keep the wiring tidy.  I've changed the wiring slightly since I took the above photo so the wires for both indicators come out of the same hole in the tube, and both run down the side with the tie bases so I only have to disconnect the wires in one place to remove the nosecone. |
Hi John,
Blimey the're some big lamps you got there....:eek: Looks like you've been spending a few hours in the garage lately... The diamond infill panels look sweet, are you planning to fit them or are they just work in progress?:) :) As always a cracking job...:cool: |
when I bought my headlamps, I wish I had bought these with the builtin turn signals. A friend of mine did, and his car is looking much cleaner on the front.http://www.yogisinc.com/index.cfm/pa...od/prd7481.htm
|
They're not that big Johno!
They're the standard 7 inch ones, they do look a bit big in the photos now you mention it, must be a trick of the camera or summink :) The diamond panels were a bit of an experiment and I haven't got around to making any more yet. I'm fairly sure I'll end up fitting them or something similar at some point. Those headlights with built in indicators area great idea, if not a little late for me! Not sure I'd want to pay that much for them though :eek: |
Quote:
Cheers Stot |
The stalks are only needed to get the indicators within 400mm of the edge of the vehicle.
If they were built into the headlights that wouldn't be a problem as the headlights need to be within 400mm of the side anyway. I suspect where they would fail IVA is with the headlight beam pattern, as presumably they 'kick' the wrong way with them being from the US. Still a nice idea though! |
Davey fitted some all in one units. Not cheap but very neat venom 5, they have side light head/dip and indicator. I think the fronts only need to be visible from the front, the side indicators deal with vision from other angles.
 Bob |
That's my mirrors fitted - one more thing ticked off the list :D
  |
Stupid question I suppose but how much fuel pipe did you use? Just ordering some now.
|
Quote:
If you mean the rubber pipes, I've no idea! |
Quote:
|
Quote:
I was running low on red vinyl, and chopped the red cover up the other night to make some more interior panels... |
Speaking of interior panels, I've spent the last couple of days in front of the sewing machine making some more :o
 Just finished fitting my seats and belts too:  |
Looks ace? What seats are those? There not your original seats are they??
|
Aww, very stylish.
|
Quote:
They're the Cub Sport L7 ones from Kit Parts Direct. |
That looks good. It looks like east coast auto did your panels. Are they gbs seats?
David |
Quote:
Are the L7s comfortable? Edit: Oh wow it's £165 for a pair! Right then. I think I'll get a set. :D Don't suppose you could tell me the height of the belt holes and the width/centres or the holes too. cheers. |
The bolt holes are roughly 330mm front to back, and 290mm side to side.
The centre of the seat belt holes are about 550mm from the top of the seat base, and about 600mm from the underside. They're not nearly as comfy as the MX5 seats, but I'm not going to complain too much for the price! I recon they'll get better with a bit of use. The fabric and foam is quite stiff at the moment, and will probably (hopefully!) give a little over time and mould itself to my behind! |
Quote:
I'd be well proud of that. Don't know if I could learn or have the patience how to do that.....LOL |
Thanks Johno,
I didn't find it that hard to pick up really, I certainly find it easier than welding! My main problem is dealing with the limitations of my weedly little machine, it was really struggling with the seams along the top of the tunnel and it all went a bit wonky :rolleyes: Could do with something a bit more industrial for car upholstery really! |
Those panels do look the dogs John ....nice one on a bit of innovative creativity, keep it going bud.
|
My old man was a tailor and his Singer machines had 1/2 horsepower motors on,not a good idea to put the pinkies near.:eek:
|
Quote:
Did a bit more upholstery yesterday and made a panel for the seat backs: 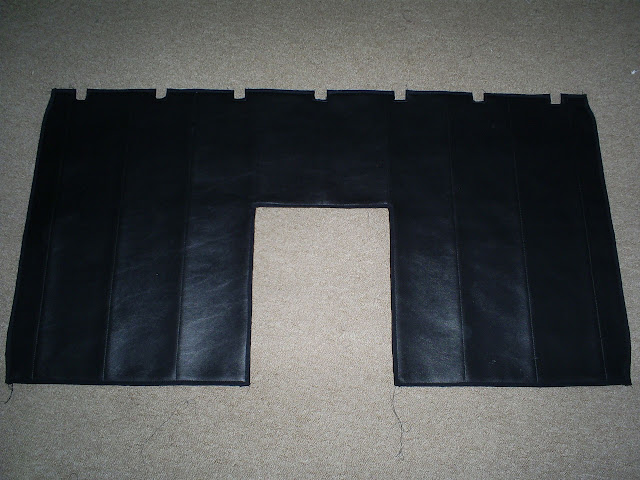 |
I love this stuff, might have to copy some of it.
Cheers Stot |
Quote:
Feel free to steal at will! Here's some more bits I've knocked up on the sewing machine, these are purely to keep the IVA man's balls at bay. Cover for my relays and fuse box:  Seat belt nut covers:  Speaking of the IVA man's balls, these polystyrene ones turned up in the post this morning, should hopefully take some of the guesswork out of what I need to trim and what I don't: 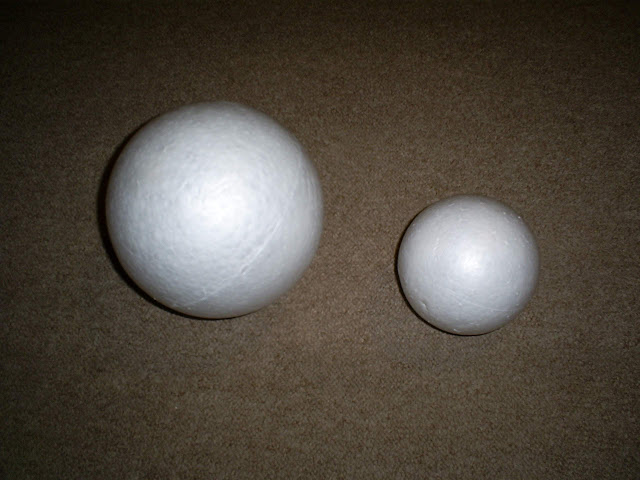 |
Handbrake cables
Have you got much clearance between the handbrake cables where they come out from the calipers and curve past the rear panel. Mine touch when the suspension is fully compressed. Where the cable is attached to the calliper have you bent 90 degree bracket or have you managed to get enough clearance by attaching the cables to the diff mounting rubbers?
Thanks David |
Quote:
I haven't got a lot of clearance there, but the cables didn't quite touch the rear panel last time I checked. I do remember it took me a little while playing with the position of the brackets on the diff rubbers and bending them a little bit until the cable was clear. |
More bl00dy wiring... (feels like I've spent more time wiring the car, than building it!)
Finally got around to wiring my dash up this week.  Amazingly, most of it seemed to work when I plugged it into the car. Just need to make a couple of small tweaks to my CAN interface modules to get everything displayed properly. Might need to take it for a short drive to test the speedo soon :D |
Looks very neat. I just spent 4 hours in the garage shortening about 20 wires, I know what you mean!! And I'm just starting!
|
That's pretty good going Chris :D
One tip - if you're ripping out the carbon canister thing, it might be best to leave it's valve connected to the loom. I removed mine and it's wiring... After running the engine for a while yesterday I checked for fault codes and the only one I have is for a broken evap valve :rolleyes: |
It would of been good going if I hadn't woke up this morning and had the great idea of changing the position of the ECU. Today I spent 8 hours chopping the loom up and labelling every wire in it! I just couldn't take the debilitating mess of wires any longer!!!!:confused:
|
Oh and thanks for the heads up on the tank valve. I was looking at that just today and wondering if the ECU would care if I deleted it. Did it affect the car at all or was it just a fault code with no ill effects?
|
Quote:
|
| All times are GMT +1. The time now is 11:58 AM. |
Powered by vBulletin® Version 3.6.4
Copyright ©2000 - 2025, Jelsoft Enterprises Ltd.