Noted :eek: .
|
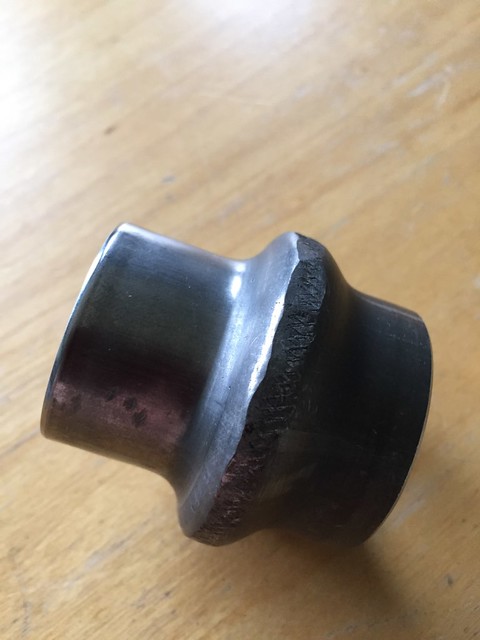
Finally got all the bits needed to rebuild the diff. I was waiting on a new crush tube and nylock nut from the local mazda dealer, parts kid there is useless but fortunately my good friend works there and sorted out the correct parts for me. I did attempt to reuse the old crush tube by compressing it in a vice and I did lengthen it by 0.5mm which would probably been ok but as it was only £10 and available I got a replacement.
  So last night I set about reinstalling the pinion shaft with the new seal. You have to torque up the nylock nut until it starts to actually crush down on the crush tube, unsurprisingly. I made a diff nose holder out of some left over 50mmx3mm angle and some bolts and set to work. 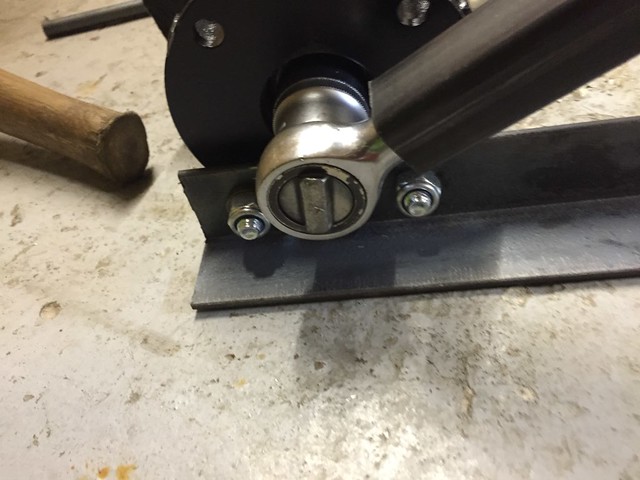 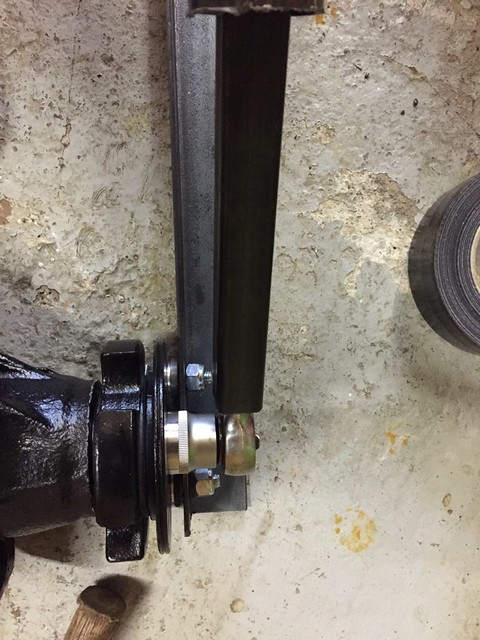 continued...... |
Because I was reusing the the old bearings I had to put plenty of effort in to crush down the new tube being careful not to go too far by doing 1/8th of an inch turns and then checking the drag torque.
 10 inch lbs was enough for me on used bearings, the guy in this thread did 12 in/lbs on new bearings but 10-15 in/lbs is within a general range apparently. http://forum.miata.net/vb/archive/in.../t-171048.html  Job done! Next the actual LSD install. :D |
Was there a reason you pulled the pinion out? If you leave it in and just swap the ring gear onto the new diff you don't need to worry about shimming it. You may need to re-shim it now you have that new crush tube in there which will be a right pain getting it all together measuring everything, and if new shims are needed stripping it all back again, new shim, rinse repeat. :eek:
Cheers Stot. |
Quote:
Pictures later.:) |
The hardest part was getting this dial gauge in just the right place. I ended up taking the magnetic base off and bolting through one of the diff flange bolt holes.
 Once I had set the backlash and checked it at 12,3,6,9 o'clock I set the preload which was a little more difficult as very small turns of the bearing adjusters made a big difference. I then rechecked and repeated process until I was happy and then fixed to ring locks in place. I did a paint test on the teeth and was happy with the patterning. I used new 12.9 strength allen bolts to reattach the case with spring washers.  I've also had made these stainless steel crush tubes for when it gets bolted into the car. The last diff fitted was just bodged in with whatever I had lying around. 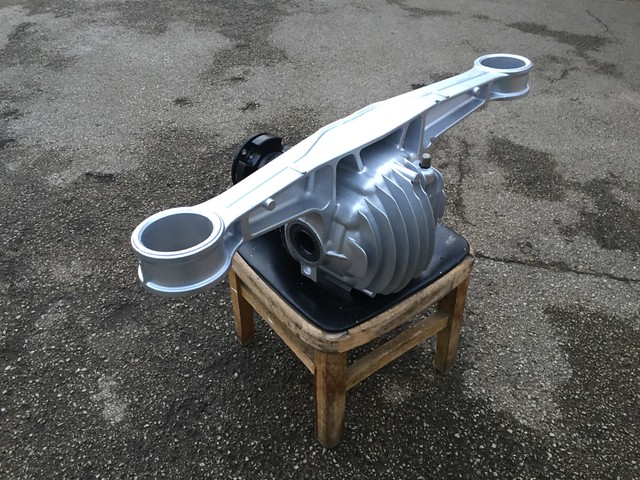 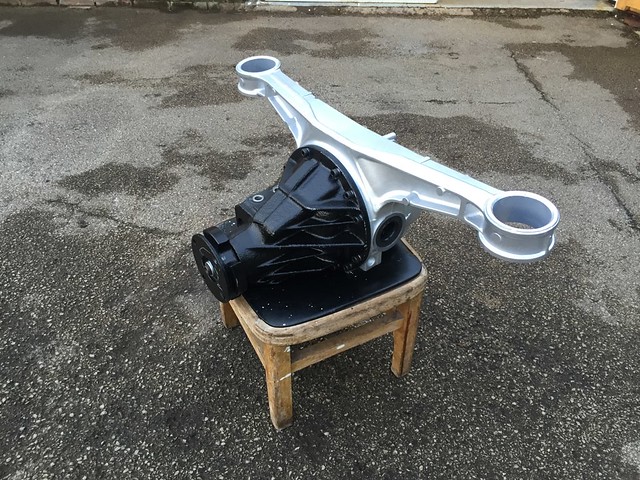 |
Having some inspirational thoughts about my possible failures and potential solutions.....
1. Something to do with the handbrake or rear brakes that I can't sort on the day. Can't fix this as it is not broken. So put this down to paranoia. 2. I have protected well but not grommeted the wiring coming through the bulk head. Going to cut the scuttle slightly larger around this wire with a dremel and glue fit rubber trim!:D 3. Front indicators are too far from the widest part of the car. If this is an issue I will remove the indicators and fit stalk indicators the the side of the indicator pods! :D 4. They don't like the radius edges of the modified caterham hazard and fog switches when in use. I measured the hole and the projections and it only needs to be blunt not radiused which they are.:D 5. They don't like the stick on side repeaters on they aren't bright enough or too low down. I've ordered some others that should be IVA OK which I will fit on the day if need be.:D |
Quote:
  |
 Fixed...:( |
Apparently you need a side light tell tale. IVA manual mentions a side marker lamp tell tale for long vehicles but I just found this thread and I'm not risking it. I'll reinstate the binnacle illumination on headlight usage later.
http://www.locostbuilders.co.uk/foru...php?tid=146174 |
You need a tell tale or the instruments to light up with side light, most do. IVA Manual refers to them as Front and Rear Position Lamps in section 22.
Quote:
Stot |
I did this with my front indicators, mainly to cover the visibility issues.
I didn't have any problems with them being too far inboard.  Iva indicator extension by Series1Landy, on Flickr Iva indicator extension by Series1Landy, on Flickr |
Quote:
Quote:
|
Bollocks, just realised why these e11 marked indicators are so dim. Those indicators are off my fathers old mobilty scooter. It runs two 12v batteries in series, the bulbs in them are 24v 10w. Doh.:rolleyes:
Just ordered some 12v 20w halogen replacements which will fit. OMG I'm going to be admitting myself to Ashworth hospital (5 miles away) for mental health care by the time this IVA date comes round.:o |
Oh here we go! Here's another fail! Fog light warning/indicator should be amber not blue. Two options, remove the bulb and rely on the binnacle but i think they like the indicator to be as close to the switch as possible, or, fit an amber bulb! Guess what I just ordered!
Ten little ducks went swimming one day over the hill and far away , mummy duck said quack quack quack quack, but only nine little ducks came back....... Oh my centre caps have a sharp edge too.....  |
Quote:
 Cheers Stot |
Bulb arrived today so it's fitted anyway.
 Got paranoid about my crossed over handbrake cables. I did this to reduce the curvature but tonight I thought they might not like them touching each other. So I got creative with 4x 10mm pipe clips. 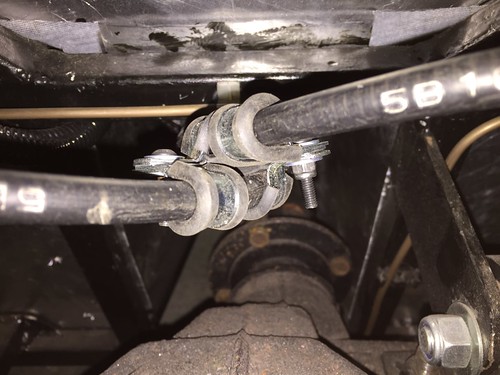 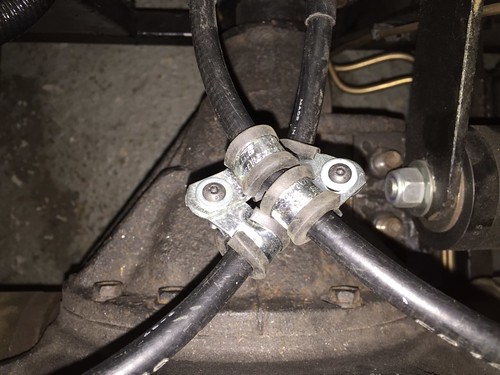 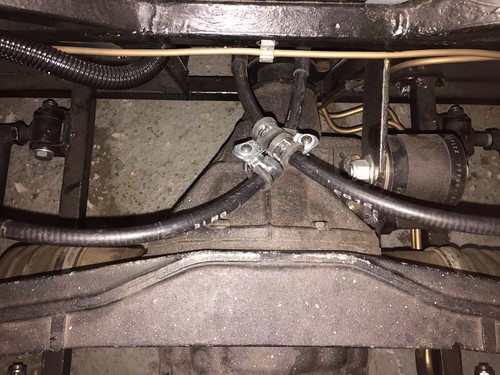 Dash is all back in now with black stainless round headed allen bolts. |
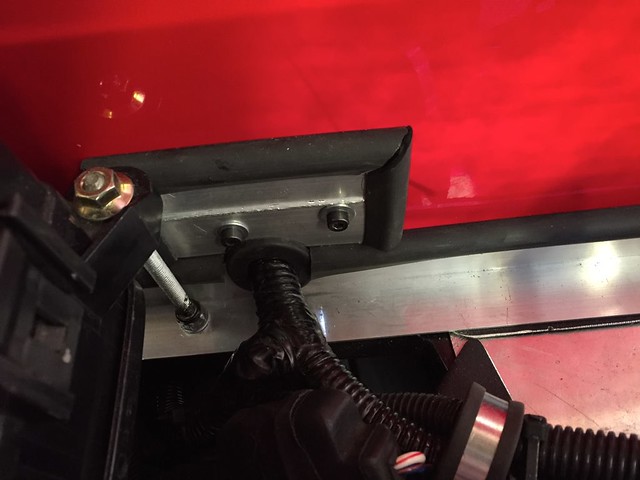
Redone the fuel tank vent as I had no proof that the hoses I had used where fuel compliant. They were from the donor vehicle but I've figured out another way to make the unusual arrangement work. Originally I was going to vent to the rear of the fuel tank but realised once the bodywork was fitted i had no space to do so.
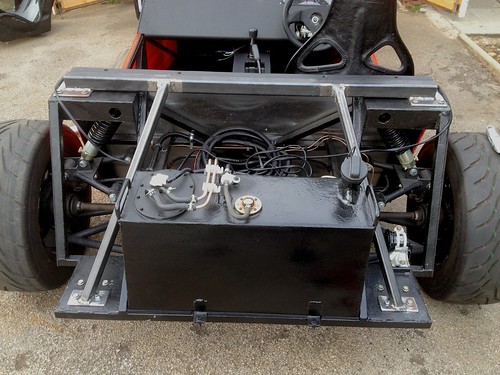 Now it uses standard 6mm I.D. fuel hose. 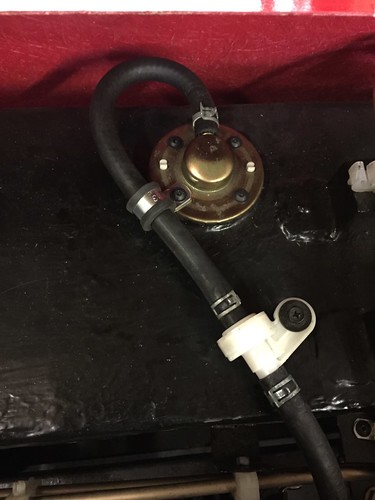 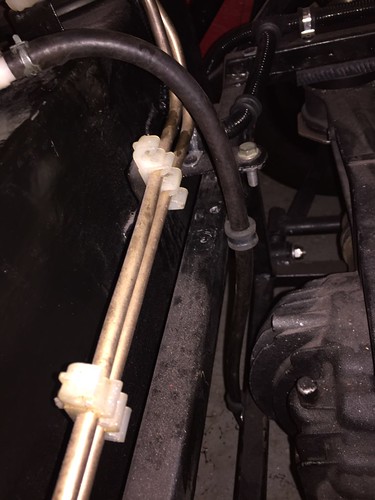 Also I adjusted the height of the side repeaters so they are above the 350mm possible minimum height.  I just rotated the mud guards forwards, they still meet the wheel coverage requirements. New brighter front indicator bulbs are fitted, not much left to do, I think?!? |
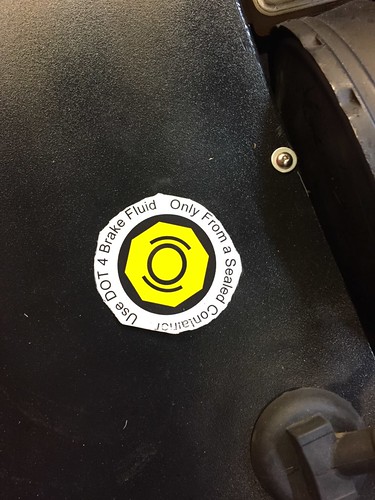
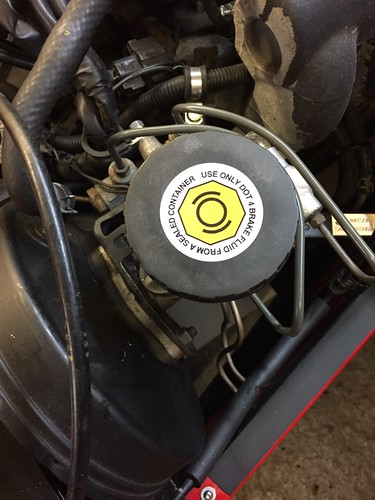
I made a mess of my original brake fluid warning sticker so I ordered another from DAX, smoothed off the reservoir lid and made a much neater job of it.
  |
PASS!!!!! Just about, had to use my words alot!
|
Well done Chris, great timing for Spring.
Cheers Stot |
Woooooooooooooooooooooooooo!!!!!!!
Nice one Chris!!! :D:D:D |
Quote:
|
Thats great news Chris ....well done bud now get your skates on and get through the paperwork side of things and you will be sorted for summer, then the smiles and grins only get bigger when you go out in it
|
Well done must be a great feeling
|
Well done bet you cant wait to give it a good thrashing now
|
That's incredible. well done!!!!! - and thank you for all your posts, I've learnt so much from them I hope to do the same
|
Well done Chris, congratulations! :)
|
Well done Chris. Good luck with the paperwork! Let me know if you need any help with how you fill it out.
You need to send it off now so that it will be back ASAP and you can then realise how much fun they are David |
Thanks everyone. I was amazed, after the possible fails that were discussed, that I passed. I will write a full report for everyone as soon as I can as it was a very interesting day! Just got back after dropping off the transporter (420 M62 miles in 24 hours with 3 hrs sleep) Having a celebration glass and a bite to eat atm. Felt great getting the pass though, been on high ever since. :D
|
Well done good lick with the paperwork just in time for the better eeather
|
Congrats with the pass. Have fun with the dvla and then driving it.
|
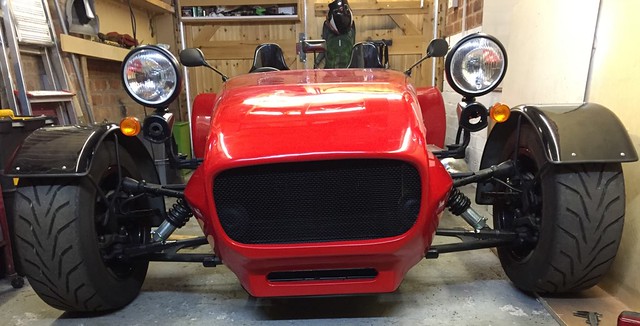
Here we go then. On Monday the 16th I went to work in the morning and then discovered I had to leave early as a delivery of young lylandii arrived that needed planting asap. Not ideal having to do gardening just before my test day but I left work at 2pm and got that done and out the way. Next I needed to pick up my wife from work and then the kids from school. We are a one car family so this had to be done before I went off to Bradford to pick up the car transporter. I left at about 3:30pm with my eldest son (11) for company.
The drive was ok it was 80 miles, but most of it was M62. Its the highest motorway in England so you get a lot of traffic speed variation due to the climbs and descent. I bloody hate it and have driven it lots as I used to go to Leeds Uni and travelled it back and forth a lot by car between there and Liverpool way. Bradford traffic was just gridlock between the M606 and the transporter location, but TomTom got us there at around 5:30pm. Pali was the owner of the transporter and we quickly did the paperwork and loaded up my car onto the back of it. He showed me the ropes, literally, told me a few dos and donts and we were off back to the motorway. Hire cost was £105 with a £250 excess on the insurance, I also left a deposit of £100 just incase the fuel was low on return. Return journey was uneventful apart from my son introducing me to KFC at the services. We chatted most the way home in the slow lane doing about 50mph. Everytime we went over a bump my son couldnt help but keep checking the car was still there. I felt like I was being really badly tailgated by own car. The handbrake on this thing had about 2ft of travel and the gear stick, I noticed, was the perfect replica of horses erect penis! So home we arrived about 8:00pm I think. Eventually I got it reversed in outside the house on our unusually wide driveway. Unloading went smoothly with an audience of my family out the kitchen window. With the family car now out the way it was time to empty the garage! I had gone through everything I might need or even ,wouldnt ever possibly need but you never know, and had organised it into boxes. I even took the CO2 fire extinguisher, the original steering wheel from the MX5, my soldering iron, a bottle of butane, literally every tool I had used in building the car apart from the welder. Which I probably would of took too, if I could of. So all of this fitted on the passenger seats and floor and I could still about change gear and use the handbrake. Now it was time to load up my pride and joy. I asked the missus to help me get it lined up but it was getting close to her bedtime (8:30pm). Loading went smoothly the sump just cleared and it was on. Apply handbrake, drop clutch, put it in first, engine off. Make sure the handbrake is on good and tight. SNAP! WTF I just snapped my handbrake cable. M*****************R!!!!!! To much adrenaline pumping through my system and Id managed to break the cable that goes from the handbrake to the cables for each of the rear wheels. Now I had a long history with this handbrake setup, I was never happy with it. Id positioned the handbrake so that I wouldnt need to shorten any cables, or I thought I had. The plate that positions the two rear caliper cables could of done with being 20mm further back because although the handbrake worked I had no adjustment left at the handbrake end I had to just wind the caliper pistons in very close the the discs. Not ideal! i had a lot of travel in the lever itself and I wasnt happy with it or the potential for drag in the off position. So I read up and decided to shorten the cable I did this at the HB (handbrake) end as the other end required a lot more work. This was not a good idea Id cut the cable slotted the thingy and welded the cable into the slot. This is were it had failed due to fatigue, theres a reason they dont come from the factory welded, I know that now! So Im up s***t creek, but I might just have a paddle! Me being me I ordered a brand new HB cable and left it in the bag for resale if I didnt need it. Even though I was probably, in my mind, now going to now fail on the HB, I needed to get the car there for the test and needed the HB to load it on the transporter! So 9:30pm at night Im outside in the dark, thank good I sorted out the outside lights, fitting a new cable and adjusting the brakes. 10:30pm Im reloading on my own this time. All strapped down and all the kit back in the cab it was time to put the rain cover on, as of course I wasnt going to get away with a rain free 24hrs. Took ages but by 11:30pm I was all locked up and the family car was guarding the driveway entrance and I was in the house making sandwiches and having a beer to switch off my racing mind. I went to bed at 1:30pm but was going to have to be up early. To Be Continued .. (just like Top Gear Haha) |
With rear discs and handbrake its sometimes better to have a little more than usual travel as the levers in the calipers need to move a fair amount to give good clamping force.;)
|
;)
Quote:
Just out of interest I assume there was is no DVLA INSPECTION and I can start making some small changes! ;) |
WAR AND PEACE PART 2
My Alarm was set for 5am, I decided to change the default sound to something more gentle on my phone, and then in no time I was fast asleep, OK I had three beers. 5am rolls around and the alarm scares the s**t out of me and the wife as we both had no idea what it was. Doh. Up at 5:15am, large bowl of Muesli, shower and a cup of tea and I’m out the door by 6:15am and on my way, waving goodbye to my the entire family. Ahhhhh. So you’d think you’d be able to travel 50 miles on a motorway at 6:30am in relative peace and tranquility and get there within the estimated time of 56 minutes wouldn’t you. Wrong the M62 was absolutely rammed. I couldn’t believe it, I was shouting at all these weirdos going to work at this ridiculous hour. I’m not a morning person can you tell? Anyway I got there with 5 minutes to spare, parked up and went into reception. I then remembered I’d left the booking number in the truck but as I was out there a yellow coated inspector asked me if I was the 8am and told me to unload and drive round the back. Unloading went smoothly. Nothing to report here and I was round the back parked up with the engine running. I was asked by a younger inspector to leave it running and remove the bonnet. He was nice, seemed interested in the car and ask if it was all my own work. I proudly said “yes, apart from the bodywork and wishbones.” they seemed impressed and then he recognised it as a haynes roadster so they are obviously aware of the marque. At this point my inspector for the day came out the office, he had a look around asked for the V5 for the donor of the engine. I thought this was odd but explained I had a letter to prove engine age. He seemed happy with this and then asked for my paperwork. I wasn’t sure what he meant and he asked if I’d checked in at reception. I explained I was going to but then someone told me to unload and get it round the back before I could. Mmmm he didn’t seem to happy and said “Were not getting of to a good start are we?” I wasn’t sure if he was annoyed or just jesting, it was too early for me. So he went of to the office and got the necessaries. Next I was asked to get in the car and hold it at between 2-3k, he was starting the emissions test I gathered. Insp. “Is it warm he asked”, Me “yeah it should be” Insp. “MMM it’s at 0.8 needs to be down at 0.2” At this point I was running through possible issues as the car had always stunk of fumes at home and then I noticed it said BET on the screen, I was sure that wasn’t the right test for this engine but it was early, I hadn’t had much sleep so I said nothing. He then asked me to rev it more and get it really warm. I did this and we tried again. Same. At this point I asked if the was a CAT test or a NON-CAT test. He said “CAT” I said “Errr it doesn’t have CAT, it will fail a CAT test without a CAT” I then went on to explain the letter was there to prove the engine was made prior to August 1995 so it could be tested using the NON-CAT test. He agreed but said the machine kept coming back with the CAT test when he entered the information. I was thinking “WTF” but good enough he said we’d have a look at it later and if it still does it we will ignore it, “Nice one!” I thought. Up next was a weigh in on some new scales they’d recently purchased. I think they had arrived that day and they were keen to test them out. Not sure what figures they had as I was too busy jumping in and out of the car and remaining still etc. On to the lift, this was were they did the light tests etc standard stuff but he seemed to have a special order in which to find any earth of other faults with the wiring. He asked for sidelights then asked for the rear fog. I duly obliged he then said “ have you got your fog on, are we having problems?” I said “no, it is on. Do you want me to turn the dip beam on?” Maybe it was a bit early for him too.” or we had a little communication breakdown. For those that don’t know reading this. If your fog works with your side lights, that’s a fail. It should only work with dip and main beam. Next were going up in the world and I’m asked to do a few things. Then I’m asked to pump the brakes and yank on the handbrake repeatedly. I stop after 5 but he asks me to continue. Thank god that cable snapped at home. Although I would of had the replacement with me if it had. :-) At this point he starts to have look under the front of the car and I’m asked for steering lock each way. He then asks about the steering uj bolts and if the UJ itself is a threaded type or not. I couldn’t remember and he informed me that the nylock nut used was no where near fully threaded up. And he was absolutely right I’d stuck a bolt in and thrown a nylock on but the nylon was not on any threads. He said If I had a longer bolt I could fix that later. ok cool. At this point I’m thinking we could be good here. Next thing is he pops his head out and announces that my column is far to straight and will be like a spear in an accident. Uh oh, WTF I’m in trouble here. I say “really? I have two u-joints and have retained all the collapsible features on the mx5 column. He said it doesn’t matter in a front end collision it will come up right through you. Bollocks!!! Back down on the ground and we’re checking the headlight aim. They’re both a bit low so he lets me quickly adjust them and on we go to the traditional weighing roller thingies. They compared them to the other scales and there 1-2kg out. Next the rear cover came off and he was checking out the tank breather which I had actually redone a 4th time in 6mm copper tube. The young inspector asked if I’d made the tank myself to which I proudly admitted to, I hastened to add that it was all metal, there was no sealer or bog in there. My inspector said “Yep that’s spot on!” He then informed me that during the brake/indicator test on the rear clusters that there was bleed from the indicators into the brake section slightly. I asked what would cause that and he said usually a bad earth design or the separator was absent. I explained that there was 3 separate earths at the rear and the clusters were from caterham. He didn’t say anything and we moved on to the brake test. I’m pretty dejected by this point the last thing I thought I’d be had on was the column extension. I was running through how I could get round this and redesign it but I had no chance of fixing this without major dismantling and redesigning. And he had a point it was kind of looking like it might kill me. Hmmmm! I then overheard him speak to another inspector, he was sat in the car looking around. “It’s simple but effective isn’t it, purposeful.” I think what he was saying that there was almost nothing to test interior wise. It was so basic in there that there was no need to get out the inspectors “big balls”! Brake test wasn’t looking good either, he was making negative noises about the power of the brakes, on went the foot pressure thing and he said “That servo is not working!”, OMG! He went through the rest of the test and I was trying to get some answers about the servo issue. We had a chat, he said if a car has a servo it must work just like the horn, and then I came up with the idea that it could be the vacuum hose. It has a little oneway valve inside and I remember all those years ago when I modified it and refitted it I couldn’t or didn’t figure out which way round it should go so I just guessed. It was something I think that bothered me at the time but it must of been lost from my mind over time. In fact I distinctly remember looking over my shoulder at the car and eyeing the servo hose but I couldn’t put my finger on why it was bothering me, weird, E.S.P. ? Anyway I asked if I could check it and fix it to redo the test, but he said it might pass I’ll have to enter the results into the spread sheet. I don’t think he seemed keen on redoing the test, not sure. Anyway it was morning break time I had 15 minutes to remove all the suspension nut covers and check that hose. Well blow me on very close inspection of the vacuum hose I found a very faint yellow arrow with the letters ENG on the end of the arrow and it was pointing in the wrong direction! Haha a victory! I then got onto that UJ nut but didn’t have time to sort it before he was back. I told him I had sorted the servo and he seemed happy with that. He then mentions another not fully home nylock nut on the front suspension, the lower ball joint one that comes up through the bottom of the wishbone. I agreed but also let him know that bolt went through threads in the joint itself and that they had loctite on them. The nut was just so I could fit a cover! He was happy, then mentioned a couple of others that were close. At this point I asked if I could speak to him about help and advise on my column extension issue and how to fix it. I offered to remove the pedal cover so we could see the rest of the column and UJ. I ran through the all the safety features of the upper column and explained that I had put serious thought into making it safe. He asked me to turn the steering back and forth while he looked at the UJs. I mentioned that the angle of deviation from the centre line should be 10˚ according to the manual “shouldn’t it” I said. I was trying to say in as un-confrontational way that I believed the angle was 10˚, if pushed I might of asked him to measure the angle, so I new what I needed to do to get it to pass! At this point he looked like he was possibly reconsidering his previous judgement but he gave nothing away and disappeared off into the office. When he came back he jumped in to take it for a blast and to check the mirrors and said he’d see me around the back for a noise test. I told him to enjoy himself, but not too much. He laughed! At this point I’m completely in the dark about a pass or a fail. |
WAR AND PEACE PART 3
He arrives at the rear and tells me Youre going to have some fun in it but you'll need to wear goggles due to stones flying up. I said Id be wearing a bike helmet and lied that maybe Id fit mud flaps on the front. He sets up the noise test and it is a doddle 4600rpm 92db! Easy I said! I told him I had made an exhaust before that one and that it was a complete abomination that made me laugh every time I looked at it but it sounded great. He smiled and then he was gone again. I still havent fixed that UJ bolt, he comes back and tells me I can load up, oh right I was just fixing that UJ bolt I say. Im shocked that it is done and over it was only 10:30am, so Im emptying the the truck cab trying to find a good solution and then it hits me. As my inspector seemed to have such a hard-on for locktite Id just use a thinner nut with some blue stuff. Job done!! Im all done when the inspector returns, he has a piece of coloured paper rolled up in his hands he asking if I used a spring washer on the bolt and I say no loctite, bollocks doesnt he like loctite anymore?? "Well" he says Im pleased to say youve passed! Ahh yes, You Beauty! Thank you very much I say! Although you would be better to fit another joint in the column it should be fine and will pass over your shoulder in the event of an accident. he advised me. Youve obviously put in a lot of effort and it shows so, well done, not many get a first time pass you know. Dont I bloody know it. The Inspectors there on the day were friendly pleasant with an air of authority but they werent lording it about like you might imagine. They were fair but stringent on the requirements and I now have much better brakes, and a safe steering column and will feel much better about hooning it about on the road. Thanks Gary (VOSA Inspector) I hope these posts have been informative for anyone else heading for an IVA. This is also a very good read. http://www.autobionics.co.uk/IVA.html |
Now thats what I call Jammy.....great write up Chris, like a bluddy roller coaster ride.
|
|
Nice one !
|
| All times are GMT +1. The time now is 05:30 PM. |
Powered by vBulletin® Version 3.6.4
Copyright ©2000 - 2025, Jelsoft Enterprises Ltd.