Plumb up the brakes do the loom then bodywork that way you won't damage your panels while doing the above..is that a tad further than you got before? if so "carry on and keep at it":)
|
yep never got the old one rolling, I might tinker with a few small things like brake lines and other small jobs whilst I try and save up some cash for the bodywork
|
She cranks
I gave my build a bit of rest after the big push to get her rolling.
This month though I decided I start to get the engine running. First up getting the starter circuit sorted. First up was a battery, I managed to pick up a brand new oddessey PC545 fom a fellow builder for a really good price. Its a very small battery but seems to crank the engine just great I only did a basic circuit for the starter, + to starter neg to engine, and a flying lead to the solenoid plus saw her cranking over. I connected an old indicator to the oil pressure swith and to the positive on the battery but his didn't go out during cranking. I have absolutely nothing else on the engine, theres a large breather at the back drivers side, I blocked that off but still no light out, any other tips as I'm confident it either the a faulty sender or its loosing its pressure somewhere rather than a dodgey oil pump pick up? I've also ordered a fiesta coil pack with HT leads for a grand total of £4.99 this should connect up to the edis module stanalone to give a basic spark to get her running. All thats needed now is some carb and an inlet (i might try her on the old sierra carb as as starter for ten) |
Mike,
I had a simiilar problem with my 1.6 cvh. Oil pressure switch was working fine. I took the sump off injected oil straight into the pump. No matter how long I cranked it for it would not turn the oil pressure light off. I looked on one of the ford forums and apparently it is a common thing on the 1.6 cvh. In the end I just started it and it went out within a few seconds. |
Mine wouldn't go out either with hand cranking or when the engine was spinning from the starter but not starting up. Once I got it running though the light went out after 5-10 seconds.
|
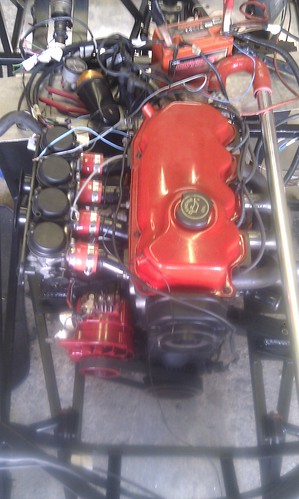
I had a go a wiring up a simple ignition circuit for my CVH just using the EDIS module and coil pack
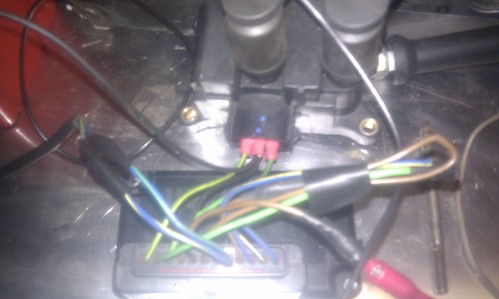 IMAG0307 by mjb22001, on Flickr 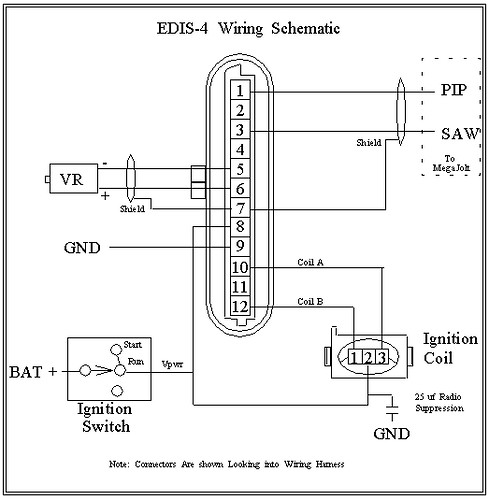 edis4 by mjb22001, on Flickr I did get a spark when cranking the engine over but it seemed a little weak. So i wondered if I had it wired correctly. The black wire is the positive feed to the coil pack and edis. I didnt' have the 25uf suppression to ground fitted as I dont' have whatever a 25uf looks like :) Also I wasn't 100% sure on the terminals 1 and 3 on the coil pack The leads and plugs are fairly old also. Any thoughts |
The ht leads dont fit the cvh head so I wandered what any ones anyone have used?
Also what spark plugs? as apparantly this can have an effect when swapping to EDIS |
25 uf is a 25 micro farad capacitor. Available from rs maplins etc.
|
Quote:
I think i used fiesta leads or ford ka, just went to local motor factors and looked at a few ford sets from around the coilpack era until i found some |
The Radio Supressor should nto make any difference on starting, it's often even ommited from the ford diagrams.
TT |
Stop faffing about man and get it running:)
|
Thats the plan, got it sparking properly now, so just need the carbs sorting, will try the sierras carb just for a giggle!
|
It's a good starting point!
I have ZX6 carbs for mine, but there's no way I would put them on before having the engine running in stock for first. TT |
It's started, bolted the old knacked carb on found the mechanical fuel pump and regulator in a box of bits, bodged some spark plug leads from halfrauds, wouldn't go on first try, swapped the coil pack connections over and it rawed into life, sacred the crap out of me with no manifold on, only ran for 10 seconds, but it went!
The carb had none of its other connections hooked up just fuel. |
Laugh or Cry!!!
Thought I'd try and get a start up video to prove to the masses she lives.
Connected up the manifold so it wouldn't be so noisy in the garage. Fired her up and tweeked the carb so she didn't stall. Great I thought as she sat there idling, then it dawned on me, how the hell do I turn this off! I'd hard wired the ignition. What proceded was about a 30 seconds of blind unrational panic! I pulled the fuel feed to fuel pump, no luck there must have been plenty in the lines and carb. Mad panic to disconnect the battery with a spanner. this did the trick! Man it made me sweat for a minute, in the cold light of day it would have been easy just to pull the lead from the coil pack or a rag over the carb but I was in panic mode! Only damage I hope is a couple of melted cable sheafs where they were touching the manifold, it got pretty hot quicly and was glowing red. Should the manifold got that hot that quickly?, ! |
Don't panic
Can definitely relate to that scenario.
Strange how quick logic goes out of the window in a brief moment of panic. I once changed the engine on my nephews Turbo charged XR2 He didn't tell me that he had fitted one of those fangled gadgets on that keeps the engine running for a while after the ignition has been turned off ( Supposedly to allow the turbo to spool down properly ?? :confused: ) After first start, I immediately noticed a major oil leak, quickly turned the ignition off. Imagine my shock when nothing happened, blind panic when faced with the reality of a newly rebuilt engine likely to go pop ( I jumped in & stalled it on the clutch ) Turned out that I had not fully tightened the turbo's oil feed pipe :o :o ( Thankfully, no harm done ) All that aside, it is not uncommon for a manifold to glow a bit when very hot ( very noticeable in poor light conditions ) |
i wonder how many of us have dropped a spanner over both battery terminals and paniked like mad getting it off. I tell myself not to do it over and over, but the flat top of the battery is such an apealing place to subconciously put tools!
|
A inlet is born
Picked up some Zx6r carbs from ebay for a good price.
They look ok I just hope I haven't been sold some lemons. So it was time to make a manifold for the CVH. FastDan cut me an inlet flange for the CVH that blanks off the water take off. He also supplied me with a length of 45 OD pipe. I sat down with my drawing board and worked out the cut angles for the pipes to give me a 20deg incline on the carbs, I'm sure I read its not necessary to get the float chamber line horizontal so 20 deg is halfway so should be good. Using the trusty rage saw to cut the compound angles made things easier, it was still tricky getting everything the right length after compounds cuts. heres the result  IMAG0321 by mjb22001, on Flickr |
Inlet finished!
I'm actually quite impressed with my skills!
The inlet looks good all painted, I've gone for a red highlight theme, so will be using red coolant hoses etc so should look nice and will go well with the white and black body work I have planned. Just need a fuel pump and som 8mm hose to try out the bad boys! No idea what hp whe will put out over the standard, hoping for about 115bhp.  IMAG0331 by mjb22001, on Flickr  IMAG0330 by mjb22001, on Flickr |
Well here it is finally.
The first start vid! http://www.youtube.com/watch?v=LJ53Gd4fa14 Its actually its second start, but first start with the new manifold and bike carbs. It needed a lot of choke on the carbs but seemed to run nicely, a lot better than the old carb and the exhaust manifold didn't glow bright red this time! First mod to the carbs will be adjusting the idle mixture to get it running without lots of choke, then not sure what to do for IVA. Leave it or open up the jets to 1.5mm or 1.6mm. I've also laid my loom in place and will be connecting up the ignition , so it will start off the key next time (super cool!) |
Quote:
After a good few runs on a rolling road I ended up with 180 jets, 170/175s were safe too mixture wise but 180s had a touch more power Still would have passed emmisions tests if required with the bigger jets in The cvh head doesnt flow very well so doesnt suck very well hence the quite large jets for a modest power output |
Well done Mike, looks a tidy build so far you should be proud :cool:
|
Congrats on the first ( 2nd in vid ) start up, sounds great :cool:
A major milestone of anyones build, :) cheers Andy |
Yeh the builds really starting to come together now.
Mark, did you do anything to the carbs to get the engine idling as mine needs lots of choke at the minute, i was planning on just adjusting the idle mixture on each carb. Mike |
Quote:
If you havnt already make sure the idle screws under the carbs are all in the same position by screwing them all home then back out the same ammount (approx 3 turns should be somewhere near) Running without a silencer/no airfilter and no coolant isnt going to give you a steady idle with no choke after 30seconds running I suspect once you have coolant in and can let it run for a while with the throttle stop adjusted accordingly it will idle anyway When you get around to fitting an air filter i would change two of your trumpets also so they are all the same length Something else to consider with the zx6r carbs is the heating circuit underneath with the little coolant pipes Every man and his dog will tell you, you dont need to use them but i would suggest you do! My carbs froze up in temps nowhere near freezing point (due to fuel atomisation having a refrigerant effect) I know the same happened to Spuds car with these carbs too I have them plumbed in and its never happened since So unless you are using it only during summer months i would plumb them in, but you do get some nice dry sunny crisp winter days where you cant help but take it for a spin :) |
Small bit of progress.
I bought a susuki tl1000 LH silencer off ebay for £10. made up a link pipe. Looks ok, its mainly to keep the neighbours happy, sound pretty good to. May have to upgrade for IVA but fine for now. Will post a pic when I get her outside next. So £10 for an exhaust not bad! |
Started to plumb in the cooling system.
Ordered the parts from ASH on ebay, good service. 1x 32mm 180 bend 1x 1m long pipe 1x 32mm joiner *may need one with a T-piece 1x 500mm length of 32mm hose, to be cut up and used as joiners. 1x 1m 16mm length of pipe A polo radiator for less than £30! and a push pull 12" fan from ebay, seems ok quality and powers up nicely 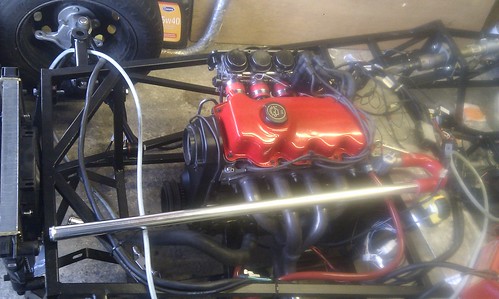 IMAG0362 by mjb22001, on Flickr I'm reusing the sierra hose for the bottom rad pipe its not perfect but looks pretty good (not sure if this was the top or bottom hose on the sierra installation) The pipe exiting the water pump was cut a re welded to make it shorter, I also welded it 180 deg so the small pipe exits downwards away from the manifold. |
I'll get some more pic ups tonight,
Progress, mounted the radiator, well at least the top mounts, I used rivnuts rather than welding the top mounts as I want to check the fit with a nose cone later one, once checked I'll weld on the bottom mounts. Fixed my thermo housing by filing the ali away from around the snapped off steel pipe, got about 10mm clearance and using a cut off from an old coolant pipe with a flaired end I welded it on. Should work ok. I've also started work on an alternator bracket. I've had to mount it the other side as the westfield exhaust manifold meant I needed to move the engine mount to where the orignal alternator bracket was. I think I've got it to clear the carbs and the steering rack and I'm using the sierra alternator belt. The good news is come post IVA zetec fitment everything is where it needs to be so it should be a easy swap. |
|
Tried it again last night with the middle post to the bulb,
Worked a treat, not sure why the wiring diagram in the haynes manual has it wrong! Bulb now goes out when the engine starts. Ran out of cash for this month so it finishing jobs I have bits for. Mounting pedal box and front brake lines, fit rear ali panel, fit throttle cable. That should keep me going until the end of the month! |
|
Got my cooling system plumbed in and run up with no leaks, so thats great. Need a temp sensor though.
Ran her up for 5 minutes, no problems and no leaks. I've ordered a steering rack from rally designs, and even though I'm flat broke, I'm going to go all out and get a prop shaft made in July. With a days work I should be able to drive it out of the garage. (no brakes mind!) Pushing it with no steering sucks big time. So heres to hopefully driving it in July, with brakes in August :) :). It will then be the big save for bodywork and megajolt. Unfortunately its not going to be on the road this year, but next spring. Time flies so I'm happy to take it steady, its frustating but heh hoa |
Planning so make some progress on the build.
I've ordered Brake lines from Exact through Vouch, they look the dogs so can't wait for them to arrive. Brake resevoir and couplings/fixings so I can finish my brake circuits. Will just need to rebuild the rear drum setup and brakes will be done I'm going to service the engine with some new valve stem seals and cambelt. Sort the throttle cable out. And with a bit of luck order some bodywork! Can't wait for bank holiday week! |
A quick shot with the bodywork plonked on top from AGM.
Very good quality its going to look awesome when finished 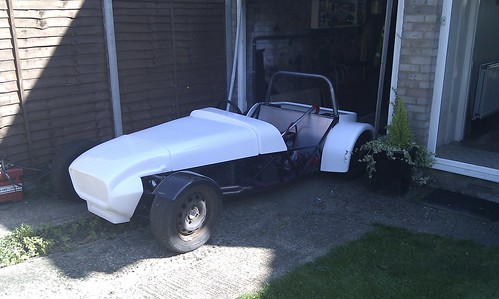 IMAG0407 by mjb22001, on Flickr 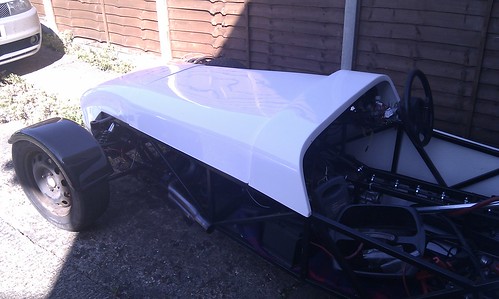 IMAG0408 by mjb22001, on Flickr 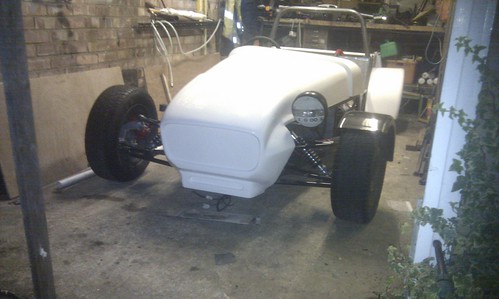 IMAG0412 by mjb22001, on Flickr I've got the nose fitted properly with a couple of rivnuts now, hopefully make the cuts to the scuttle tonight so it lines up properly. The scuttle has the front face fille in so no need for a seperate firewall panel if that makes sense, I'll just need to put a base in for the battery to sit on etc |
|
I haven't done an update since spamgate.
So here we have it. Seats are now in, they are nice westfield leather ones really comfy and don't restrick my thighs! My side panels are nearlly fitted, need to solve my issue with the throttle linkage on my pedal box then I can finally fix them in place. Next jobs: throttle linkage mod, engine bulk head panel, then start to sort out proper engine bay electrics. here's hoping for a drive in the summer!! 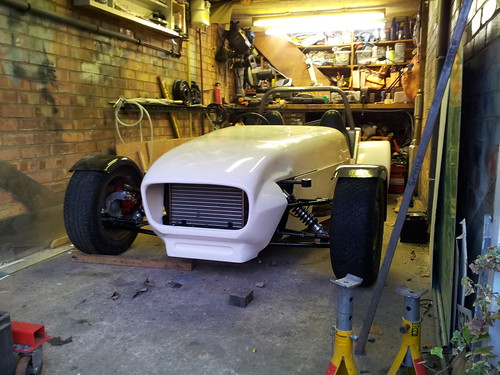 20130217_170950 by mjb22001, on Flickr 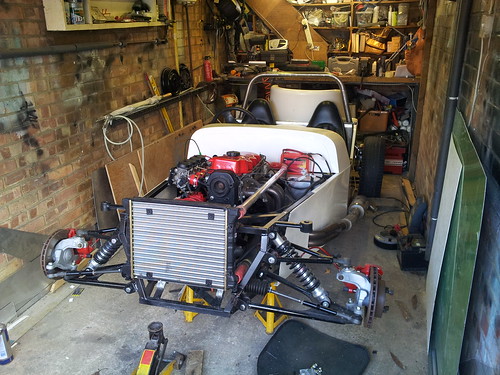 20130217_135619 by mjb22001, on Flickr |
Nice to see you have been tinkering forward with your build and really looks as if it is coming together.... roll on the summer eh:D
|
Hoping for a bit of time on the old girl over easter (and the car ;)
Lots of little jobs, throttle cable/pedal box is the one I want to get sorted, then I can fit the engine bay bulkhead plate, think I might make it two peice to get access to the pedal box from above. Finish off brakes, this involves working out all the springs for the rear drums argg. then I might start tidying the wiring up in the engine bay and few bits of bodywork tweaking, not major just lots of little bits that need doing. i'm hitting a lull with the build thinking theirs still lots to do and no time and money to do it. So hoping to push through that! |
I took a pic of the rear brake arrangement when I was stripping the donor - Might be of use:
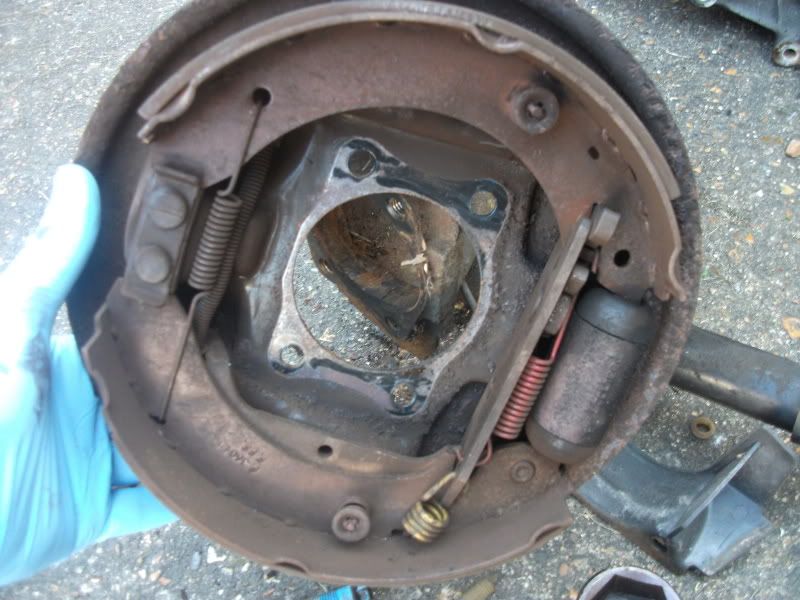 |
thanks eddy thats helpful, driver or passenger side?
Also which end does the handbrake come in, from the front or back. I never got a definative answer last time I asked. |
| All times are GMT +1. The time now is 10:10 PM. |
Powered by vBulletin® Version 3.6.4
Copyright ©2000 - 2024, Jelsoft Enterprises Ltd.