Does look good,well done Dave.;)
|
|
Well, that looks to me like someone might be holding the tiger by the tail, grab a hold and see what bites you.
It's awesome Arfon |
Brilliant video.
Can I ask what model and size steering wheel you have chosen Thanks David |
Looking fantastic. It's such a great feeling to get it moving.
Your steering wheel seems to be on the wrong side. :D |
Quote:
|
Heres this weeks update:
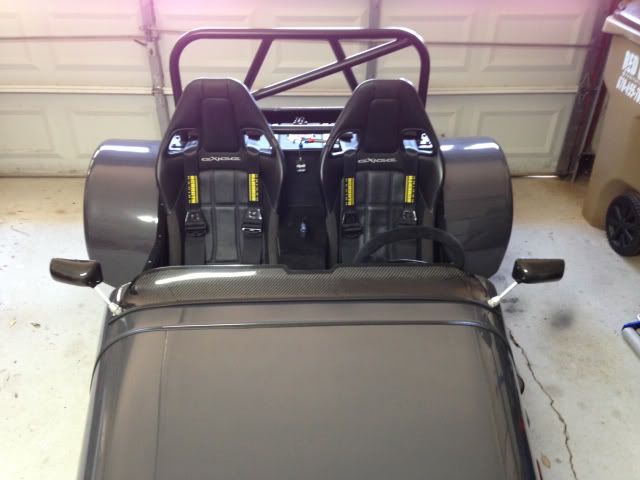
Started the week off by installing the headlights. Thankfully the brackets i made 8 months ago actually worked with the lights i bought last month. As well as being the correct height according to GA law. The lights have the integrated led signals as well as a running light on top. It also has a projector lens in the center. The buckets are made out of stainless, although i may end up painting them to match the car. 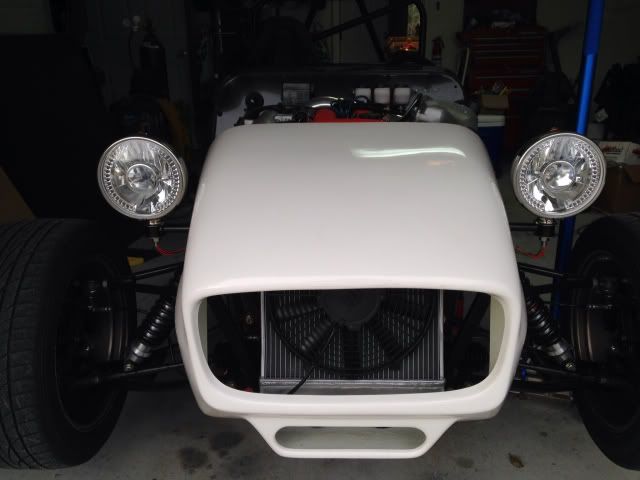 Next up was the seat belts. This turned to be easier than expected. I'm using Schroth 6 point harnesses combined with my lotus exige seats. Ill give you a run down of how they will be setup. First the shoulder straps loop around the roll bar cross member, then the hip straps bolt directly to the seats seat belt bolts, so that is easy enough. Finally the sub belts would be attached under the seat somehow. However this presented a bit of a problem. First the seat is so low (just a few mm above the floor) that almost anything would interfere with the seat or bracket. Second when the seats are in and body is fully skinned adjusting the sub belt is almost impossible from the main connection point. Third, the available mounting point through the rear seat rail on the chassis. This is a 3/4" square tube that is welded to the chassis as well as the steel floor, this would probably work if I could get the mounting point in without interfering... But that didn't happen. However there was another option, since i decided to use exige seats and brackets i benefited from a few things. I got some bitchin seats that are comfortable and i got the ability to use Sector 111's sys.6.pack http://www.sector111.com/parts/inter...nesses/sys.cfm . This gives me a low profile option that adds some addition reinforcement. Basically how it works is on the under side of the chassis you have a t shaped plate. On the top of the t you have 2 holes that pick up the seat bolts, on the bottom of the t you have 3 holes that get drilled through the floor and connect to a pinch plate that the sub belts loop through. So thats it a low profile solution that puts the belts in the correct location and was more or less a boltin with exige seat brackets. 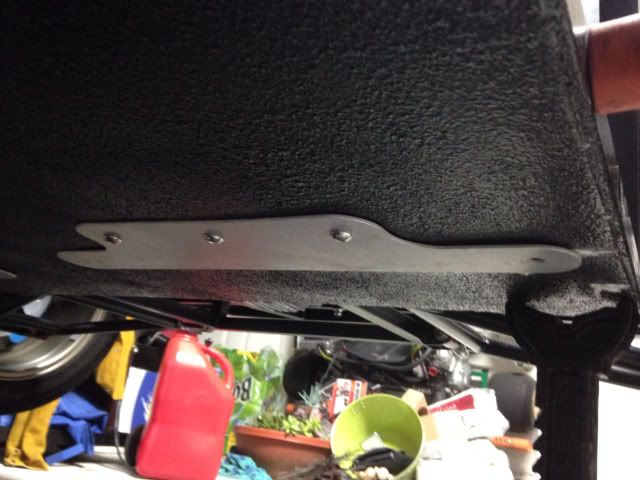  Finally my last accomplishment for the week, was sealing op the tunnel. I had been putting this off for a while for a couple reasons. I wanted to make sure all the wiring was run tot he back and the exige seat brackets i was just praising did conflict a bit with the saturn chassis variation. The problem was the tunnel had to get wider at the rear to clear the offset diff. This made the tunnel frame intersect with the seat rails. So i had to recess the skin of the tunnel, which meant doing some cutouts and then boxing it back in. Kinda a pain, and not the prettiest thing, but its obscured by the seats for the most part. 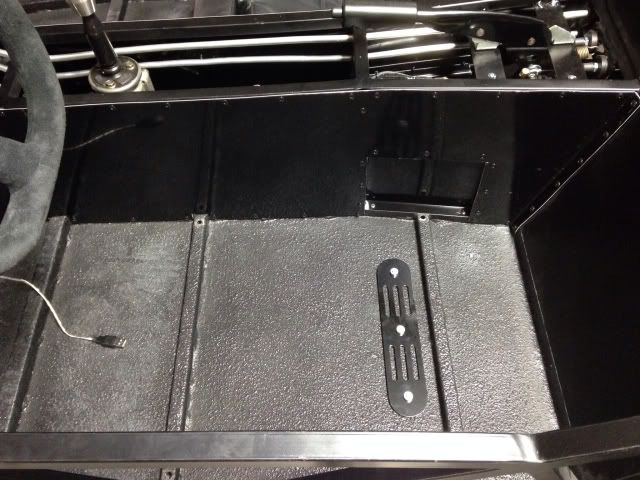 Anyway sides are now done and the top is next up. The final plan for the tunnel is to skin the top, then make a matching cut out in mdf. I will then round the edge of the mdf add some padding and wrap in alcantara, to create a decent arm rest, similar to what you see in caterhams. |
Here's a couple pics with the seats back in and the tunnel closed off. Ran into a few issues with the tunnel. On the driver side the seat slider was such a tight fit after skinning the tunnel that it can no longer slide. Not really a hug deal as its in my seating position which is pretty much all the way back. And if I really wanted to I could probably fix it with a hammer. But right now I don't care. Second issue was that I forgot to install the brake balance bar adjuster knob before riveting everything shut. Again not a hug deal but something I had wanted to do to simplify the brake adjustments. I may come back for this later.
  |
That's all coming together rather nicely ....those harness's look pretty mean.
I had a similar problem with my seat so I put them on their side and knelt a little bit on their sides until they gave 1/4" or so which was just enough to stop them sticking on the tunnel and outer cockpit frame, looks like yours might give a little in the same place. |
Quote:
|
looks like your getting there. the first drive video was excellent, what do you think the local police reaction would have been if they had seen it unregistered on the street? in the uk it would equate to a lot of trouble.
i wish i could bring my car out next time im over in Atlanta, there are some excellent roads that need to be driven in a fun car not too far away from your place. |
Quote:
Worse case I would be ticketed. I'd have to really piss off the cop to get any worse than that. Don't know if I told you about this. But there is the Tail of the Dragon a few hours from here, which is pretty amazing. http://www.tailofthedragon.com/pdf/Brochure.pdf Next time your in town, it might be worth a road trip. |
Welp missed a week of building last week. The time finally came to pay up my end of the car bargain to my wife. This meant it was time to remodel our kitchen. I put it off as long as possible, but as soon as the tax refund hit the account my wife made me move.
Anyways back to the car. After putting the belts in I realized, if I was going to do a arm rest I would have to do it prior to skinning the sides of the car. So that is where I started this week. While I had the tools out for the kitchen I cut the center console in mdf. Once the pice was cut I router a .5" radius on the edge to match the thickness of the wood. This again was done for comfort and the fact the seats wouldn't fit otherwise.   I had to do it in 3 pieces due to the tight fit and the change in angle of the tunnel. The rear piece had to be totally separate because of the seats fit, otherwise there would be no way of installing it. The middle and front portions were fiberglassed back together so that it held the correct angle and could be one piece. Once that was done I found a Tandy leather store and picked up a hide of black suede. Here's the final product:  Last thing left is put a shift boot on it. I ordered one off of ebay and if it matches color wise I'll use it. Other wise I'll have to make my own. |
That is looking well tidy, had a look at the link too and the devils triangle looks a lot of fun
Arfon |
Looks a bit like the road up Palomar Mountain in So Cal.
|
Or the horseshoe pass and LLanberis pass in gods chosen land.
Arfon |
Warmer on Palomar Mountain.:p
God only chose it to use as a military training ground ! |
Update: 2
So after wrapping the center console this week, I moved on to skinning the car. I began with the passenger side since it was the easier to do. Everything was pretty straight forward, just wish I had a better way of bending the lips. But some clamps, square tubing, and a hammer did a decent job. Anyway I'll be covering any exposed lips with some edging so the hammer look shouldn't be noticeable. Finally once I finished skinning and riveting, I went ahead and wrapped the side in the vinyl I'm using.   So on to the drivers side next week. |
Update 2:
This one has been mentally in the works for a while, but I had been waiting on the resin I needed to arrive. So my problem arose when I used a Miata/MX-5 steering shaft combines with the sparco hub and wheel. The problem being that since I wasn't going to use any of the steering column controls, I would have any exposed steering column as well as no way of running a connection for the horn to the hub. The hub has a brass ring that creates a ground when the horn button is pushed. But the ring is moving with the wheel and there for has to have some sort of contact. So with the aid of one of my 3d printers and a bunch of black resin I designed and printed this out yesterday.    So 16hrs of print time later and $15 worth of resin, I've got something that fits perfectly and can house the wiring. |
Very nice, I knew 3D printers would be useful for something...
|
Just wrapped up this weeks work. Got the drivers side skinned and wrapped. Prior to riveting in the drivers panel, I went ahead and added the brake bias adjuster I forgot to install weeks back. Thankfully this task was much easier than expected.
 Once that was done, I decided to finish up trimming the interior. I had already wrapped the center with suede, so to finish off the look on the outside I got some trim from mcmaster http://www.mcmaster.com/#8124a37/=r7leks then wrapped that in suede and riveted it to the frame rails. This gives me a armrest on the outside of the frame as well as concealing the cut edge of the metal. I am super pleased with how this turned out. I'm going to need to get some suede water protector, in the off chance I even get caught in the rain.   On a down note, I think my injectors are gummed up. Engine appears to only be running on 2 or 3 cylinders. Thought the fuel filter had gotten clogged after test driving it last week, but it must have been the injectors as the car will not run without the throttle opened. |
Another saturday and another update. I can clearly see the light at the end of the tunnel now, and think I may actually have this road ready by the 1 year mark... which is insane when I think about it.
So this week, I wrapped both the fenders in the anthracite vinyl, skinned and wrapped the rear panel, installed the rear fenders, and properly riveted the outer arm rests.     Next weeks task is the hood. |
Can I have a couple of pints of what your'e on :D bluddy good progress mate keep it going.
|
Friday Progress Report. Been super busy with work this week so its taken longer than I would have wanted. But I chipped away at it and the hood is almost done. Made it out of .060 aluminum, which was thinker than I was expecting. Bought/Borrowed a 6" pvc pipe from Lowes. Which did a very good job of matching the curves. The scuttle has a ledge for the hood so that was easy enough, and the nose has a catch molded into it, which will come in handy for leveling the front of the hood, which is about 3/16" high. So I'm going to 3d print the male end for the catch and be done with it. Only issue I've run into is the supercharger clearance. for the most part I clear with a 1/4" but the bypass valve really gets in the way. So I'm going to have to make my opening a bit wider then let the engine shape it the rest of the way.
  |
Getting very close now.
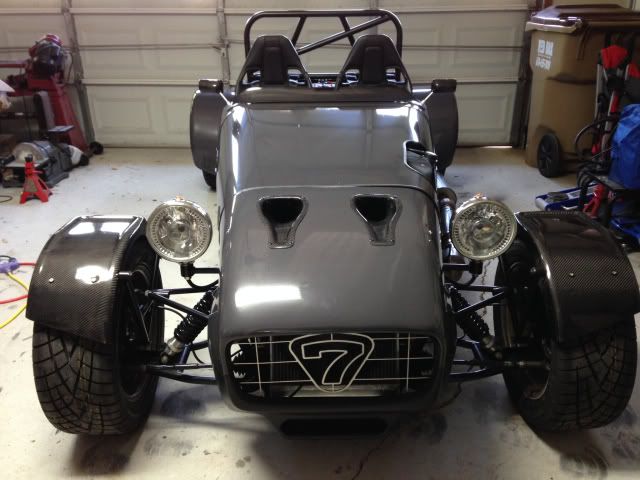
Checklist for the week: - got necessary paperwork for vin request filled out and notarized by country tax official, then submitted to state. If a VIN number comes back, then the car will have cleared the major hurdle. - Finished hood install and cutout. Think I'm going to just leave it as is for now and paint the supercharger top in wrinkle black. It kinda looks cool like that. Also it makes for a nice heat vent. - So I don't know if I mentioned in a previous post but I began experiencing engine issues after a second test drive. Engine effectively cut out over 2000rpm and then the follow week wouldn't fire up without the throttle open. Turns out it was only running on 2 cylinders. So this led me to replace the fuel filter figuring it was clogged... which it wasn't. Replacing plugs and wire, plugs are cheap and wires were questionable... no dice. Pulling the injectors and sending them out to be cleaned... not the issue, but they did need it. Swapping out the ignition control module and coils... not the problem so I returned them. At this point I was at a loss, that covered nearly even piece of the fuel injection system. What I didn't bother to check was whether the vacuum line that runs to the megasquirt ecu was still attached. The same vacuum line that is teed into the fuel pressure regulator, and the one line that if were to disconnect from the overly small fitting would result in the engine getting very little gas. Sure enough it was off and the engine fired back up... but wait there's more. Thought I had resolved this until I test drove it and realized it was running like sh!t. Upon further investigation injector 1 and 3 were not working. Which thankfully since those were on the same wire led me to the ecu where my wire loom must have been pulling on that pin a bit much and causing the disconnect. Thankfully I found that one pretty quick and everything is working swimmingly again. Although I'm out about $200, $100 of which was unnecessary. - While researching the engine issues I realized my blowoff valve was not hooked up correctly... I kinda wish I hadn't. The friggin thing is really loud... and awesome. Finally I finished up the main body work. Had to do some bond repairs on my nose cone from when it was shipped. Then I had to make a decision on whether to cut openings for a pair on carbon fiber naca ducts I had bought with my nose cone and fenders. The problem being, I wasn't sure exactly what to use them for. The original plan was to have them feed a intercooler or to feed air back to the intake filter. Well I pulled the trigger, and while I still don't have an exact answer, I can say without a doubt they are visually worth it. So here it is. Only body work left at this point are the fenders.    I wish I had done some sort of drawing before I started this because this has completely met my original vision of the car. |
Mid week update. This weeks goal is to get the fenders installed. Just finished welding up the first bracket. It is somewhat over built, I borrowed various design elements and think I have a fender bracket that should withstand the vibration and avoid the usual weak spot. I'll take some further pictures when I take it back off. I used 3 pickup points, lower, upper and upper brake bolt.
   |
For anyone thet may be looking for fender bracket stay ideas that work with the miata mx5 spindles here's some detail shots.
    |
I accomplished this weeks goal of completing the fenders. Got word back from the aeroscreen company that my wind deflector is complete and will ship next week. So while I wait on that I start working on the lighting wiring, hopefully this goes smoothly.
   |
Your car is looking smart. I wish I had got too your point as quickly.
|
Monday - Brake Lights - Complete
 May have over done it with the 3rd brake light. At least there is no excuse for someone not to see me braking. |
Don't knock the overkill of the brake lights with all those tall SUV's and mini vans trying to keep up with you, I think Dad had his Locost on the road 1-2 days when an ice cream van run in to the back of it.
just to let you know that.... I AM BRAKING! |
Looks like the "Force "is with you !
Nice build :cool: |
Tuesday: Backup lights
 I finding that I conveniently left enough lighting wiring in place that its making some of this very easy. |
Good progress , like the bonnet vents.
TT |
Finished up the electrical for the car last night, so everything is now functional. Just waiting on the aeroscreen and my vin number.
Anyways, went for a test drive today and actually remembered the gopro. http://youtu.be/y7nWnLJ88bw |
Been quiet on this end for the last week, as the car is pretty much done with the exception of tuning and alignment. I just waiting on the VIN at this point, so I can complete the registration process. Don't know know if I posted this or not, but my initial application bounced back because the state wanted photos and a bill of sale. So I made one up and sent it back week before last, so no new is good news at this point. Just hoping it doesn't take to long for a Vin to be issued. So I wrapped up everything possible this week.
I built a under tray for the rear compartment out of some leftover aluminum. This put a floor under the diff as well as some wings in the back of the wheel well to hopefully direct air coming under the car out the back versus into the trunk. Next I took some more bed liner and did a undercoat under all the fenders, to hopefully add some protection from tires flinging rocks. And the last thing on my punch list was getting some decent tires. Which turned out to be a slight pain in the butt. I bought a set of Toyo R1R from tirerack.com. Anyways, I took the wheels and tires to my local tire place to have them mounted and balanced. However what I got back was a bit disappointing. All 4 wheels had been damaged. One wheel had a pretty badly bent lip and all 4 had gouging on the back side where the mounting machine clamped on. Finally the person who balanced them did a horrible job, one wheel had a strip of wheel weights about 14" long. Nothing like adding a half pound of lead to a set of light weight wheels. So I brought them back and bitched to the manager, who was very understanding. So he took them and sent them off to a wheel repair shop, which fixed everything up, re-powder coated the wheels (not the worst thing since the existing powder coating from konig was pretty thin) and rebalanced the tires (without a ton of dead weight). So other than that I'm just waiting on the wind deflector, which is somewhere in atlanta and will hopefully be delivered in the next day or 2. I also mocked up the stripes in photoshop to get a idea of what design I'm doing. I settled on the caterham 650r stripes in copper to match the wheels. Here are the photoshop mockups.   The end result should be a bit brighter and stand out more. |
The wind deflector showed up this morning, so i got right to installing it and the mirrors i had.
 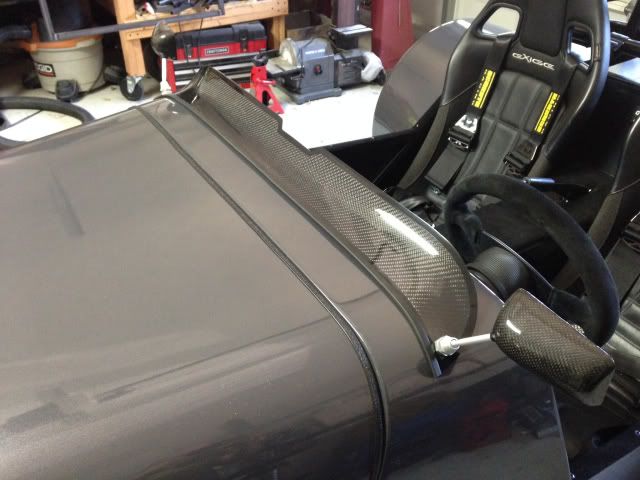  |
Good job well done there it's an awesome looking car and build just a shame your on the other side of the pond or I will be looking to take a closer look and a drive lol
|
Another week and no VIN. Spoke to my contact this week and asked for info on time frame and was told its usually 2-4 weeks. So hopefully I will see it soon. In the mean time I've been trying to find things to do on the car. Started by taking some leftover carbon fiber vinyl from another project and made rock chip guards for the rear fenders. We'll see how well it works, It's pretty durable stuff. Then I got my bronze vinyl and had my racing stripes cut. Nothing like putting some straight lines down the center of the car to see how off center other things are. I had to do the striping twice down the hood, as either the windscreen or rear view mirror cutout on the windscreen is a little off center. So when I centered my stripes off the windscreen, it was visibly moving off center to the drivers side. I also did the stripes down the side of the car, but after living with it for a day, I decided I didn't like it very much so off it came. The goal was to match the wheels color, and when on the same plain as the wheels it does, but when on the body under different lighting the color difference was enough that it was distracting to me.
I also installed a rear view mirror from race mirrors. It was by far the cheapest of the carbon fiber rear view mirrors available, but still way more that what I would have liked to spend. The upside is they will custom make the stem for you, so you can get it in whatever height you need. He also helped verify that it would fit perfectly prior to ordering so that was very helpful. Finally I installed a halon fire extinguisher for the car. As you can see I'm scraping the bottom of the barrel here for things to do while I wait.     |
Well after 2 months of battling with the state to trying and get antique replica status on the car, having them lose my paperwork, then deny me because the car looks to much like a kit car, I finally gave up on that approach and just registered it as a miata. So as of ten minutes ago I have done my first full on-road test drive. So thats it I'm calling it, this thing is done. Now on to tuning and a proper alignment.
|
| All times are GMT +1. The time now is 03:48 PM. |
Powered by vBulletin® Version 3.6.4
Copyright ©2000 - 2025, Jelsoft Enterprises Ltd.