Looking good. I would however consider rounding the edges of the mounts, as per the book. You might get away with it on wishbones, but the Shock mounts would jam for sure.
|
I rounded the edges on one of them, but it tok me ages to do one of them, so me being typical, i just left it and put the brackets on:o :D .
|
I used a bench sander to round the edges off my mounts. Took, maybe, 10 seconds each side.
|
Quote:
|
Quote:
But best to do it properly first time because you will only cause yourself more work later :D |
UHHH!! today has been really frustrating. I waited till about 1 for the ups package with all the wishbone bosses and plates. I managed to finish all the rear wishbones and the lower front ones, then as i was cutting the cds tubing to make the last 2 wishbones, my evo rage 3 saw seemed to swing up taking the cds tubing with it and shooting it into the garage wall making a gaping dent in the wall. Im glad it didnt hit me. It also put teeth marks all the way along the cds tubing digging in to thetubing about 1mm at most so now i need to buy about 300mm more tubing, but am not sure if i should still use this piece as i didnt buy any excess tubing to make my wishbones.
 I called tesco direct(where i bought my saw) and they said theyll send me a new saw on wednesday and collect the old one as it no longer goes down properly to cut. I think the large spring holding the saw in place from coming down has moved itself slightly not allowing me to cut. Tomorrow is sierra butchering day and im expecting everything from 3ge components to come and the ball joints and other bits to get the car rolling. ill hopefully weld on the last few bits on wednesday and finish off the wishbones then, and hopefully spend thursday putting it all together to get it on wheels. :D |
Quote:
|
tbh, i purchased a metal cutting blade for mine and it was SIGNIFICANTLY better than the blade supplied with the saw. i mean it is amazing , it cuts so much faster and neater than any other saw ive seen/used, and the metal cutting blade really makes it really good. i mean eveery cut has been perfect with this blade. However this one episode today was abit of a downer, but im getting a replacement saw so hopefully all is good, but i could have finished the wishbone today if it hadnt broken:( .
|
Well yesterday the sierra was taken apart, however i dont have enough room in the garage to store bits, so its all lying on the driveway under some blue tarp. Ive been busy today taking apart the front and rear subframes. Yesterday i also got my deliver froim 3ge components with the rear uprights and other bits. I also got a new rage 3 saw delivered after my old one broke. I also have a set of ball joints for the front end, and have put in the suspension bushes in my complete wishbones. I also pu together the rear end and put the rear uprights on. I hope to have the steering and front hubs fitted tomorrow.
I also wondered, i have rear drum brakes, and i cant figure out how to seperate the 2 drums as there is the handbrake cable(i think) joining them together which i cant get apart. Also what is the size of the rear hub nut on the drum as ill go to halfords tomorrow and buy the correct socket. All seems to be going well, apart from when i wash my hands it stings like crazy as i have soooo many cuuts on them now, about 2 or 3 on each finger. |
socket
41 mm socket for the rear hub nuts
|
sorry but you wont get the socket from halfords have to try elsewhere im afraid bud
Ray:) |
ahhh, just realised they dont have it... where could i get one thats not online?
|
You could try a local motor factor - the one nearest me keeps a pretty good selection of large sockets.
Matt |
good idea, ill try a few tomorrow. Thanks.
|
I got mine from local motor factors for for the princely sum of £8 :D
|
Sockets that size are usually 3/4 drive, so bear that in mind you may need to buy a bar aswell.
|
Quote:
Unfortunatly i dont think ill have a rolling chassis tomorrow as i dont have the plate for the lower front wishbones so havnt made them:( . But apart from that the project is going well ALso anyone know how to get track rod ends off the sierra steering rack, as they seem stuck on too well:o ? |
I used a large pair of Stilson's around the drive shaft and a 4ft long 3/4 drive bar and they were still "kin" tight,dont forget one is left hand thread.
Use a little heat on the TRE's, also tapping around the treaded housing against something solid like a vice shifts the crud around them. Keep shaft,hub,flange etc together and mark them left and right for future reference and replace bearings while they are out. Good luck. |
If you have an agricultural engineers near you, they will have a 1" Impact wrench, take the rear sub-frame down to them, your nuts will be off within seconds...:eek:
A garage that deals with lorrys and HGV's may also have what your after Jas Gray |
If the hub is still on the subframe then you could put the wheel back on and jam it solid with a spare piece of steel. The weight of the subframe should then give you enough leverage.
It worked for me, but the subframe was still attached to the Sierra which made life a bit easier. Matt |
I forgot to undo the hub nuts on my first donor :eek:
Should know better but forgot anyway :o My rattle gun at full tilt wouldn't shift em. Ended up using a 1" drive socket & T bar + a 6 foot long scaffold pole . One person standing on the subframe & another person standing on a long flat pice of 12mm thick bar that was trapping the wheel studs. If you don't want to damage the studs, put a tiny piece of rubber hose on them ( The donor will have plenty spare ) If you do damage the stud thread, don't worry, simple to replace & easy to get hold of ;) Good luck, those nuts are about as tight as it gets. :( |
ok, i phoned 11 places just now looking for a 41mm socket, only one place said they had it in stock, but they wanted £30 for a socket, there no way id do that. I phoned camberly auto factors and they said they can order one in for this afternoon for £14 so i will get it from them now.
|
I had to heat mine up then get my impact gun on them.
Heating stuff up always helps............ Thats what i keep telling the other half when shes making my dinner :D |
a quater rolling
Well today was a pretty fulfiling day as for the last foew days the work on the car has been wuite painful and not so enjoyable(several cuts and brusies and burns).
Today i went to get the 41mm socket around 3pm and then got straight on the car from then. i managed to get the rear hub nuts off preety easily, i just put the wheels on the hub, and then put bricks on either side of it and got someone else to hold it in place as easily as possible while i undid them, AND i remembered that the left side hass an opposite thread.:D . After that i spent almost 2 HOURS trying to just get the handbrake cable disconected from the hubs, it was a real pain as ive never touched drum brakes before and just didnt get hoe to disconnect it, i didnt understand the haynes manual for the sierra at all either. I eventually got it out, and then sdecided to put the rear right side of the car on a wheel (as i didnt have enough m12 studding left for the left hand side) Unfourtunately i would have had all 4 wheels on if i had any more m12 studding and the lower wishbone plates as i recieved them unbent from the seller so i am awaiting a bent set of lower wishbone plate which i should get next tuesday:( , but seeing the quater rolling chassis is nice as it gives a real sense of achievement to get to this stage. 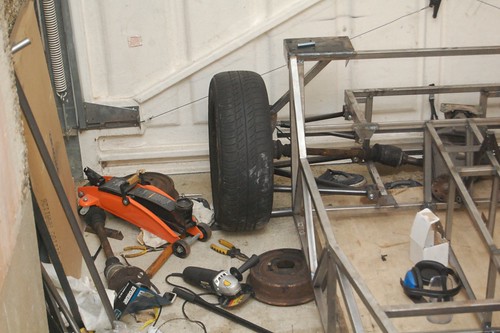 One thing that i am worried about id the steering column attached to the wheel as i dont see how that will fit to plates cp15 and the steering wheel support as there are noe boltholes in the steering wheel assembly for bolts to attach to cp15:confused: . I also tried some electrolytic derusting using some baking soda water and stainless steel. It worked magic on one of the front habs. the pics in my set dont really do it justice as neaarly all the surface rust has gone and for some reason the hub that i derusted turns much more freely. |
a big well done on your build, putting the rear wheel on does make it feel more like a car, it gives the chassis a sense of width, as you can now picture the rolling width so much more,
don,t get upset about a delay for parts, the fact that you have only been building approx 6 to 7 weeks & to get this far so quickly , you are doing a damm fine job, well done. the steering wheel bits should have a bright steel bracket attached about 4inches further down the column from the switch wires ??? :confused: all the best & keep up the great work. andy:) |
Well done
A very big well done on your progress to date :cool:
You can feel very proud of what you have achieved in such a short space of time. ;) :) The Sierra steering wheel should haev been held on the donor car with a yoke plate, silver in colour. This is the plate that bolts onto the steering wheel support frame on the Roadster. It is quite easy to discard this when you strip the donor or even worse leave it on the donor. I'll try and take a photo for you in a moment. Well done |
ahh crap, that would have been binned so i dont have it:( :rolleyes: . here is all i ahve from the steering wheel
 |
Here's a couple of photos that may help to make things clearer :)
Yoke  Yoke fitted  I hope that helps you :) |
;) not to worry, a fellow forum member has made a very nice replacement part that does that job, i believe its billet made & a very reasonable price too.
it fits on to that slotted area on the column then attaches to CP15. i,m sure he,ll be along soon too, andy:) |
I've come across two different types of Sierra column, I remember having to make up one good one from two that had different required features. I'm afraid i can't remember the details, though, but I do remember that the mounting bracket was one of the issues.
|
Quote:
If you are not wanting an adjustable steering set up then a plain bolt & crush tube will do the trick nicely. ;) |
ok, i guess il fabricate my own bracet, looks like somthing that would be easy to replicate in some way. Also the only reason i am yet to fit cp 15 and the steering supports to the chassis yet is that i am not sure how far apart the 2 cp15 plates are meant to be as i cant find any reference to the distance between them in the book.:confused:
|
Quote:
|
there is a thread with measurements, tho it might be one of the threads that went missing,
tho once you have the plate that attaches the column to CP15 it does become clearer, if you wish i can measure my position tomorrow for you & either phone you with them or post on the forum ? it also helps if you have CP16 in place as the column seems to "fall naturally" into place. would the measurements from my chassis help? cheers andy:) |
i fitted cp16 quite a while ago, however as i dont have the bracket:rolleyes: , i cant tell what sort of distance to place it. If you could get the measurements and put 'em up here that would be great:) . Thanks!!!
on another completely different note, anyone know where i can get a roll bar made cheaply. I remember reading on here a while ago that someone was doing group buys of roll bars fairly cheaply, i wonder if that is still possible, as it seems that the roadster building community is quickly growing and there should be many more people in need of a roll bar:D |
geeman when doing the electrolysis use mild steel. using stainless steel creates a substance called chromium. chromium causes cancer if you have too much exposure. the water you have used already will be contaminated. i suggest that you dispose of it by not tipping it down the drain.
|
Quote:
|
sorry for being late with the info, had busy day with my family celebrating my mum,s 80th birthday :)
measurements for you...... the CP15 plate that is on the outside(offside) is 120mm from the inner edge of TR2 along the TR9 rail, then you have the 40mm width of CP15 then a 60mm gap to the next CP15 plate. i hope this makes sense & hope it helps:) cheers andy:) |
Quote:
Thanks!!! that will help me get the steering bits fitted. Ill probably do it on monday as i wont be doing any work tomorrow. Today i made the diff mounting plates, made plates cp10 and fitted them, fitted the diff, and then fitted the other wheel so the whole rear section is rolling:D . I then wheel barrowed the chassis outside on the driveway and my neighbours finally realised what i was doing with al the metal and nosie in my garage. also, the drive shafts were a tight fit, but nevertheless did fit. I also bought some swarfega from halfords as i was tired of dirty hands and it sucessfully gets rid of oil off my hand(mum was killing me for getting all the walls black:rolleyes: ) |
ok, well i tried fitting the steering supports, which seem ok, however im bemused as to how this is all going to work. for a start my steering column doesnt look like it is right, what goes in the cp16 hole to support the coloumn and wheredo you extend it from, it just seems like it wont reach the universal joints at the end of the column the is on the rack as the suspension upright at the front is in the way. I know i have probably not been very clear but hope the pics help. Also where abouts does the yoke go on the coloumn as shown by bonzo a few posts before. It seems that i never had one of those in the first place:confused:
   Also, i should say the steering coloumn does sit futher down than what is in the pics, but not my much. THanks |
| All times are GMT +1. The time now is 09:06 AM. |
Powered by vBulletin® Version 3.6.4
Copyright ©2000 - 2025, Jelsoft Enterprises Ltd.