Davey,
Too much work must be a good thing, surely that means more pennies?:D I think I must have sat in those seats for about two hours now, really comfy. I had to put them in the loft so I didnt wear them out!:confused: Cheers Ginge |
Webshite updated, pictures to follow later this week:D .
D. |
Davey,
I didnt read your post properly and went to your web site looking for pictures!:confused: It is going to look great with six bike carbs.;) Not seeing any pictures just builds my anticipation; give us a shout when the pictures are up. Cheers Ginge |
Cheers Ginge will do, they're ITBs not carbs though. There's been a bit of a hickup with the MT75 box though. Guy's e-mailed today to say its not the box he thought, it is an MT75 RWD V6 box but out of a Transit, he has a converter plate to match the Cosworth lump to go with it and has offered me that plus a partial refund. Alternatively he has offered me a V6 4X4 MT75 and a RWD MT75 to build a hybrid myself plus a partial refund. Third option he's given me is a type 9 V6 box with alloy bellhousing plus an even bigger partial refund.
As the type 9 is going to be too close to its limits I've bypassed that option although the bigger refund would have been nice:D . I've gone for the 4X4 and RWD MT 75 hybrid build it myself option as this will give me the chance to check the internals out plus I get a nice wad of cash back, that's what I call a result;) . D. |
Webshite updated with photos:D .
Basically Zoe and I have spent a couple of hours in the shop this morning and have now tacked the front and rear suspension mountings in place and started framing the rear tub area, then we went to the pub for a couple of hours:D . D. |
Davey,
Wish bones looking great and that engine looks sweeeeeet.:D Cheers Ginge |
Cheers Ginge, not looking too shabby is it?
Hopefully you will have noticed the difference in my front wishbones from the book spec but you will also see how I have utilised the Gibbs design and adapted it to suit. The only issue I have is that on full lock the wheels do just touch the rear edge of the lower wishbones, I think I will be fitting an end stop to the inner rack section to prevent this. All of a sudden its starting to feel and look like a real car!:D D. |
Davey,
I did notice the front wish bones looked a little different but didnt comment as I have been caught out by odd looking pictures before.:eek: :D Land Rovers use an end stop on the front uprights due to the varying sizes of tyres that can be fitted. Cheers Ginge |
The front bones are different to book spec simply because mine is the bastard spawn of the devil:p , used to be a Locust but now turning into a Dragon via the Haynes manual sort of:D . The chassis as it was/is just wouldn't work with the standard Haynes/Gibbs wishbones so the design had to be adapted. The Granada rack had 2.8 turns lock to lock and once I've fitted end stops or shortened the main section (about 25mm too long I reckon and giving some naughty bump steer) it should be about 2.6 turns lock to lock so nice and quick (read twitchy:eek: )
D. |
Just for information my MT75 boxes have arrived now and all I can say is Rob Smith who trades via E-Bay as "SierraShack" is a top bloke!
Original deal was for a V6 2WD MT75 and I bartered with him to get a £50 reduction off the original asking price, he threw in a clutch assembly (second hand but it gives me a pattern) for £30. Then when he took the box out of the Transit it was in it turned out to be a standard MT75 box with an adapter plate so he E-mailed me to let me know and offered me three choices: 1/ Have this box with the adapter plate and 25% refund. 2/ Have a V6 4X4 box AND a standard 2WD box and 25% refund. 3/ Have a V6 type 9 box complete with alloy bellhousing and 50% refund. I opted for option 2 and the two boxes along with the clutch which while obviously used is in good condition arrived yesterday. All the way through Rob has kept me informed and even asked about the project it was for, purely out of interest. So if anyone wants any Sierra parts I'd reccomend you try Rob, I'll check with him before I post his E-mail addy on here but you can certainly find him on the bay. D. |
Davey,
Nice little find there and nice to hear of great ebay sellers,:D well in mate. Cheers Ginge |
Well I'm very happy with the service :D .
If anyone is interested here's one of his other sale items on the bay: http://cgi.ebay.co.uk/SIERRA-2-9-V6-...item4aa16b6b4d Cheers, D. |
Well its taken me a couple of weeks but I've managed to build the hybrid box out of the two MT75s. I'm going to write it all up with pictures and put it on my website but I'll probably make it available as a word document via e-mail if anyone else wants/needs to do one, it proved to be not major league difficult in the end.
D. |
Not much of an update really and I still haven't got round to updating my webshite, maybe tonight:p . Anyway during a spare hour today while waiting for parts to arrive I was looking at the Dragon and I think I have found me some good news:) . Due to the bellhousing of the MT75 being slightly narrower than the type 9 I can lower the engine by 50mm in the chassis, it will mean altering the sump but hey ho. It also means I can move the power unit back by about 75mm which will give more room at the front as well as improving the weight distribution. Downside of this revelation is that I have to cut off my beautifully fabricated engine mounting pads and remake them:( .
D. |
Webshite partially updated, pictures to follow plus a blow by blow of how to build the hybrid MT75 XR4X4/RWD V6 box.
D. |
Davey,
Your hybrid box sounds really complicated, I will sit down with a clear head and read that one.:eek: Cheers Ginge |
OOoooo..
SierraShack usualy gets a bad wrap in all the circles I frequent.. Have you built the box just using the V6 front casing? I hope you have pulled the input shaft and swapped it for the V6 input shaft or your going to be cursing yourself. TT |
Just read your build, Glad to see you did the shaft..
But the flex plate bolts may not hold up, if they are the same as the ones on my 24V's then the head is quite thin as it has little mass unlike a large flywheel. TT |
Sierrashack did me what I consider to be a good deal, communication was loads better than some of the companies I regularly deal with and he volunteered the partial refund and gave me three options. OK so I could have possibly bought a 4X4 box cheaper and a DOHC box cheaper but not from the same source and if it was from a private buyer they would almost certainly want a personal collection "due to size/weight". I consider the deal I got to be fair and just, both gearboxes are in good condition, were well packaged and delivered to my door in a reasonable timescale. 'nuff said? I think so.
Ginge, the hybrid conversion is not too difficult if you're conversant with gearbox overhaul, don't forget I qualified as a light vehicle mechanic nearly thirty years ago when mechanics did overhaul gearboxes rather than just replacing them, we also replaced alternator regulators etc rather than just swapping out the entire unit:D . Anyway, as gearbox work goes its a piece of wee wee:rolleyes: ;) . I will try ot get the blow by blow hybrid build procedure done soon but I have so many jobs to do and next Thursday we roll for Goodwood Festival of Speed till following Monday, can't wait:D D. |
Quote:
D. |
Just revisiting this thread and noticed I had not updated it since June, that means I haven't done anything meaningful to the Dragon for nigh on two months:mad: .
Anyway that may all change in the near future, I've just bought an AC/DC TIG welder off the bay, I've been bidding on several second hand units over the last month or so but they all went to more than I was prepared to cough up so I've bought a brand new unit. Its a "WSE 200" 200 amp AC/DC tig welder complete with foot pedal (which is damned near vital for aly work) for £350 delivered. I just hope it is as good as its write up. Once I have this machine and a bottle of Argon/regulator I can set to with chopping the sump down and welding up the intake manifold, I have all the bits cut and formed just got to glue 'em all together:D . Its been a couple of years since I did any TIG work but I'm looking forward to getting back into it. The really good news is that I have a new product in mind for my business that will require aluminium welding so its all nicely justified:D . D. |
Join the club
In the same boat as you Davy, not been able to touch my build for the entire summer. :rolleyes:
It sounds very much as if you have bought the same TIG welder as me. I was a bit reluctant to go down the budget route but to be honest, I could not justify buying a high end set .... Not a hope in hell of finding a good quality, used single phase set in this neck of the woods. Anyhow I was quite pleased with the TIG welder & it does what it says on the tin. Here's a couple of test pieces that I done to try & get my eye back in .... Been over 20 years since I last TIG welded alloy :eek: 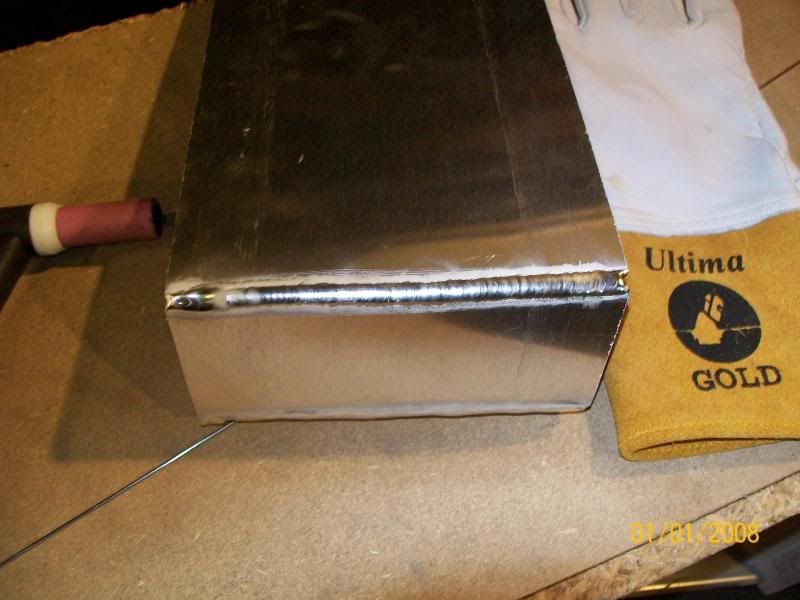 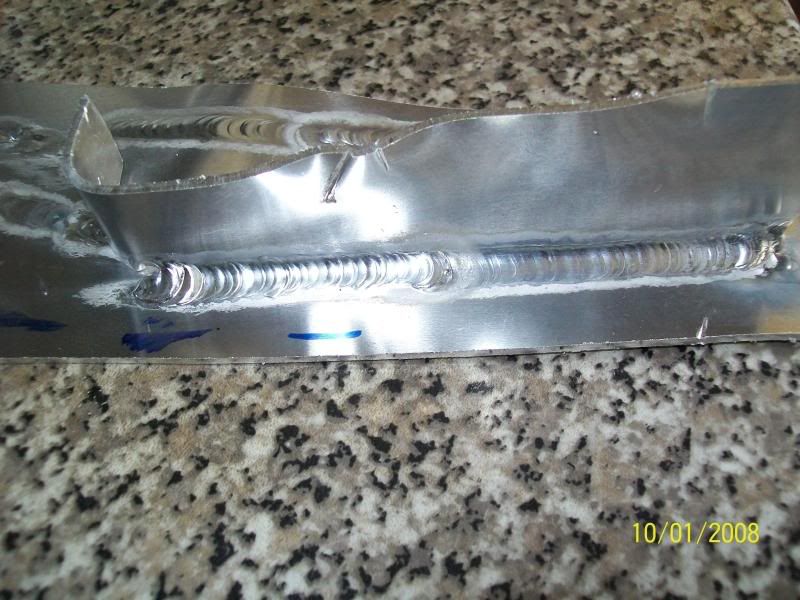 Here's hoping that your set will work as well as mine. |
Cheers Ronnie, if I can make welds that look as good as that I'll be a happy bunny:D . I have done lots of aly TIG work in the past but its about 7 years since I last touched a TIG set so its going to be a bit of a "learning curve" as modern parlance has it.
D. |
Quote:
I dare say after a short while of getting to know the new set, you'll soon be back in full swing :) Did manage to use about £30's worth of Argon messing about on bits of scrap :eek: :D |
Yeah the cost of consumables is a bit daunting:eek: ! I seem to recall back in 1987 when I was foreman in a fab shop we charged (I think) £5 an inch for aly tig work:cool: . Can't wait to get my new toy and have a play with it:D
D. |
Well I've just sold my type nine box on the bay, after seven days it had 57 watching it but only one bid and that was right at the end so it went for £50:( not as much as I paid for it but better than a kick in the sensitive bits I suppose:) . I've also got an Iveco wheel and tyre on and some eejit in Warrington actually asked me to "meet him half way" to save his delivery/collection costs:confused: :confused: ! Obviously I said "not a freeking chance bud!". some other muppet from Scotland complained that the overnight courier costs were too expensive and could i send it by some cheaper means? For a wheel and tyre going for £26 he really expects me to bust my nuts to find a cheaper way of getting it to Scottyland?
Obviously we all use Ebay at some point, some of us use it lots of times, I know I do but it does seem to be patrolled by eejits some days. D. |
£11 by Parcel Farce if it's under 25KG
TT |
Wheel and tyre on a pallet weighs in at 45 KGs, Iveco wheels are on the larger side.
D. |
Hi Davey.
Check below: www.directcouriersolutions.co.uk good deals for wheels. www.parcelmonkey.co.uk Hope that helps |
Thanks for those links guys but they won't be necessary, the gearbox was collected this evening and the guy who won the spare wheel will collect it unless I can get it delivered for less than a tenner, guess he's gonna be collecting it then:D .
Better news is my new TIG welder arrived this morning and looks fan-chuffing-tastic:D . I just need to make a trolley for it, get a bottle of Argon and reg plus some hose and I'm away:p . Instruction book is the usual direct translation from Chinese, here's an exerpt: "Electric shock-------------may lead to death!!........................................... .....Caution! The machine is mainly used in industry. It will produce radio wave, so the worker should make fully preparation for protection." Can't wait to get started with it, D. |
nice welding! im looking forward to doing some ally welding soon myself. Hope i can get it looking half as good as yours.
|
That user manual cracked me up Davy :)
Did you get a free " Hand held " Welding screen with yours .... An absolute must if TIG welding :D :D I am sure you'll soon get into the swing of it mate, I suspect like me, you are new to all of this new fangled inverter technology :) |
Hi Ronnie, yes I got the "free" safety screen made of really cheapo plastic and hand held, I did wonder how you were supposed to use a TIG welder and a hand held screen but then the makers can use chopsticks without wearing their dinner so maybe they hold the torch and filler rod in one hand and the screen in the other.
D. |
Well I managed to get out and source some Argon and a reg today so tried the set out forthwith and I have to say that although it was only a brief trial its pretty bloody good for the money:D . Tig'd up a small piece of 1.6mm thick 2"x2" angle and its looking damned good. You were right Ronnie, just like falling off a bike, you never forget how:D . Spent a couple of hours building a trolley to carry the TIG unit, its gas bottle, foot pedal and give a working surface on top but didn't have time to take any photos. Got a small job to do in the morning then have to move our son and his girlfriend back into our house:confused: (how did that happen then?) so probably won't get to play till Sunday AM.
D. |
2 Attachment(s)
Had a good morning at work today, small job for a customer then I could get on with my TIG workstation, still a few bits to do to complete but the main parts are sorted, its on castors so I can move it around easily and it gives me a nice clear welding table too. Here's a couple of photos, first of my new TIG station then of my first TIG weld joining two pieces of 1.6mm ali together, ignore the lump of snot in the middle of the run, I tried to add a bit of filler rod but it was too thick.
D. |
Did you forgot about moving your son then?
TT |
Nice one Davey
Way to go Davey mate .... Green with envy over that neat little workstation that you have made :cool:
A propper stand is still on my to do list, just can't decide if I want to mount it onto the top of my Cebora DC tig set or to keep them sepperate .... Bit of a nuisance swapping the large Argon cylinder about !! The weld is looking FAB Got my Sherlock Holmes hat on now .... The heat got away from you a little in the middle, You reached for the filler rod & had a " The Eagle has landed " moment with the Tungsten, then promptly stuffed the filler rod right into the said Tungsten :D Only kidding Davey, what you have done is looking great, told you that you would soon get back into the swing of things. I have never used the inverter type tig before but I must say, I find the current really smooth, good cleaning cycle & produces a very tidy weld. Like me, I expect you have loads of plans for some nice goodies for your build .... Swirl pot, catch tank & the likes :) Very tempted to buy a metal polishing mops for my bench grinder, you know, just for that little bling factor ;) |
Cheers Ronnie, not too far off with your sherlock holmes work:D :D . I'm well pleased with the workstation. I welded the frame up yesterday afternoon then my mate gave me a bread tray trolley which i was going to rob of its castors but when I tried it turned out to be a perfect fit so I just drilled and bolted it on, quick spray job with "poundland" primer and then a coat of black to make it look a bit tidier, a shelf for the welder to sit on and an ali deck on top as a work area and bobs your father's brother:p . I still need to make a wooden deck for the bottom and fit a restraint for the Argon cylinder then its good to go.
Got a fiar bit of work to do with the TIG. First up is gluing all the bits together to make the inlet manifold then I need to hack about an inch and a half off the sump plus of course there's the SS exhaust headers and pipes to make plus a mate wants me to do some SS pipework for his bike and another mate wants me to fab up some throttle body inlets for some little shitroen cars or summat so there's a bit to go at yet. Probably will make a catch tank too and I'm sure there will be other jobs for it on the car. I've also got to make some brackets for sat dishes which I'm hoping will sell. TT didn't forget my son I went and did the move about midday, thankfully only half a mile journey so not a major issue but he needed me to shift the bigger stuff in our camper so his bed is now back in his old room and the rest of his furniture is residing in the corner of my workshop. Hopefully not for too long though. D. |
Well I haven't had much time to play since I got my new TIG machine. It only came with a single 1.6mm tungsten which is a bit skinny for higher power jobs so I ordered a set of tungstens, shrouds and collets from the parts dept to give me all the options. They finally arrived today and this afternoon I tried it out. It seems to be stuck at a low current level and won't melt 3mm ali but I have the pedal attached. Although I have the switch set to "local" it seems to be controlled by the pedal anyway. Ronnie, if you read this, does the "local/remote" switch only control the switch or the current control too? I've only just thought about this as it was working well till I connected the pedal.
The only other Dragon news is that I now have a clutch cable! Last week I had to replace the clutch cable on my brothers Nissan Almera as it was seizing up! I ran some cleaning fluid through the old cable and you would not believe the crap that came out. Anyway after a couple of hours soaking in cleaning fluid I applied some slippy liquid (WD40) and it seems to be fine so I offered it to the Dragon and it is a perfect fit (although I've still got to make the pedal box:rolleyes: ). If it turns out to be a FUBAR cable I can easily replace it at a small cost. D. |
I've solved the lack of power on the TIG set, it was me:( . I'd got the remote/local switch set to remote so without my foot pressing the pedal it was only giving me minimum power. Sorted now and working like a charm.
D. |
| All times are GMT +1. The time now is 10:56 AM. |
Powered by vBulletin® Version 3.6.4
Copyright ©2000 - 2025, Jelsoft Enterprises Ltd.