Glad your sorted Davy
I saw your post earlier Davy
To be honest, I had not really given the foot control a fair go .... Me legs were playing silly beggars when I first got the welder :rolleyes: Inspired by your post earlier, just had to give it a try. I had a root about in my bins, found a bit of 50mm X 50mm X 3.25mm alloy box section & a bit of 5mm alloy plate. Quite badly Oxidized, been in my bins for a fair few years, I gave it a quick token rub with a wire brush & heres the results. 3.25mm thick box section  A lap joint in some 5mm plate 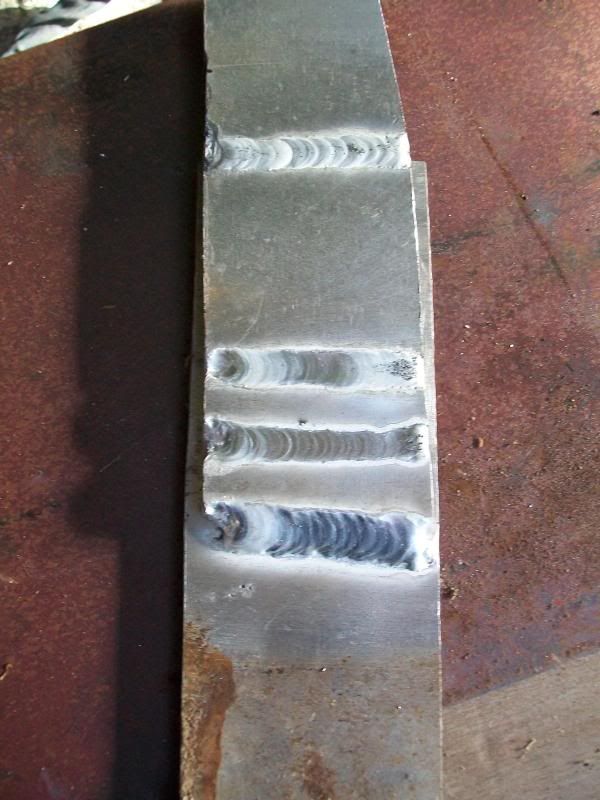 Not too bad at all in view of the fact that the material is well past it's sell by date !!?? Foot controll works really well & welder was giving a good degree of penetration. I thought it might struggle with the 5mm plate but to my surprise, coped easily & still had a fair bit of current left in reserve :cool: |
Looking Good Ronnie,
Definitely a market for fuel tanks if your up for collecting some pennies.....;) AndyH |
Hi Andy
I did give some thought's re fuel tanks :) A couple of the major drawback's for me, one would be the very high cost of alloy sheet in this neck of the wood's, the last sheet of 1.2mm cost me £47 & I dread to think how much the 2mm is per sheet now :eek: but by far the biggest drawback is the lack of a suitable sheet metal bender :( My own tank was made out of sepperate pieces, this meant 3 extra seams to weld & greatly increases the fabrication time, not to mention the extra Argon consumption. Been scouring ebay for a decent locost box folder for years .... Allways fetch silly money or are a gazillion miles away :rolleyes: |
Wow, that's some skill you have there Ronnie, can't say I have ever seen better than that. My Chinese arc jobbie doubles up as a tig but I think it needs some accessories eg gas bottle and regulator. I hope to look in to it and give it a go when I have a bit more time. Keep up the good stuff:)
Enoch |
Nice work Ronnie, one day I hope to turn out welds as neat as that. All I've done so far is stitch up some brackets for work with it welding 3mm wall 50mm dia tube to 4"x2" 1/8" angle. Its not the prettiest welding but for what these brackets need to do its fine, maybe I'll take a photo or two tomorrow and post it up for public ridicule:D . Northern Tool do a combination shear roll and folder with a 3' bed length, its the one I got last year and works well on light gauge metal, I've bent up to 3mm thick ali at 50mm wide with it today. http://www.northerntooluk.com/metal-...e_143342E.html
D. |
looks fab ronnie. if you do decide to make a few fuel tanks, give me a shout. ;)
|
2 Attachment(s)
I had a few hours at the TIG set this morning gluing the bits of my inlet fanimold together till I ran out of rods:mad: . Anyway here's a couple of photos of my dodgy welding, it aint pretty but the fanimold will need some attention from a die grinder and a flap wheel when its all glued together anyway.
D. |
Its been a fairly quiet week at work so I've managed to get all the fanimold bits stuck together at last after a new consignment of ali welding rods arrived. I have to say I am well chuffed with the TIG welder, despite it only having a claimed 60% duty cycle it hasn't cut out once, produces nice clean welds and with the foot pedal is super controllable.
I did quite a bit of cleaning up of it all yesterday with a borrowed die grinder and carbide bit then switched to my cheapo Dremel type rotary tool to polish it all up. It was all going swimmingly till 3 pm when the rotary tool suddenly lost power, I looked down to the main unit to see it glowing and unhealthy colour and pouring with smoke. So I chopped the plug off and went out and bought another!:D Going in today to do some more polishing and hopefully will have a couple of photos for your delectation later. D. |
Sorry Davey
I missed those photos when you posted them mate :o
Certainly got a nice bit of penetration going on there & I must say, I do agree with your assesment of those inverters. They do seem to have plenty of power in reserve for the heavier material .... I did slice open that bit of 5mm plate I used, a good 75-80% penetration, very good in view of the fact that I was not using that much power :cool: Look forward to viewing the completed manifold mate :) Been looking at that combined folder/roll/shear on the Northern Tools website, the current price is very good & I am growing ever more tempted :D Could almost pay as much that for one of those lightweight Clarke angle iron type folders !! |
3 Attachment(s)
Cheers Ronnie, your new website is looking interesting. I look forward to following it.
Attached should be three photos of the fanimold after initial welding and as it is currently. The third picture is a bit glary but it shows how I've built up "buttresses" around the fixing holes 'cos they were too close to the sides of the transfer tubes to allow for bolt heads. I've built them up with weld, drilled them through then I'll mill the tops flat and use cap headed bolts to fix it. There's still loads of tidying up and polishing to do but its coming along nicely. I'll leave it up to you lot to decide if its a candidate for automotive porn or would be better consigned to the scrap bin and get Ronnie to do it properly:D . D. |
Looking good Davey
That manifold is coming along nicely :)
You have done well for such an intricate part .... A lot of folk under estimate the degree of difficulty on a project such as this, what with ever changing angles & material thicknesses .... not to mention dissimilar alloy types ;) That is going to look the dogs danglys one you have lightly fettled & polished it all up. , I am sure once you have finished the manifold it will look every bit the part as a several hundred quid, off the shelf part ( Assuming you could get one in the first place ) :cool: I am hoping to have a crack at my inlet manifold in the next week or so. Really must get Junior to do some update work to my site .... Not been touched for ages :o Well done mate |
Cheers Ronnie, I'm pretty pleased with it so far. I seem to recall someone asked me if I could make him one a few pages back, trouble is the time its taking, about 40 hours spent on it so far:eek: . Of course a second one should be faster and they can do the cleaning up and polishing themselves which would save a load of time so it might still be possible. One for a four cylinder motor would be lots easier though.
D. |
Well I've hardly had a chance to touch the Dragon since I did the inlet manifold over a month ago and its been bugging me so as we were quiet this afternoon I decided to have a play around with my pedals. I'm going for a top mounted pedal setup, for one thing I think it will be more comfortable with my size 12s:p and it also puts the brake master cylinder higher up so it should be easier to bleed, well that's the theory anyway.
I mocked the pedal box and pedals up first in 5mm plywood to see how it would all sit and how long the pedals need to be to give a comfortable position then I marked up the main pedal arms for brake and clutch onto some 5mm steel plate before gas cutting them out and dressing them up. Next I cut the pedal plates which are now waiting for dressing. I may get time tomorrow to cut the throttle pedal and finish dressing all the bits up ready for welding. The brake pedal arm may need a slight crank to allow it to clear the steering column. Sorry no photos yet, maybe when its all sorted if it works out ok I'll take some:D . D. |
Good to hear that you have found a few moments for your build Davy :) :cool:
Can't be easy finding time with such a busy work schedule :eek: Hopefully you'll find some more time as the winter draws on ;) |
Hi Ronnie, yeah its good to do a bit now and then. The bonus of having the Dragon at work is I can drop onto it at a moments notice;) . As if I didn't have enough to do we've just decided to acquire an exhibition trailer for next years shows. If we can't find a decent trailer at the right price then we're looking at possibly getting a luton van and transferring the box to a trailer chassis, then its all got to be kitted out so either way there's going to be plenty to go at:D . Could make a useful "tea hut" for Stoneleigh next year though:D .
D. |
Had another quiet day with just one small paying job in so I thought i could get on with my pedal box but............................
My mate on the other side of our trading estate is allowing his father to build a Haynes in his unit, Mick (the father) isn't on 'tinterweb yet so isn't a member on here so I downloaded and printed out the front frame info for him the other day. I popped over this morning to see how he was getting on and it wasn't too good. The front frame was 6mm out of square which in turn put the diagonals on the top rails (FF4 to the transverse rails at rear of engine bay) out by 10mm. So when he came in this afternoon I went over to help him out and ended up remaking his front frame from scratch. Quite pleased with myself as its the first one I've done by the book (and ammendments/tutorial) and it turned out fine, to within 1mm on the diagonals which I reckon should be OK. To whoever wrote the tutorial all I can say is very well done, it makes a simple job of it. I was all done in just an hour and a half from start to fully welded:D . Mick can now crack on with his build and hopefully get it straight and true. I did manage to get a bit more done on my pedals, I've cut the blanks for all three pedal arms and hand filed them to tidy up the gas cutting marks, I've bored the 19mm hole for the bush tube fitments and I've cut and filed the pedal plates for all three. Hopefully tomorrow I can weld the tubes and plates onto the arms ready for a trial fit. D. |
Sound's like you have had an eventfull day Davy :) :D
Fancy finding another Roaster builder within spitting distance .... Sure is a small world :cool: Heck, even my eldest brother lives in Shropshire .... Don't get up to visit as often as I should :o |
To be honest Ronnie Mick is building one because of me:D . He saw my build anddecided he wanted to build a car so I pushed him gently but firmly towards the Haynes roadster:D. My business neighbour two doors the other way is talking about building one too but he still needs a few more gentle shoves in the right direction;) .
D. |
Davey, that manifold is going to be perfectly ok, I can only mig myself so I think the work you've done is really good. I dont recall if anybody has asked this before, I apologise if they have but was your motor registered? Guessing it would have been, is there any chassis numbers etc that could help you get a copy of the V5 :)
Anyway nice work Rich |
A quote for ally sheet Ronnie,2 mm half hard from Aalco 8x4 £75 quid non polished.
All the 2mm 5 bar chequer plate to make a tank 24x9x12 "£15" !!! from a good friend. Sheet of 1.6 polished from the mate £47 inc vat. |
Quote:
I guess my local stock holder must be feeling the pinch a little, I enquired about prices a couple of week's back. 2mm 1050 half hard was £67 + vat That is a fair bit cheaper than the 90 odd quid that I was quoted earlier this summer :eek: Wish I coud get mates rates :D |
Quote:
Pedal box is coming on nicely but we've been away to the Welsh lakes this weekend so no more progress as yet. D. |
My mate's dad Mick has been having some fun. Having got his front frame sorted last week I popped over yesterday morning to see how he was getting on and woe of woes all his diagonals were out plus a few of the BR rails were wrong dimensions so he spent yesterday afternoon cutting it all up again. Anyway I spent an hour with him this afternoon and we got him back on track. He now has the outer BR rails in place and tacked along with the front frame tacked in position. Tomorrow he should be cutting the two longitudinal parallel BR rails (BR9 and 10 I think) and then he can get them tacked in place.
D. |
Well work has gone quiet at the moment (slightly worryingly so:( ) so I've been doing a bit to the Dragon. Over the last few days I've framed up the rear end, I'm going for ali sheet over steel tube frame. The bottom rails I've made out of 25mm sq 3.25mm wall the same as the rest of my chassis but I've used a piece of 19mmdia round tube for the top rail. I nipped round to a local electrical contractor yesterday to see if they could make the bends for me with a conduit bender, they did and I had a nice little chat with the boss while his mate bent my tube. Turns out the gaffer is a petrolhead who runs a 7 litre V8 Corvette, he showed me a pair of tyres he has on the shelf ready for it (cripes they're wide) and reckoned they'll be the third set on it and its only done just shy of 7K miles so far:eek: . Anyway they did a smashing job of bending my tube and the only charge was a promise to take gaffer for a blast when its done:D .
I've been working on the pedal box too but today I tried it all for size with the drivers seat in place only to discover a major cock up, the top of my scuttle is about four and a half inches to low:mad: . This is the trouble with not doing my build by the book I suppose. Not a major headache to sort out, probably about two to three hours work I reckon but it does come with some good news. I am planning a top hinged pedal set with the brake master cylinder in front of the scuttle, as it was the brake reservoir would sit about two inches above the scuttle top. Once the scuttle top is raised the master cyl reservoir will be about an inch and a half below the scuttle top. The bonnet line will also be better for covering that mother of a motor. I do have some photos but they're on my phone and I've left the data lead at work so I'll have to post them tomorrow. D. |
4 Attachment(s)
Had to go out to collect the Mrs from the train station so called in to get my data lead. I also discovered a slight cockup with the inlet fanimold, essentially the transfer tubes foul on the fuel rail thereby stopping it going all the way down to the heads, possible solutions are:make a pair of spacer plates to take up the distance (about 12mm) or "adjust" the transfer tubes to clear the fuel rails or alter the fuel rails to clear the fanimold transfer tubes. I'm open to alternative suggestions too;) .
Here's a few pics of todays cockups:D . |
Due to the weather I've been able to spend a good couple of hours on the Dragon today. I've now got the rear end all framed up and 90% welded, only the underneath bits to do once its all stripped down and I can flip it over to do them. I've framed the transmission tunnel up and again that is welded on the top sides. I rebuilt the scuttle frame a week or two ago, just a couple of bits left to do on that and sort out the pedal box finally and I'll have a completed chassis:D . Then it'll be time to strip it all down, flip it over and weld the undersides then grit blast it and paint it.
I'm using the fuel tank that was fitted to the original Locust which measurements show should hold six gallons of go go juice so it should have a fair range unless I get a touch of leadfoot disease:D . I'm going to make the rear tub panels in three sections with the actual rear one as a separate removable panel so I can get the tank out should I ever need to. Not sure when I can get any photos as I've got a big job in tomorrow and rebuilding/redecorating the front room over the weekend but I'll try soon. D. |
Nice work Davy, sounds like your build has made some nice progress :cool:
You,ll need the extra capacity of the fuel tank for that beast of an engine :eek: :cool: Look forward to seeing some updated photos. cheers andy |
I'm expecting 30+ MPG from it when driving sensibly Andy, it did up to 32MPG dragging the Granada shell around when cruising at 70MPH so with more efficient breathing and a lighter body to haul it should be OK.
D. |
Progress of late has been patchy but I've had a decent day on it today and I now have the lower steering cloumn bush mounting and drivers footwell end plate tacked in. I've also been working on the pedal box, I've opted for top hinged pedals so as to mount the brake master cylinder higher up than the Haynes design, this should make bleeding the system a whole lot easier as gravity will be on my side;) . I've acquired a master cylinder from a Saxo so I've set it up using that but I really need to calculate the pressures/clamping forces and pedal travel using this and Granada calipers so I've only got the MC mounting tacked in place for now.
I've also looked at shortening the steering rack centre shaft as it is about 25mm too long and giving rise to an unacceptable amount of bump steer. The good news is it looks like it will be really simple! The centre shaft is made from mild steel (checked with a nick from a hacksaw) so it won't be difficult to hack 25mm off the nearside end. The track rod knucle jonit is screwed into the centre shaft on a M14X1.5 thread and my local tool supplier is getting me a tap for tomorrow morning so I should be able to just tap further into the centre shaft (there is plenty of hollow length available), hack 25mm off the nearside end and refit the knuckle joint with thread lock. I think I will almost certainly need to make some track rod extensions though. I'll try to get a few photos tomorrow afternoon and I also need to update my website. D. |
No progress to report sadly as I've been floored with serious manflu for the last two weeks:( . I have been to the workshop twice in that time, once to fetch the van for a ride to Norfolk to collect a trailer and once to meet up with Triff for a good old chinwag, (thanks for the mushies bud, I haven't been close enough to the Dragon to try them yet but they look good and I'm sure they'll fit a treat;) ).
I had intended to spend at least half of this fortnight working on the Dragon but this manflu has beaten me down, I even had to go see a doctor type person in hospital the other day:eek: . Anyway down to the real purpose of this posting, my next door neighbour is a mature single woman who has in ther last few months found a male companion. today he said to me "you've got my old motor in your place" which nonplussed me a bit. My face obviously gave away my confusion 'cos he then said "little two seater sports car in green"! My first thought was I hope he hasn't read my description of the car when I got it. Apparently he had a Zetec in it but it suffered really bad bump steer. his description was that it was "bloody awful at 80MPH":eek: Would you believe it? D. |
inlet manifold looks ok now its been tarted up :D my mate tom could never get the hang of ali he always said to me you dont need to be a good welder as long as you are good at grinding things lol.
i have finally managed to get the nack of ali but it took me a good year and about 3 big bottles of argon at £50 a pop. i found that a little bit of high frequency pulse helps when doing thick stuff to thin. will have a look at what the numbers on my welder say for the freq settings that i use for that sort of stuff (i just remember the positions not what it says on the switches lol). Also i found that using Ceriated tungstens made life easier on ali, they can also be used on steel so double bonus. |
Cheers Ash, I've done plenty of ali work in the past but it was many years ago so my skills are a bit rusty, your mate does have a point;) . I'm pretty sure I am using ceriated tungstens now, the originals that came with the TIG were plain tungsten but I had to buy some more because you only get a couple of really thin ones as standard. The manifold does still need some more work and fettling but its coming along. I'm just working out a little deal that will hopefully pay for the Emerald ECU, fingers crossed that it all works out:D .
D. |
at the end of the day its function over form that is important. ali is usually my last choice when it comes to materials :D think i would have done the manifold with stainless :D
been tinkering out in the workshop and have made a charge cooler out of ali and shortened the sump on the new engine which is also ali. dont know what the composition of the ali on the sump was but the thing was a total pig to weld even using rods with extra silicone especially for welding cast. will stick some pictures up when new year is all done and dusted and im let back out in the workshop. |
I made a good start on shortening my sump today, yes its ali and full of all sorts of crappy inclusions so just like yours Ash its been a pig. I managed to reduce it by 35mm which should be sufficient (damn well better be:D ) using a reciprocating demolition saw with a coarse metal blade. i've taken a few photos as I've gone along but I'll wait to post them till its all sorted and I know it don't leak:) .
D. |
i had a couple of little pin holes in mine filled the sump up with water mixed with a bit of food die and left it over night. marked the points it dripped from then went over them again, its unavoidable with cast ali as you can get little air pockets caused by crud in the material, reheating it usually brings the crap to the surface :D
|
5 Attachment(s)
Well I've now completed the sump alterations and hopefully there should be some photos attached to this posting. I cut 35mm out of the sump pan using a demolition reciprocating saw with a coarse metal blade fitted, to hold the sump while I cut it I clamped it to the front rail of the Dragon. I re-used the front and sides of the piece I cut out to extend the mid section to retain a similar volume to the original, I reckon I'm probably about half a litre shy of the original which I don't think will cause too much of a problem as its not really going to be a race car.
Once I'd welded the base back on and the extension pieces on I cut out the section where the sump pan goes down at the front (photos will explain better than words) and then welded on a piece of 3mm ali sheet to close the whole sump off. Inside I drilled three 8mm dia holes in the pan base to prevent air locks. I filled it with water and found a couple of pin holes just as Ash did so just went over them again. The sump plug had been butchered in the past and was a real mess so I turned the head down in the lathe so that it was a nice fit in a 12mm nut which I then welded onto the plug so it now has a nice big 19mm hex head. D. |
3 Attachment(s)
Here's the last few photos of the sump.
D. |
I managed to get an hour on the Dragon today and have refitted the sump and oil pickup pipe. While I had the engine hanging on the crane I used a G clamp to measure the required travel on the clutch release fork. From fully engaged to fully disengaged the fork moves 20mm at cable position which works out perfectly as my clutch pedal has about 24mm movement. I also had a stroke of luck with a radiator, a nerighbouring business specialises in French cars and has a C5 diesel he's breaking. well a quick meausre up and the rad will be just the job so £20 later I have a rad and both hoses, might try for the fan too on Monday.
D. |
Good stuff
Sump looking good Davy :cool:
Pleased to see that you are managing to find some time for your build :) Never know, you may even manage to get the motor up & running before the start of your forthcoming silly season ;) :) |
sump looks good like the stepped design should reduce the need for baffles
|
| All times are GMT +1. The time now is 12:34 PM. |
Powered by vBulletin® Version 3.6.4
Copyright ©2000 - 2025, Jelsoft Enterprises Ltd.