some progesss
I managed to fit my brake flexi hoses the other day (made by furore). I am hesitant to fill the system with fluid. I willl need to remove the front flexi's when i attach the bodywork and dont want a mess in my garage..... However i do fancy the idea of taking the car for a quick spin (on a private road ahemm cough).
I have also rec'd 2 grp seats from kit spares in Hull (the biggest box I have ever had delivered - my son immediately made it into a submarine). They seem to be good quality, however the way the harness holes have been trimmed seem to make it impossible to fit the edging strip. Looks like I will have to ask santa for a Dremmel! Could be handy with the bodywork as well. Has anyone else fitted these seats? If so what kinds of runners fit? The seats seem to have a bulge underneath so they presently dont sit completely flat on the floor. I was hoping not to use a runner on the passenger seat to save a bit of weight. |
Just a quick mention that I had to get a certificate of Conformance for my brake lines (Also from Furore) to pass the IVA.
|
Did Russ provide this free of charge? I am well impressed with the service so far
|
I'd expect so. I sorted it out myself, a long with many other items of paperwork the IVA man wanted to see to prove stuff was suitable if it wasn't marked as such (fuel filler hose, carb rubbers and brake lines). Receipts don't do it, they wanted actual proof.
|
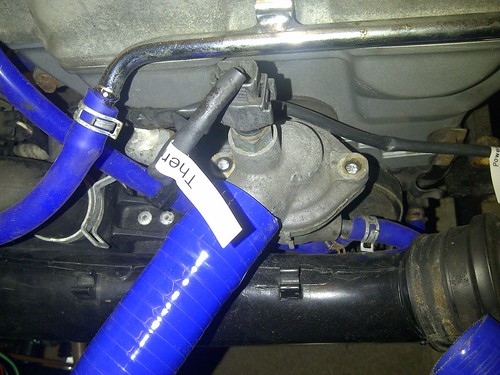
Broken bolts in thermostat housing aghhhh!
I popped out for 2 mins tonight (braving the cold) to do something on the car. I thought an easy job would be to change the thermostat. Both of the bolts sheared off. Has anyone got any ideas of how to remove them??? Here is a picture. I was contemplating drilling them out and using 2 long bolts.
 |
Will the thermostat housing slip over the broken studs
If they will take housing off place washer over stud weld stud to washer then weld a nut to the washer The heat generated should make the stud easy to remove cause the alli will expand with heat twice as much as the steel Hope this helps |
I cannot get the thermostat housing to move. The bolts seemed to be really soft as though they were aluminium.
|
I've managed to remove the thermostat cover and I have about 4-5mm of bolt showing. Any other way of doing it other than welding?
|
As long as you can apply heat and grip and turn the stud it should come out
I assume you have handed the welder back if you do need one you could come borrow mine for a day or 2 |
I had a similar issue on my manifold block, the way I tackled it was to drill a 3-4mm hole in the centre then slam an oversized torz bit into the hole. Hit the torx bit fairly hard to try and 'jar' the bolt, then put a socket it on it and wind it out... it may not work if the material is as soft as you say but it worked for me in the past when all else fails
hence why me and half pint nick named the car 'bolt'... |
My vote goes for welding something to the studs, too. I had also used a stud extractor on a broken exhaust stud successfully.
|
Quote:
Bob |
Another method I have had great succes with is to put a cut down the side of where the stud/bolt is mounted and open it slightly with the right sized chisel and as you say David nut and bolt.
If you are stuck give me the nod. |
Thanks I have ordered a stud removal tool off ebay and will see if it works. I am going to spray the joint with wd40 as much as possible until it arrives. If that doesn't budge I will try some of the other methods.
Exhaust. I managed to find and exhaust on ebay off a 7 style car (not sure which) it should have arrived today but I missed the delivery by about 5 minutes and they didn't try to leave it with a neighbour or behind my bin that was the instruction on the parcel!! Hope it's ok when it arrives as I got it for £25 David |
I find plusgas to be better freeing off oil
|
Gearbox speedo adapter
I have finally found a supplier for the 90 degree angle for the speedo cable! 18.50 delivered. Better than 80 from toyota (used though). I have just sent the guy an email to see if he has any more available for mx5 powered builders.
David |
success
The post man came running down my street yesterday, whilst I was working on my car and said," here are some more parts for your kit car!" Luckily it was the stud extractor and the snapped bolts came out straight away! Now just waiting for my Exhaust to turn up!
|
Hi David,
What type of exhaust did you go for in the end? I see you're progressing quickly on the car now...:cool: |
Hi Johno,
I bought the exhaust of ebay and was told it had been fitted to a vindicator, however i think its off a robin hood. I am only going to use this temporarily until I buy a cbs one. It should stop the neighbours complaining too much. I am still waiting for the exhaust to arrive (after making several complaints to the courier). fingers crossed it should be there tomorrow!! In the meantime I have been working on my tool shadow board on the garage wall. You can never beat good tool control! David |
A bit more progress
I've spent a bit more time in the garage lately. I have installed my radiator and some of the pipe work. I am waiting for a gasket and an olive to turn up in the post so that I can finish it. When I took off one of the old coolant tubes to the water pump inlet the tube had corroded badly so needed replacing. I looked on mx5 parts £100! And ebay £40! So i went to the specialist breaker next to me and got one for £5 that is almost brand new. I also managed to pick up a fuel pump plug for eternal.
Here is a picture of my almost complete radiator...  |
Looking good David i have to admit its a very smart build! Thanks a load for finding that plug wont be long now till i can get the beast running.
|
Suspension set up
I want to set up my suspension roughly myself. What angles should I measure and what should they be??? And.... Has anyone got any tricks for measuring them. I was planning to make a cardboard plum bob.
Also has none used the bodywork from agm? Would there be any problems with the side panels stopping short of the suspension? David |
I have a magnetic camber guage if you are stuck.;)
|
Quote:
I am going to try and make a plumb bob contraption with a protactor some string and MDF. If I get stuck I will give you a shout. When it gets a bit warmer you will have to keep an eye out for me working on my car when you are on the Base leg of the circuit which seems to be right over my house. I am going to try and set up my rear wheels with 1 degree camber and the front wheels with a couple of degrees toe in. Does this sound about right? All I could find was something on the westfield owners club forum.... |
On page 159 of the book it has recommended starting points.
Front and Rear Camber 1 degree negative Front Toe In 0-0.5 degrees Type Pressures 18-20psi. Cheers Stot |
Quote:
Why don't you get you logo made into a badge as it would look great on a nosecone.... or let me have the artwork to make some up. |
Quote:
If you want the artwork still I can sent it over. Cheers Stot. |
By all means do David,no probs at all.
Every time I am in the curcuit its usually mental with inbound IFR traffic and they tend to say the imortal words "keep it tight and expadite vacate" so I tend to turn base at Brunswick Ind Est and descend quick to land well up to vacate Foxtrot. Set up a flashing light and we can sort a flight one day. If you are stuck let me know. |
Quote:
Here is a picture of the earth bond I have added to my tank. I have used 17 amp wire. Will this be sufficiently thick?  |
Quote:
Just modded the sender for my build to fit it into the tank. My first question is.... How have you bolted/bonded the pump and sender unit to the tank? and secondly..... Surely if you earth the tank to the body when fuel causes a path of least resistance between the tank and the live wire in the tank the pump and/or sender will stop working and probably blow a fuse?? I was thinking about this this morning after reading up on fitting a metal fuel tank. Surely the tank needs to be isolated from the body altogether? Confused!:confused: Edit: I must be miss understanding something about vehicle electrics as surely even if the tank wasn't earth bonded to the chassis the pump and senders positive and return would short when wetted by fuel. I remember having the same thoughts when I replaced an in tank fuel pump and my old car. :confused: Edit!!!! Oh petrol in non conductive ! Well that explains a lot!! haha! I thought all liquids conducted electricity! Doh! |
Quote:
|
Quote:
As far as the earth goes the sender has its own earth that runs back through the cars electrics however I added another one to satisfy my IVA. The fuel pump still works with the earth attached. I think the tank is negatively earthed on an mx5. Let me know if you find out otherwise...... (in case I blow my garage up by mistake) |
Quote:
edit: Found this in a Fire Brigade, Fire Safety leaflet. Quote:
Stot |
Thanks for that david. And thanks for clearing up the question of petrol condutivity everyone! Haha.
|
Have seen films of petrol tanker explosion caused through static when I did an ADR course, Guy was blown from top of tanker when answering phone,a women slides across seat to get purse and touches nozzle and bang nice fire.
Moral of story,dont wear nylon and earth the tank.;) Sender unit resistor is insulated from body of tank otherwise A,it would not work and B it would short and blow fuse. |
LOL thankd David you are my 200th sub on youtube! Will have to send you a Mars bar or something =P
|
Quote:
Does anyone know who's it is?? David |
Definitely spuds car
Seemed to be doing ok too, although the m3 seemed more interested in going sideways than fast :) |
Had a ride in Spuds car at Teeside,well sorted and handy motor,defo better than beemer.:p
|
Exhaust
Has anyone got an idea of how I can remove the old pipe from my exhaust. There is a rusty bit of 2 inch tube that has been forced inside the exhaust. .??....
Here is a photo. I have tried wacking it with a BIG hammer and a cold chisel. Now I just have 2 holes. I tried heating it on the cooker to expand it a little but it's stuck fast? Tried wd40 as well  |
| All times are GMT +1. The time now is 12:06 PM. |
Powered by vBulletin® Version 3.6.4
Copyright ©2000 - 2025, Jelsoft Enterprises Ltd.