here,s another photo that might help....
 |
Quote:
i still cant believe what i was trying to do earlier.. i even tried putting bricks behind the rear wheels to stop it moving, and i pushed on the engine as hard as possible to try to move it. :D |
no prob, ;)
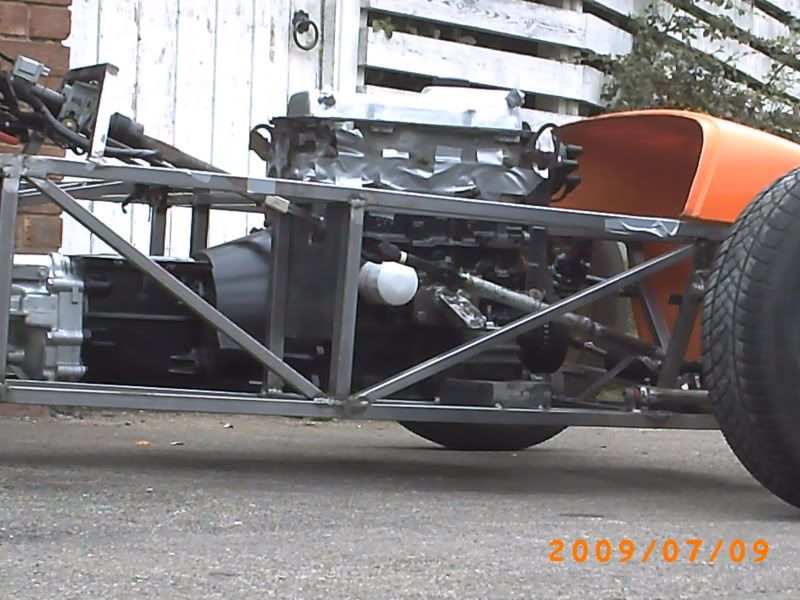
in the above photo the only part of the engine/box that is lower than the bottom chassis rails is 25mm of the gearbox bell housing, the sump of the engine is flush with the lower chassis rails, but i have used a shortened sump from a zetec engine, so it all depends on how much your sump is shortened by, to how much clearance you have below the engine. when fitting the engine/box..... try to keep the output shaft of the gearbox level with the center of the diff flange ;) . cheers andy |
Quote:
I fitted my engine & box in as a single unit. Just couldn't manage to roll the chassis forward as I was gently lowering it all down. Spent ages looking for snags, then noticed I still had a wheel chock under the back wheel. :o :D |
Quote:
|
well today i half gave up for the day, firstly i cut out the bit i forgot to cut out for fitting the engine. I then started reaming the bottom of the front hubs to fit the ball joints, after about 35 min of continuous reaming and a VERY painful arm i stoppedd and left it for a few hours, i then weled on the shock bracket on the lower front wishbones but only just realised that it was meant to be 300mm from the centre of the bush tubes, not 300mm from the end of the wishbones, so will grind off the welds tomorrow and re weld them on. i also stared putiing on all the front running gear, but wasnt sure which way around the mushroom insert was meant to go, but i think the hole in it is meant to be as far in as possible. I then treid to fit the steering rack extensions, but they wont go on all the way as the rack starts spinning then. how do i stop the actual steering rack arm from spinning? today has been abit of a pain as most things that could go wrong went wrong!!!:(
|
the reaming should tke approx 10 mins per upright, just keep checking that you don,t go too far with the reaming.
as for steering extensions, are they the ones that are too long? mine are from Rally Design & fit like a glove, check the internal depth of the thread in the extension in relation to the length of thread thats on the actual steering rack, they may not be matching. the mushroom is to sit fully into the upright with the offset hole towards the front of the car. hope this helps. andy:) |
Quote:
ok, ill rotate the mushrooms tomorrow and hopefull put the front wheels on and engine mounts in. Thanks! |
if the extensions you have are made to book spec then i think they are too long, if i remember correctly when you fit them & put the wheels on then the wheels will be pointing outwards instead of straight on , not 100% sure but somebody else had a similar problem,
what total length are your steering rack extensions? andy:) |
ok my rack total extension is 185mm, the thread depth of the extension is enough to go over the whole thread of the mk2 escort rack.
|
Quote:
If they are book spec they will be too long as i found out :mad: The rally design aluminium jobbies are perfect though, and very nicely made too :) |
just a quicky the book extensions are too long i made mine 125mm long
ive only set the track wit a tape measure so far but beleive i have enough adjustment with them at 125mm Ray:) ps you can stop the track rods turning wit some mole grips but the threads should go full depth by hand on no account should you have to use force hope this helps:) |
Quote:
i didn,t want to say who ;) :) i haven,t got the book with me Geeman, but i think the extensions you have are too long, i think they will make the wheels point outwards, turning left & right at the same time :eek: but i think you can shorten them but will probably need re tapping, might be easier to buy some from Rally Design (£25 i believe) andy:) |
i guess simply shortening the threaded ends of the extentions arent going to work then:( .... (a bad day made worst:( )
|
:o sorry Geeman,,
but tomorrow will be a better day for you, now you know of the prob;) andy:) |
well i was busy yesterday doing other things but today got the front wheels on now so its now a fully rolling chassis, however, i havnt got the steering rack problems sorted. i maganged to getb the old t5rack rod ends off the sierra rack by welding some box section onto it to act as a lever to stop the rack arm from spinning when undoing the track rod end. i mean it rellly was tight and siuezed on, it was nearly as tight a a hub nut!. I think this might be the reason that i cant screw my rack extentions on to the escort rack as the thead on the escort rack has bits stuck in the thread. Also i thought of a possible solution to the problem of my extentions being to long, why cant i just shortn the escort rack and then screw on the extension, and is nessacary shorten the extensions. Thanks
|
Shorten the extensions leave the rack standard.
If later on you need to change the rack for any reason then its a simple swap. In all my mods on cars I always try to keep the consumables or parts that may wear standard. Ray:) |
ok, well today seing the engine in the correct place was good and i spent about 2 hours cleaning up the garage as well. i only spent an hour on the car and it really is surprising how easy it is to place the engine in the car as it take around 5-10 min at most, however pulling the engine crane with engine up a steep driveway with only myself is very difficult especially when the driveway is full of potholes:rolleyes: . I fabricated the left side engine mount and fitted it( i didnt do it like the book as i dont have much 3mm plate, so used box section.
I also wondered what material the engine mounts on the 1.8 cvh are made of as they look like either cast oron or some alloy? Also i have put all my photos on flickr and try to update it a few times a week if anyone wants to see em. one other thing, is this around where the gearbox should sit:  thanks |
also, im now really looking for a roll bar, anyone got some suggestions? should i try taking drawings to some local fabricators and get quotes? do most people use cds or not?
|
Didn't someone on here have a rollbar group buy? That were I got mine from. The rear stays and cross brace I just made from thickwall tube I had lying around in the yard.
I got a quote from a fab shop in Liverpool, and to just mandrel bend one roll bar was extortion. |
I remember there were a few group buysd in the past, but that was before i was here. Im hoping there are enough new people for another group buy, nonw just to find a supplier.
i havnt done anything on the car over the weekend, bu finally got around to fitting the steering(sort of). I i shortened the trackrod ends and the ends of the extentions abit, enough so the wheels are now in line, however, there isnt any space for locking nuts now:( .  Ahh well, i also tried cleaning the cvh, and was going to paint it with hammerite, but then didnt bother, however i managed to remove most of the grease, but its not clean as such. The left engine and gearbox mounts are done, now i just have to make a mount for the right side so it fits under the steering coloumn. Im just wondering what sort of order people do things in after they hve arolling chassis, What did you do next as theres much to do but im just not sure what order to do it all in. Also when did you all fit the floor? |
chassis looking good there.
as for order of doing things, here,s what i did/doing finished all welding, engine mounts, headlamp stalks, brake line tabs etc, i,m now almost finished painting the chassis, then once fully dried i,ll be fitting the floor then build it all back up, put the wishbones/suspension/steering back onto the chassis & back onto wheels, then fuel & brake lines before engine/box go back in. well thats the order i,m doing things. cheers andy:) |
Need some help??
Ok, simple question, is my engine sitting too low???
Ive fitted the engine, but it seems to be sitting in the chassis too low, is it? im using the original unmodded cvh sump atm.   |
Also both engine mounts are 68mm off the chassis as per the book specs and the gearbox mount is also as per the book specs.
I wasnt expecting it to be as low as it is especiaaly when i just remembered this picture from handyandys car. |
from the angle of the photo it looks about correct, once you chop the sump it,ll feel like you have it in the right position,
most builders seem to have approx 25mm of sump below the lower chassis rail, if you look on my build photos you can see that my sump is level with the lower rail but has the 25mm of the bellhousing below the rail. cheers andy:) ps, may i ask if you have turned your chassis over to weld the joints on the bottom rails? |
Quote:
I knew someone would pick up the joint not welded all the way on the chassis:p :o , but i have mostly fully welded the under side, including that joint, but i am yet to fully fully weld the chassis. |
the above photo of my car is a bit deceptive with the angle it was taken, if you look at the last photo on my thread "big day" you can see the bellhousing below the lower chassis rails by 25mm.
in that photo you can just make out the shortened sump, i,ll be honest & say that i bought my chopped sump, which was also extended to keep the original oil capacity. andy |
looking good geeman dont forget to weld in all the tight corners. one thing to check. make sure your clutch arm clears the transmission tunnel. i had my gb back like yours and had to nudge it forward a few mm to get the clutch arm to clear.
|
If another group buy comes up for roll bars i will be interested as many others will be im sure ;)
|
Quote:
|
thought it would.
mark is that a hint about the roll bars? i could do another group buy if we can get 10 people to pay up. |
Quote:
Also im up for the group buy, so youve got 2 people. Im sure there will be another 10 few people willing to go for a group buy as the ammount of people building recently seems to have grown quite considerably. |
roll bar hint
im in for a roll bar.thats 3 so far.
andy |
Quote:
I was hoping you would pick up on that one! We are upto 3 people so far and im sure some more will soon follow, especially if people have looked into getting them made locally because it aint cheap, anywhere near me anyway! |
Quote:
Sean |
Quote:
|
Make that 5 :D
|
Quote:
|
I cant remember what the nut on top of the track rod ends are called, the one that looks like a castle and should have a locking pin or somthing:confused: ? i need them but dont want to pay ford a fortune?
Also, will i ever need a tap and die set throughout the duration of hte build, ad aldi have a set for a bargin price and i want to buy it, but not sure ill need it. (see here) I also wondered about my brake master cylinder, as the end of it is too big for the pedal box?(ill take some pics later) Oh yeah, and what did people use for the bushes on the pedals(i remember reading a thread about it on hhear somwhere but can find it). I might turn my own bushes later on when i have access to a lathe, but if they are very cheap ill just buy em. Thanks! i also have a bit of a problem witht he steering as the steering coloumn does hit the upright when it turns which im not sure how to fix? Also where can i actually find an stainless silencer, as im having trouble sourcing one? wow.. i have soooo many questions:rolleyes: :o |
No 6 on the list for me please for a roll bar.
|
| All times are GMT +1. The time now is 03:20 PM. |
Powered by vBulletin® Version 3.6.4
Copyright ©2000 - 2025, Jelsoft Enterprises Ltd.