the clamp will fit its meant to be tight. the packer under the bigger bracket only needs to be 1.5-2mm on your front upper suspension brackets i welded a little bit of 3mm plate on to brace them as they are not central.
|
Ash,
That makes perfect sense about the upper suspension bracket. Im thinking two triangular gussets (stop sniggering at the back) would do the trick. I have just had another bash at the steering clamp and it went on a little further. My rack is brand new and there might be an excess of paint on it! Cheers Ginge |
11 Feb
I spent quite a bit of the day fabrication a bespoke engine stand to enable me to manoeuvre the engine and gearbox around the garage on a trolley jack without it falling over, also it will allow to fine adjust the position of the engine and gearbox in the car. [IMG] 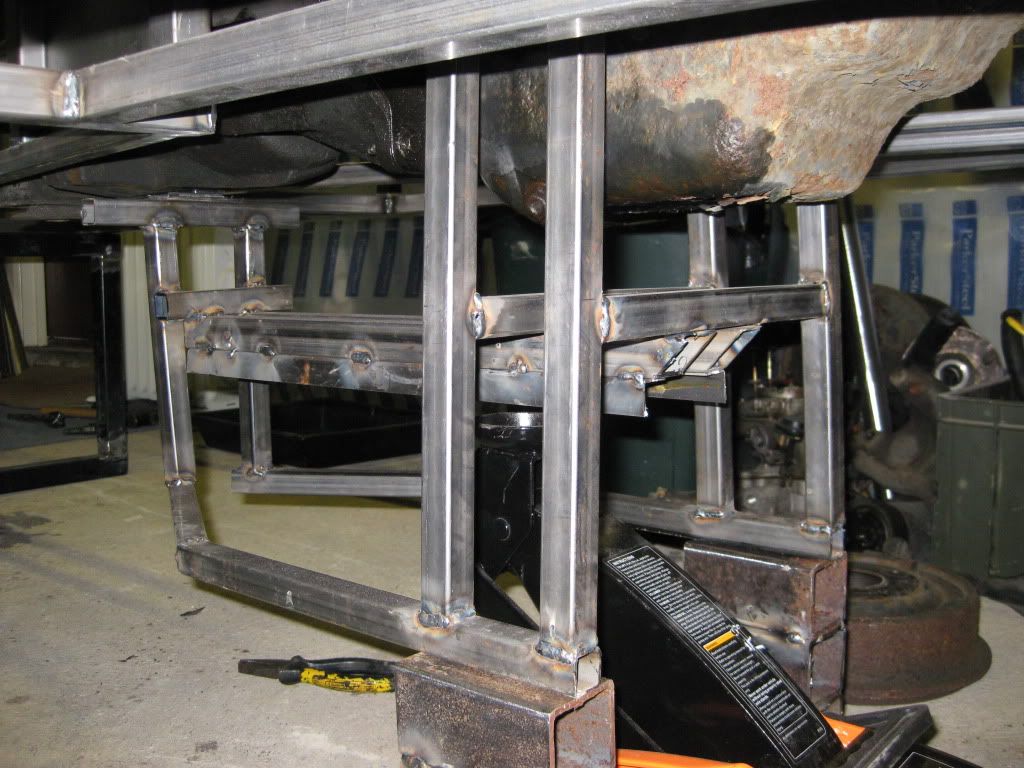 [/IMG] [/IMG]I managed to get the engine and box ‘into’ the chassis, it was a little nightmare as I had already fitted the diff which made the back end really heavy, so to get the gearbox up the transmission tunnel I had to raise the front of the chassis and lower the rear. The opposite of how you would do it if you had an engine lift.. [IMG] 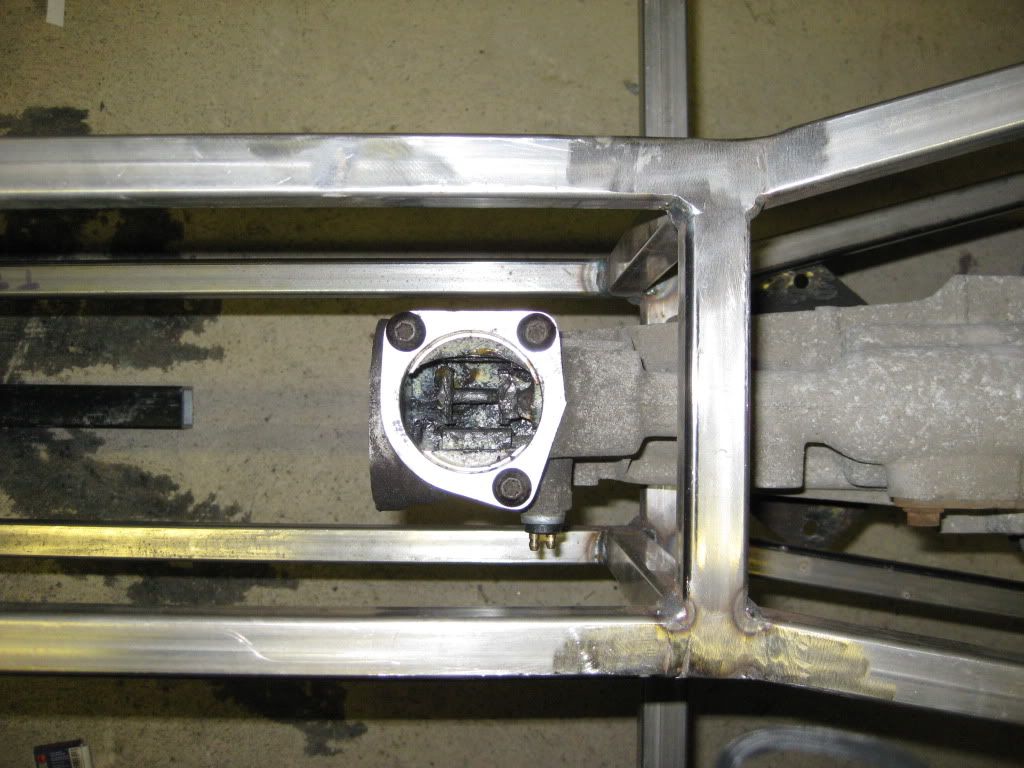 [/IMG] [/IMG]It is roughly in position now and needs some measuring to get it perfect, I am going to be stuck if the 5mm steel I ordered doesn’t turn up soon because engine mounts are next. Sierra is still on the drive! 12 Feb Only had a couple of hours in the garage after going to ‘sharing assembly’ and before school pick up. I concentrated on getting the output shaft of the gearbox bang in line with the input of the diff, ensuring the gear stick still goes in reverse and the reverse light switch connecters are still accessible, then I welded on the gearbox mounts (I added some ‘gussets’ to them just to beef things up a little) with the gearbox attached. As for the engine mounts, the steel hadn’t turned up so I sacked it at 1pm and watched CSI. [IMG]  [/IMG] [/IMG]The steel turned up at 2.30pm so tomorrow (I know Saturday and I get to go into the garage I think it is only because it is half term) I am going to mock up the complete steering system to make sure the driver’s side engine mount doesn’t encroach. I have finally admitted defeat and TR5 has got to go, I offered up the bike carbs and there is no way they will go on with it in place. Another example of Ginge thinking he knows better, rear hub nuts and now TR5, you would think I would have learnt by now. [IMG] 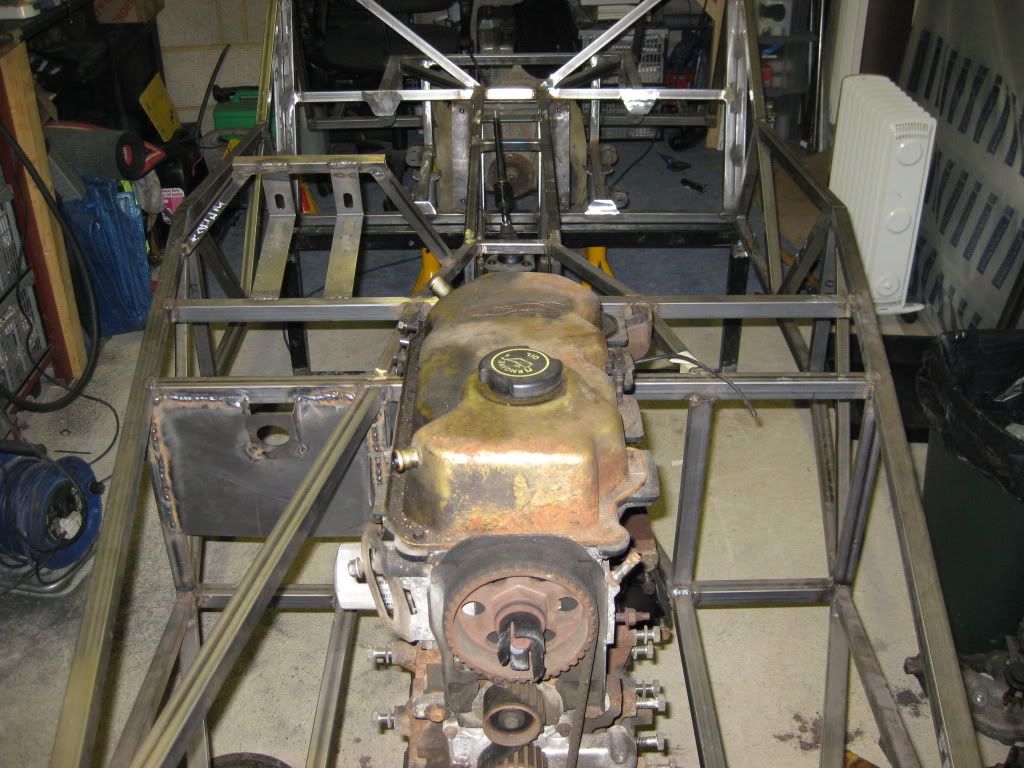 [/IMG] [/IMG]Sierra is still here. Pictures arent working pop back later Picture still not working properly dam it I think I have got it now |
Looking really good Ginge. Although you've missed a weld on one of the uprights, look to the right of the engine in the last pic :p.
|
Mate,
You must have eyes like a Hawk! I thought I had found the last missed weld the other day, thanks. Cheers Ginge |
looking great Ginge, nice work
did you have the .........."looks like a car now" feeling? ;) cos i know i did when put the engine / box in :D Tatey........ i dropped a needle at the unit today....fancy coming over & finding it for me ????:p :D cheers andy |
Brilliant stuff Ginge :cool:
I am pleased you posted those pictures of the gearbox position ...... It has certainly made things a lot clearer for my Zetec install :) As I have said before ..... Those pesky Pixies sneak in the garage overnight & steal those welds :D :D |
Andy,
It defiantly feels more like I am building a car now and not just cutting and welding steel together, although I seem to have to weld something every day it is interspersed with engines and steering columns. Ronnie, I was really convinced I had got the last of the Chassis tube welding done, can’t believe I missed it. Cheers Ginge |
If it's any consolation ...... I missed that exact same weld .... Twice :rolleyes: :o :o
I wonder if anyone has counted how many welds there are on the Roadster chassis tubes !! :eek: |
Quote:
Ginge.... yeah , know what you mean.....its no longer a climbing frame for the kids or a "chinese puzzle"........its a CAR . nice work mate . cheers andy |
Ginge i have to say im glad you made this build diary. Otherwise i would have welded the other roll bar mount on the wrong side of the car as well :eek:. I welded the first one on, put all of the other chassis plates around it to complete the box, then thought 'hmm, that space looks a bit tight to get a bolt for the suspension bracket in....bugger it is', quickly came on here and realised my mistake, 10 mins of grinding and a few welds later its all sorted :D.
|
Didn't listen to what I said did you. :p
Put the roll bar and plates on where they sit and make sure that if fits well before welding together just in case you need to alter it. Will save you loads of hassle and grinding. |
13 Feb
I cracked on and cut out some 5mm plate for the engine mounts, two large pieces to sit flat on the chassis and two pieces to bolt to the engine. Nothing outstanding here I just traced around the old engine mount and cut it out. Then decided the lack of pillar drill will be a big hold up, so because I am an impatient when it comes to buying stuff (I want to hand my money over and walk off with the item) I went to Wicks and purchased said item. Now I like a good bit of engineering, and would rather pay a little more for the same item if it is better made and will last longer. I am under no illusion that my new £55 pillar drill is not at the height of pillar drill engineering HOWEVER after 8, 10mm holes through 5mm steel it is performing well, I am keeping the drill bit well cooled with oil. [IMG] 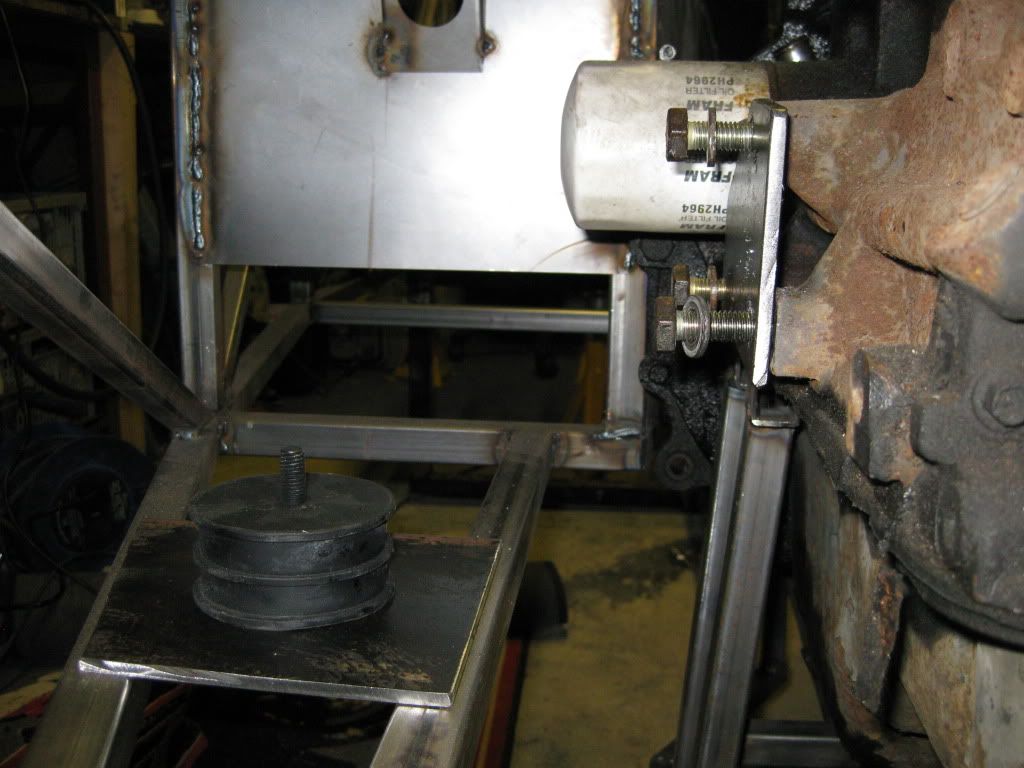 [/IMG] [/IMG][IMG] 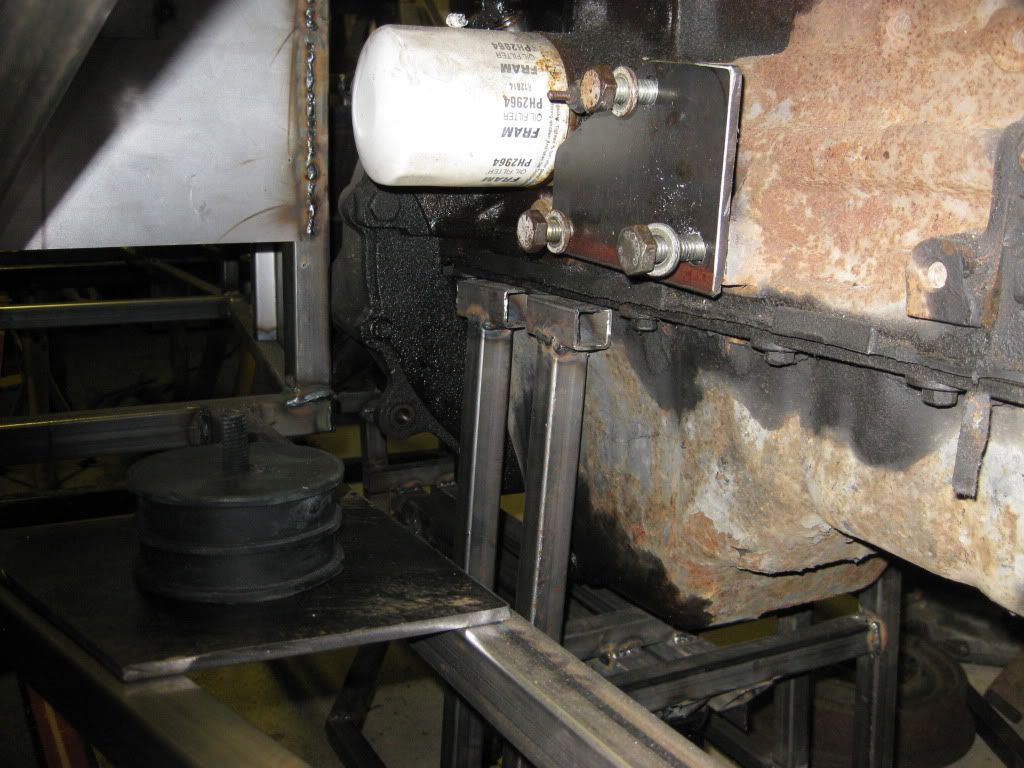 [/IMG] [/IMG]Should have the mounts finished tomorrow. Anyone else working on the roadster on valentines day? |
Looking good Ginge. I have to say my £40 pillar drill has been working a treat since I bought it last month, it's amazing how many uses you find for a bit of equipment you have done without for years.
I'll be working on my Roadster tomorrow, and even driving to Carlisle to help TwinTurbo get the chassis off his roof and collecting mine and HandyAndy's roadster bits. |
Its Sunday tomorrow so I'll be working. By the way when is this valentines day thing?? :) :D
|
Quote:
Makes it sound like its on my house :) TT |
14 Feb
5hrs in the garage today and I still havent finished both engine mounts, the drivers side is done and I am chuffed with how it has turned out. [IMG] 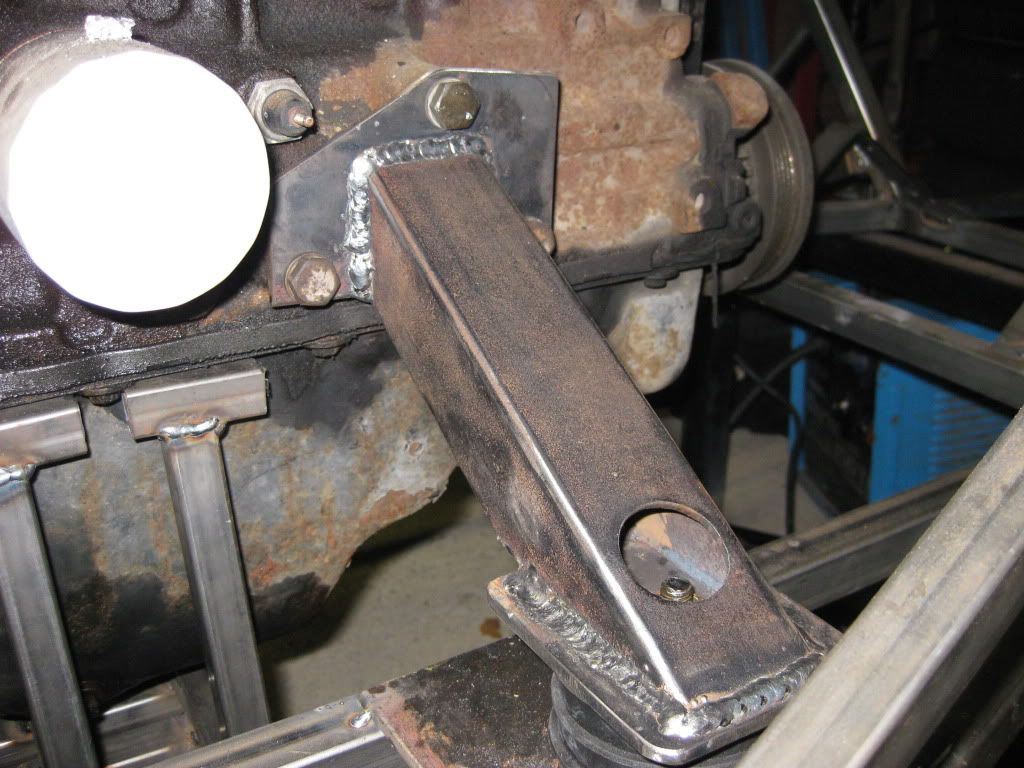 [/IMG] [/IMG]The passenger side is a little trickier, simply because, the three bolts that go into the engine block are closer together so the strut, as it were, needs some cut-outs to allow you, or rather me, to get a socket on the bolts. [IMG] 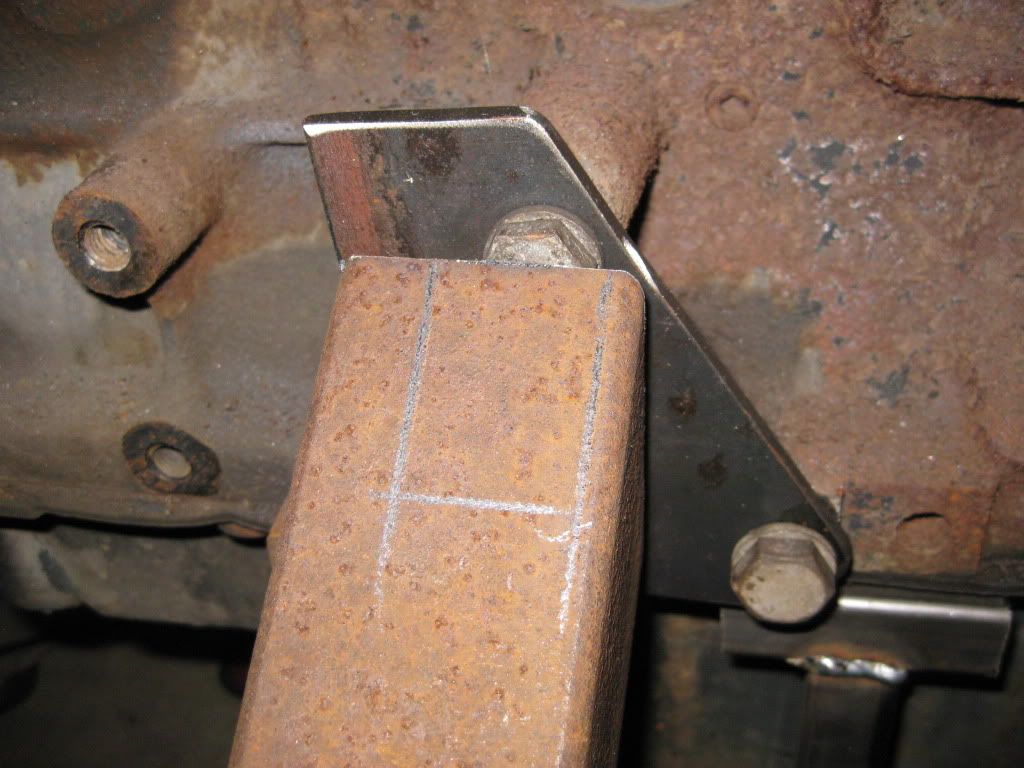 [/IMG] [/IMG]I will be doing half term type stuff next week so no building but it should be full steam ahead next weekend. Cheers Ginge |
Awwww Ginge
Your engine mounting arm looks soooo much neater than my Ugly but stong AF ( Gorilla ones ) Going to have to re-make them now :o :D :D Good work there mate :cool: |
Cheers Ronnie,
I am pleased that it has turned out as I wanted. There is more to this, making engine mounts, than meets the eye.;) Things like the bolts that go into the block need to be shortened, takes time to do properly, the strut needs to be marked up whilst in mid air before cutting angles, cutting out the big hole in 5mm steel. I think I might get another angle grinder as I spend an inordinate amount of time swapping between cutting disc and flap disc. Cheers Ginge |
Definately agree with all of that ..... Certainly takes a little head work sometimes :)
Sometimes I have days when I can't see a clear way to solve a problem .... next day it just jumps straight out at you, hope it is just not me that has this afliction !!?? :confused: :rolleyes: Not a bad idea to have a spare grinder .... Saves a fair bit of time ..... I just use several cheapies nowadays. I'll kill a Makita or Bosch ( Not the quality of days gone by ) one in a couple of years. Better value in a £14 B&Q one that'll last a year. So far my build has seen the demise of 3 sub £20 grinders :D ( A lot cheaper than killing one, £100+ Makita !! ) |
B&Q Do their own Brand one with variable speed for £25ish.. I have the older version and it's the best grinder I have had ( Bosch, B&D, Clarke not as good)
TT |
I might invest in another one soon.
My problem at the moment is I have £1.58 in my build account. I need to sell a scooter I have to inject some cash. Cheers Ginge |
Yes the B&Q Power Pro range is a lot better quality than their old Power Devil stuff ;)
The flap disk does put quite a load on the poor angle grinder .... Poor buggers don't stand a chance :D ------------------------------------------------------------- Know how it feels Ginge .... Very, very soon my build pot will be empty once more ( Paying for my last major purchace ) ;) Been spending quite a bit this year .... Just keen to give the build a boost this year. Besides the IVA, I have no more major spending to do, it's all here :cool: |
For anyone contemplating getting a new 4.5" grinder check out Aldi tomorrow. They have one in at £14.99 and don't forget that all Aldi electrical equipment has a 3 year guarantee on it:D . i was going to my local B&Q today for one but now I'll hang fire till tomorrow and get the Aldi unit.
D. |
I have given up buying Aldi stuff. It just does not last.
Hand Files.. Droped one and it shatterd! DVD Player. #1 did not work , #2 lasted 40 days. Compressor. Worked for 30 seconds then burnt out! Jumper Pack. Lasted 18 months and would never start a car properly. Think there have been a couple of other failures or underperformance issues.. TT |
I bet I hold the record for the most grinders burnt out during the build......:rolleyes:
8 so far and still counting.......:eek: Admittedly they were cheap as chips..7.50€ each:eek: I know I know, I could have bought a good one instead of loads of cheapies. But I also burned out my best Bosch one. |
Quote:
|
The only good tool i've had from Aldi to date is a pillar drill even though i did bend the shaft on my first one, my fault not clamping the steel properly, and they changed it straight away.
Must have gone through 6 grinders over the last 4 years, including Aldi ones, since bought a Makita grinder for £45 and its been great. Always worth buying good gear. Just bought a nice big lathe for Saturn, coming on Wednesday, was going to buy one that Ash had for sale but needed to pay by credit card. Gonna be like xmas again.......;) AndyH |
Quote:
|
Quote:
D. |
20 Feb
Not quite full steam ahead as I didnt get into the garage until 1pm. I have finished the other engine mount, I forgot to take any pictures with it in situ, but suffice to say the engine and gearbox was in the chassis, supported by its own mounts. I then stripped it all out put the engine by the garage door had a good tidy up finally getting two coats of etch primer on the mounts. [IMG]  [/IMG] [/IMG]Not sure what to do tomorrow but I should imagine it will involve welding the underside of everything I have welded so far, oh and fitting the handbrake cable guide CP14, then I will either have to pick the good book up or start cleaning Sierra parts. |
Aldi Digital micrometer go mental over 10mm...
Their Wireless doorbell packed in after a couple of months too.. TT |
Mounts look good.
TT |
Quote:
D. |
Quote:
|
my grinder is the cheapo Machine Mart one , £22 , its been well used, built my car & it now gets serious use at Saturn, a great bit of kit for the money :)
cheers andy |
Looking good
The engine mount's are looking tidy Ginge :) :)
Don't remind me of cleaning donor parts .... Can't say I am looking forward to that Job :eek: I guess that's why it hasn't been done yet :o |
Electrolysis is your friend!! Donor parts came up like new, and all you have to do is wipe them under running water when done, then get some paint on them PDQ!
Actually turned out to be a pleasurable experience, and had me looking for more rusty stuff to do!! Cheers Adrian |
Quote:
TT |
Quote:
Errrr well yes ..... That's what de-greaser and a pressure washer is for. :D Electrolysis is a method of removing heavy rust scale .... very effective too ;) Going to need a MF Electrolysis tank to fit an engine in, dread to think of the damage you'll do to the engines internals :eek: :D |
| All times are GMT +1. The time now is 11:18 AM. |
Powered by vBulletin® Version 3.6.4
Copyright ©2000 - 2025, Jelsoft Enterprises Ltd.