hi johno Is that equinox body kit?
David |
Quote:
No it's an AGM kit. :D Johno |
Quote:
 Bob |
Hi Robo,:)
I've been thinking about the design of my upper front wishbones and think I'm going down the "Rose Joint/Heim" route istead of polybushes. I believe on Algas thread you said the MX5 caster is 5 degrees. I was thinking about moving the top ball joint adjuster rearward to achieve 6 degrees with the Rose Joints at 90 degrees to the pivot bolt. I'm going to use misalignment washers and machine some spacers for the suspension brackets to take up any slack. This will give me the option to dial in a caster angle to suit the geometry for the front of the car. I plan to bend the top tubes and weld on threaded inserts onto the ends of the tube which will give a cleaner look...... The outer camber adjuster will be adjustable whilst on the car without removing the ball joint but it will not be a bought in item as I'm having some parts machined up. Like I said not finalized yet so any input from anybody will be appreciated.:) :) |
i think ur going down a good route with rose-jointing the wishbones. it was something that i was looking at, and think will do for them all. will mean making more but hey ho. your builds coming on really well though johno, be a good step with the bodywork on. :)
|
Quote:
Bob |
Here's what I propose to fabricate as my front top wishbone.
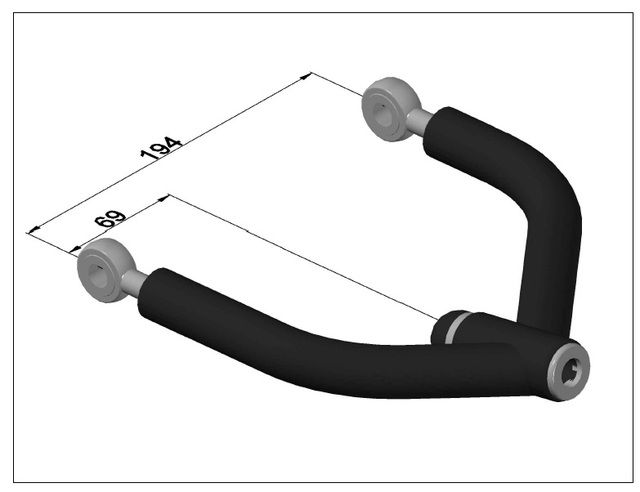 I will be using 25mm x 2.5mm wall which will allow me to weld the threaded bushes into the tube as these are 20mm OD. The tubes are going to be bent at 45 degrees to give some extra weld/joint area to the main threaded adjuster. I have moved the main threaded adjuster back 5mm to the book dimensions. With the Rose Joints I should be able to increase/decrease the caster as required for my car. I believe DRCorsa has stated in Algas post on "self centering" that this will increase the caster by 1.4 degrees. Camber will be adjustable in situ with a homemade camber adjuster. |
Well I started to fit my bodykit today.
Not worked with GRP before so not sure how to work with it.. I've made a start on the front nose cone cutting out the unwanted panel. I used a Dremmel with a cutting wheel which seemed to work fine and then sanded some of it back with a drum sanding atatchment. Also bolted my side panels and scuttle on with riv nuts. It took some time linning up the ally panels with the GRP kit but it's taking shape slowly. 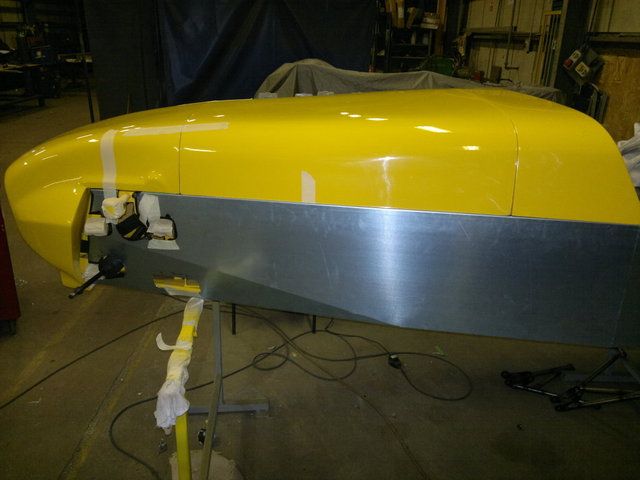 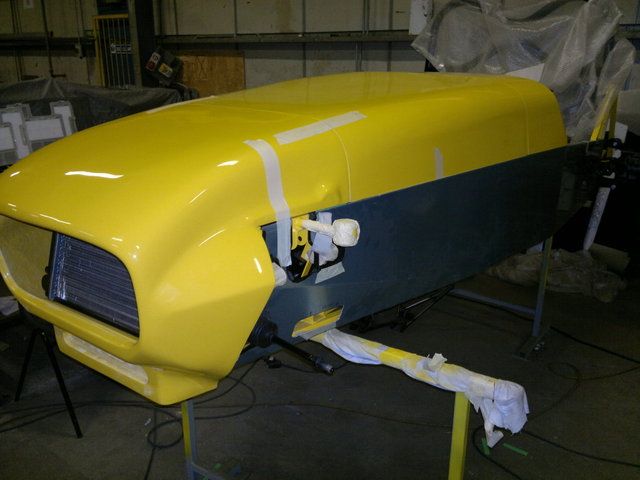 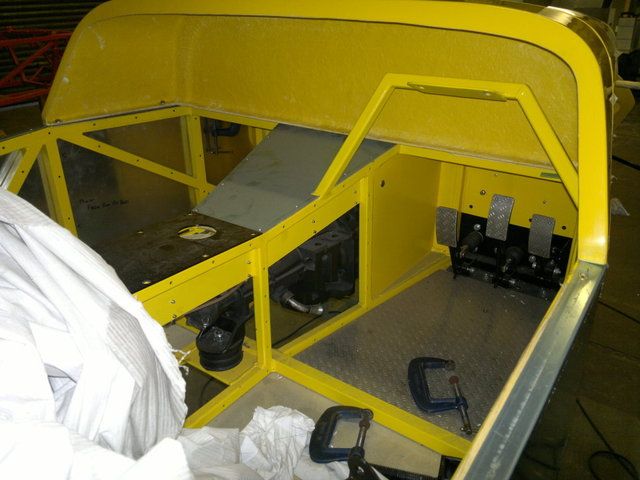 I plan on fitting my bonnet catches tomorrow which will be be fun I'm sure:rolleyes: |
Looking really good there.
Where abouts did you get the silicone hoses for your engine? Is it designed to be flexible? David |
looking Nice :) .
Bodyworks a gr8 colour too, I am using yellow and black. TT |
Quote:
The hoses came from AP Motorstore on Ebay and yes it is designed to be flexible. |
Quote:
I decided I wanted a colour that was easily visible in a row of traffic especially in somebodys rear view mirror....:eek: I also think yellow and black look good together.:D I've now decided to concentrate on getting the car up and running instead of trying to make it look good........:rolleyes: |
Quote:
http://imagehosting.rodsnsods.co.uk/...b0f3674ceb.jpg Bob |
Hi all,
Managed to spend sometime on the car Sunday fitting my bonnet catches and steering column. Still waiting for two of the catches to turn up but all holes are in place ready. 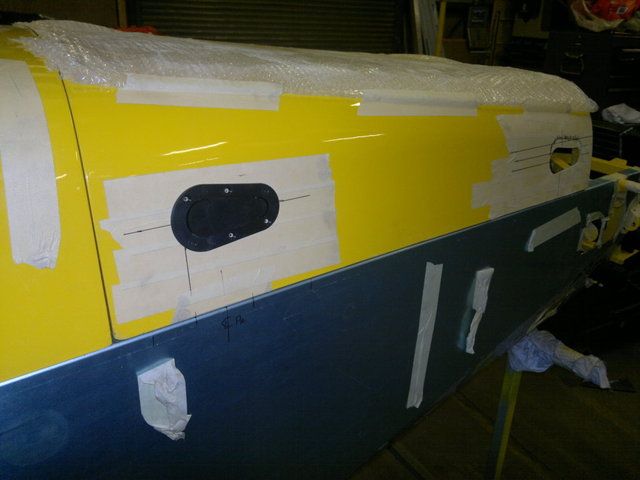 Ther'e a bit fiddly getting the adjustment right and will need realigning on final assembly but I'm happy with how they fitted. Also managed to get my steering column in place. 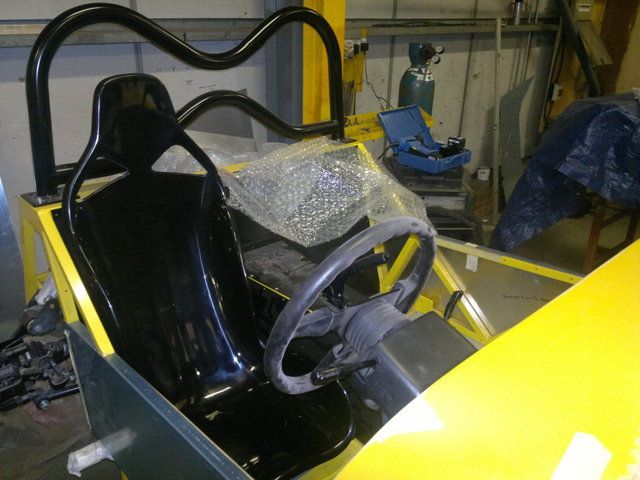 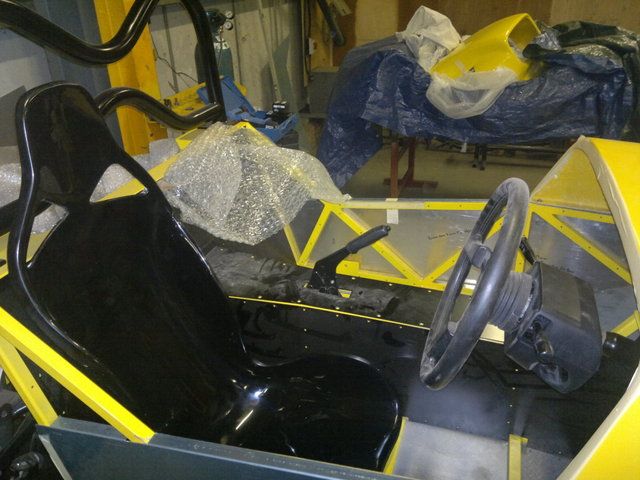 I started on my dash using ally so looking forward to working on that soon...:) |
looks sweet mate. coming together really nicely. same seats as i went for too. :)
|
Quote:
Not spent too much time on my car lately, lost my "Mojo" a bit so to speak... Got to that point in the build where I just couldn't find any enthusiasum to carry on. Sadly my Dad past away few weeks ago followed by my wifes Uncle then my Uncle so things lately have been a bit crap to say the least..... I was hoping to finish the car so my Dad could see what I was capable of doing but alas that was not to be. Well I've decided to get back into the swing of things and get on with it... My son is looking forward to being a passanger so at least that helps me out. Well I'll keep posting my progress as it goes and you never know maybe I'll finish it...:) :) ps..... the GRP seat is quite comfy which I was supprised about, only ordered one but will order another when I need it. |
sorry to hear that johno, talk about getting kicked when your down! but im glad ur trying to be positive. i think its easy to loose motivation in the build, ive not touched mine since march, just due to work commitments, and now im on two weeks holidays (planned to spend lots of time doing the car), but ive been doing lots of favours and other jobs that have come my way, and its real frustrating. im so keen to get back into it, but seems so long since ive touched it!!! its always good to read ur build thread, gives me lots of inspiration, and your doing a real great job. :)
|
Hi Johno sorry to hear of your sad losses glad you are getting back into your build been reading ur thread great work, I've bought a part built chassis which so far hasn't got any brackets for the suspension yet, I'm going to build mx5 version I've got all the main parts from mk1 1600 mx5 I need some advice please.
1) I have been told I can't use the power steering mx5 rack, so i have been looking at a mk1 escort 2.9 quick rack would this be okay?. 2) What would be best for wishbones? I see you are not going to use wishbones as per the Saturn plans, Robo has posted a link to some wishbones will these be what you are going to use?. Thank you in advance for any information you can give me. Regards Mick. |
Quote:
Firstly thanks for your kind words.:) :) I bought a 2.9 Escort steering rack from Rally Design for my build with the ally clamps. Be carefull not to get your steering rack extensions made as per book as the MX5 versions are shorter. I originally made Saturn type wishbones and over time have changed all of them except the rear lowers. The front lowers I've removed the front adjusters as "Toe in and out" can be altered by the steering rack extensions. I've kept the pivot points the same but made a different outboard end to hide the bottom ball joint and lower the tube to overcome the steering rack extension fouling the tube on full lock as some people have reported. Skov overcame this problem by fitting plastic tube in the rack to reduce lock to lock. The front uppers have changed to accomadate inboard rose joints to allow me to adjust caster in case self centreing is a problem (see Algas thread on this) and it can help if you use standard lowers to overcome the steering rack extension fouling the tube also. Where the top ball joint fits I've fitted a camber adjuster to change camber without removing any parts on the car when setting up. The rear upper I have moved the shock mount to above the upright and made the camber adjustable on the car without removing any parts. Everything is detailed in my photobucket so any questions just ask. All my alterations are drawn up in Autocad along with the chassis in 3D which I should be able to pull up any measurements if required. |
Quote:
Thanks for the post and kind words.;) Just keep plugging away at it and it focus on finishing it. I can understand why people start and then sell up later as it seems never ending...... I've basically bought bits over time which spreads the cost but only parts which I need to achieve the goal I set myself, for example one seat and harness to sort locations of mounting points. This is my method throughtout the build. Well I look forward to your progress in piccys and hope to show some more progress soon myself... |
Hi Johno thanks for your reply you say you have moved upper rear shock bracket to above upright maybe I'm stupid but I don't understand what you mean maybe you could explain, also are the wishbone brackets as per book?.
Is there anywhere I could get the wishbones as your using made for me? Regards Mick. |
Quote:
All the suspension brackets on my car are as the Saturn build guide Rev 3 (I believe I still have this somewhere in pdf format). The rear shock mount I have moved to above the upright similar to the Sierra version. This way the shock is in line with the upright and the same length as the book. It also takes some strain off the threaded adjuster. 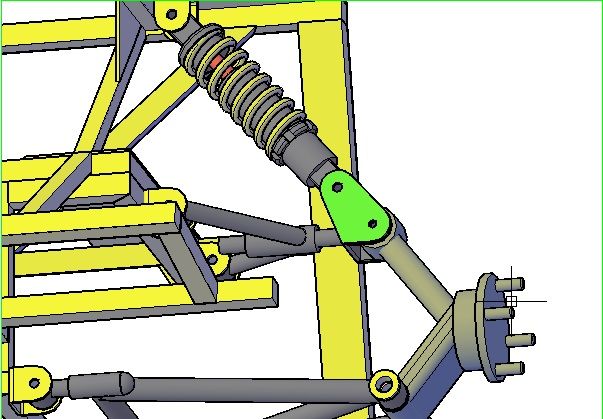 The rear top wishbone is adjustable via the bolt running through the bush with a lock nut one end and a half nut the other. This way I can alter track width on the lower wishbone and adjust camber on the top in situ. The front lower is non adjustable as all the adjustment will be on the top wishbone and steering rack. 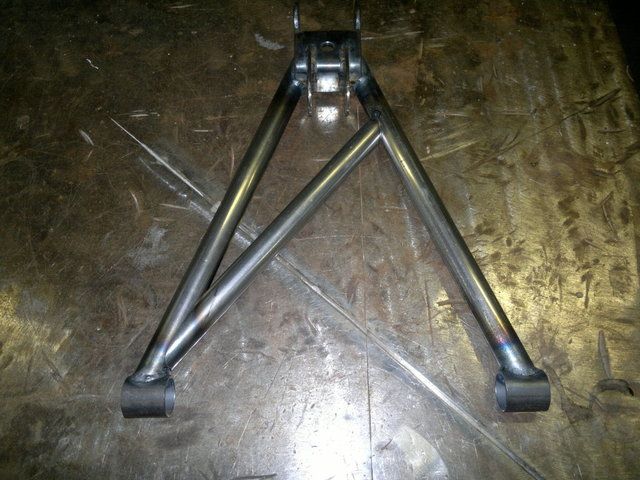 The front upper wishbone will be as this drawing and hopefully will be able to post a photo of the finished product as I have recieved my machined parts today. I've designed all the alterations myself and as far as I know I'm the only one with these type of wishbones. I've made wishbones for other people on here for the MX5 version only and they seem happy with them but not to my new spec. The front upper is designed to overcome the self centering problem, with adjustable inner "Rose Joints" to alter the caster as required and the only difference to the Sierra version would be the thread for the ball joint as the MX5 version uses 14x1.5mm. Just pm me if you need any further info. |
Well I made my new wishbones today....
Got a bit of a panic on at one point... Started welding my tube to the bush and decided to slide my inner threaded adjuster in to see if it still fitted. Well that was a bad Idea....Slid in easy and all of a sudden it stopped moving. I even told myself before making them at no point leave inner adjuster in when welding.....dohhh. I eventually got it out with a bit of heat going over the weld with the TIG and a tap from trusty old hammer... Lesson learnt. Here's a piccy of the finished product......... 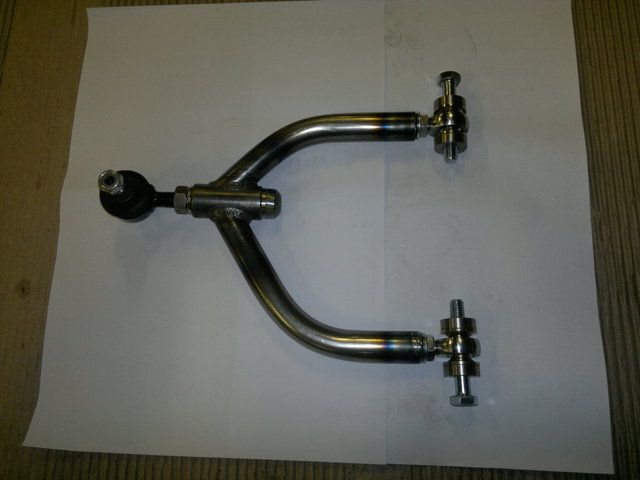 The inner adjuster is made from mild steel with a 16mm dome head welded to the flange on the adjuster which is tapped 14x1.5mm to suit the 325 BMW ball joint which has the correct taper for the MX5 upright. Adjustment for camber can be acheived in situ on the car with an Allen key and 22mm spanner without removing any parts. Caster can be altered via the "Rose Joints" which turned out to be pretty easy. Just remove the bolt and spacers and turn the rose joint in or out as required within the suspension bracket. Each end of the adjuster is a stainless machined washer to stop the locking nuts chewing up the paint/powdercoat. 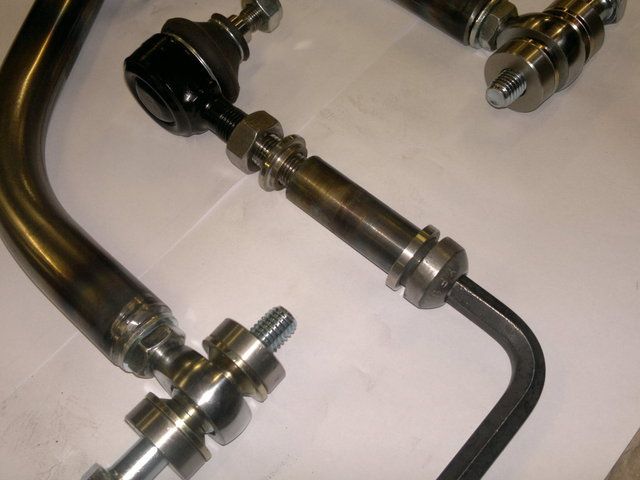 All radiuses are 2.5mm where required for IVA. The rose joints are 12x1.25 fine thread and are "Ultra High Strength" with misalignment washers both sides for optimum adjustment. I've moved the adjuster back 5mm to increase caster by about 1.4 degrees. Here's a piccy of the wishbone in place.. 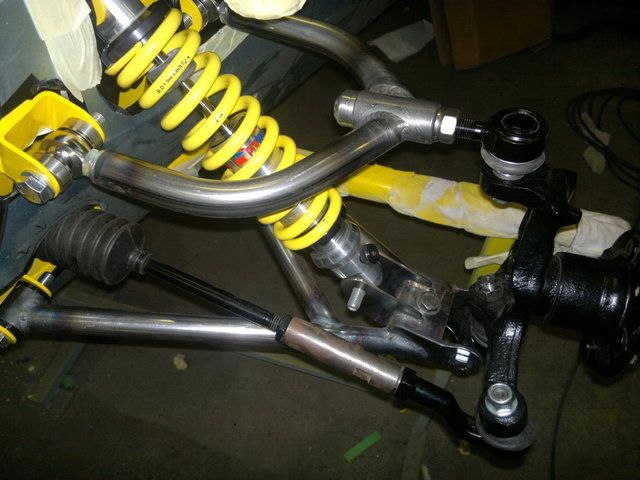 |
I've also been playing around with the dash.
I'm going to fix it behind the scuttle flange and cover it with leatherette (well the missus is :D ). I'm planning on fitting the original MX5 instruments but at the moment got no Idea how to do it...LOL.....:eek: With any luck will be able to post a photo tomorrow. |
Hi Johno that wishbone looks great, I've pm you
|
Johno,
If you look at Nathan's photos he seems to of made a good job of it and used some trim around the hole David |
looks real sweet johno, would rose joints work for both top and bottom wishbones or would they want to move about fore/aft??
|
Quote:
When I fitted the top wishbone this was the first thing I checked.:D |
Quote:
Excellent, job for the next couple weeks for me then!!! :) |
Made a start on my dashboard this weekend.
I've decided to make it out of ally and it will be padded and vinyled up when done. I made a panel to hold the instrument cluster and cut a hole in the dash to to accomadate the bezel. I attached 4 thread inserts to the dash and fitted threaded rod into each. The bezel is then placed in to the dash and then the instrument cluster is tightened down onto it. 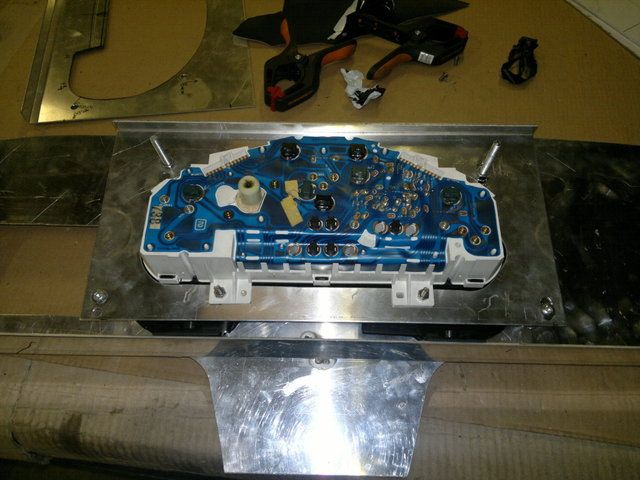 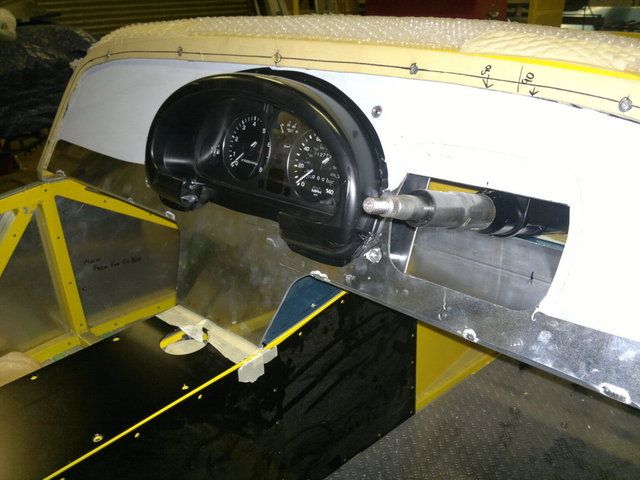 It took some sorting out but I also managed to panel underneath the dash as well, just need to fix the front edge to the dash edging angle. 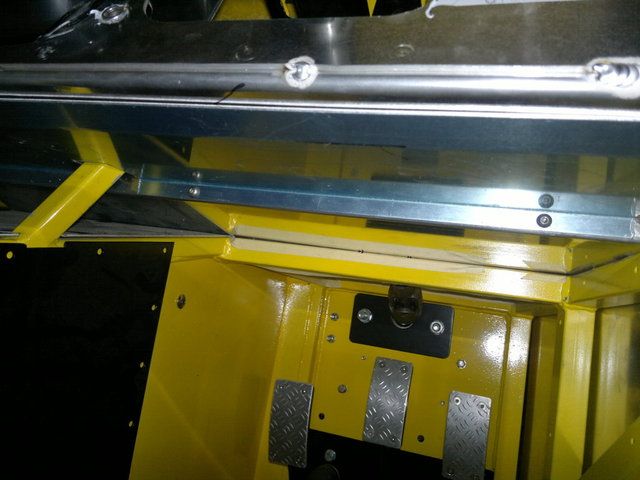 I cut an access hole for my brake pedals in the top ally panel in front of my scuttle. I will make a cover for the steering column and access hole in one piece which will be removable. 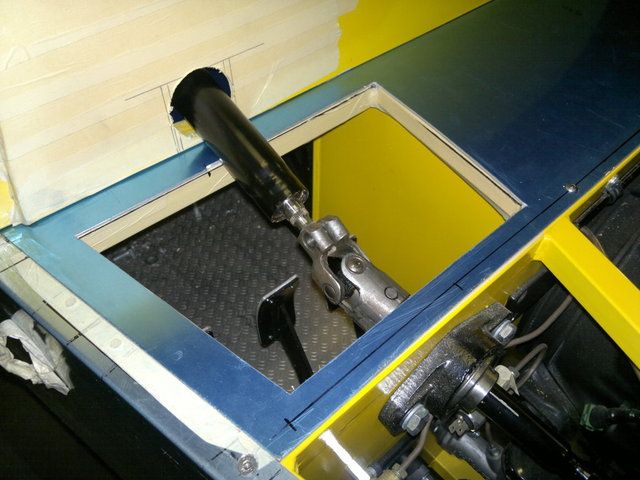 |
Seems to be coming on very nicely Johno :)
I'm going to have a long read of it at some point - I'm at the stage where enthusiasm is in short supply :( so hopefully reading this build thread and a couple of others will help me sort it out :) |
Well I finally got round to doing something this afternoon after a few months off.
I took a look at my Aerocatches and decided to remake the inner part out of ally. I fabricated the brackets with slotted holes so I can fine tune the bonnet fitment. I also got round to making my cover over the steering column and foot pedals. I've made it removable to gain access to the pedals without the need for working upside down with my feet in the air. 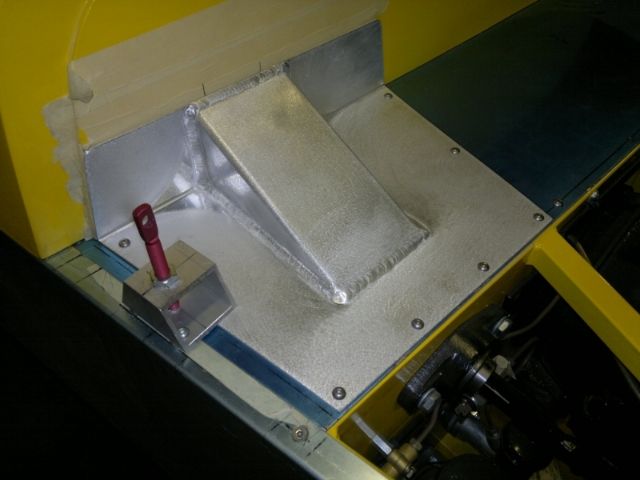 I know its not much but it's a start I guess.:) Hoping to get a few hours on it during the week at nights. |
[QUOTE=Johno;88330}.
I also got round to making my cover over the steering column and foot pedals. I've made it removable to gain access to the pedals without the need for working upside down with my feet in the air. Thats a good idea. :cool: Another build on the move again:cool: Bob |
Good to see you back Johnno
Yours is a class build and I missed watching it:) |
Thanks guys appreciate the support...:) :)
I guess some of us go through a bad patch at some point... |
Great to see you back at it !! Missed my morning read
Cheers Nigel |
Hi all,
Well I've got going on the car again at last and decided to finish a few things off before starting new stuff. 1, Managed to finish installing my Aero catches at last, just needs fine tuning when I rebuild the car after mock up. 2, Nosecone bolted in place. 3, Steering column/brake pedal cover finished. I redisgned my dashboard after some head scratching. I removed the the lower part of my dash where it meets the transmission tunnel and welded it to the underside cover panel instead. I've also moved it forward to give the dash a more broken up feel. 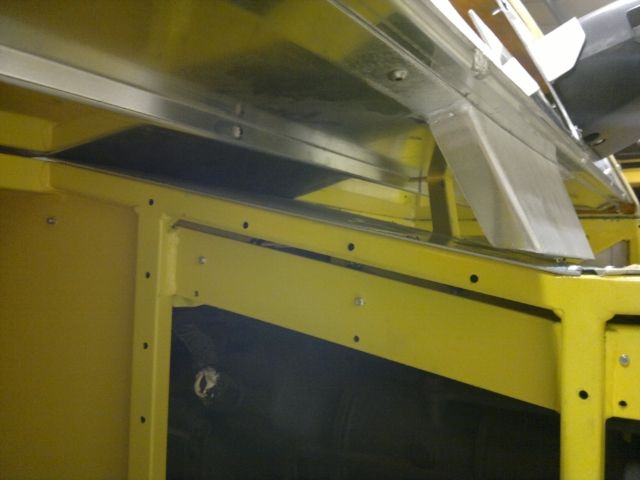 I also made an ally cover to go over my steering column bezel as there is a gap between the dash and the top plastic cover. 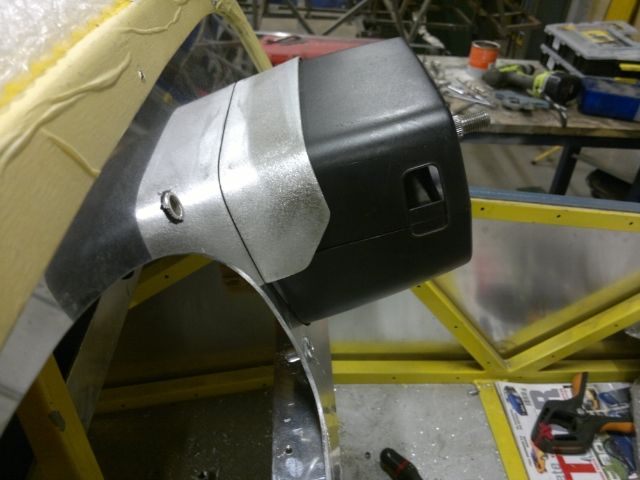 The ally panel which goes into the engine bay and under the scuttle will be a platform for me to mount most of my electical relays and ecu etc... Brackets off of this will support the various electrical items I require to be hidden up. Hopefully I will be able to remove the lower dash cover panel and scuttle to sort out any electrical problems that may arise without too much hassle. 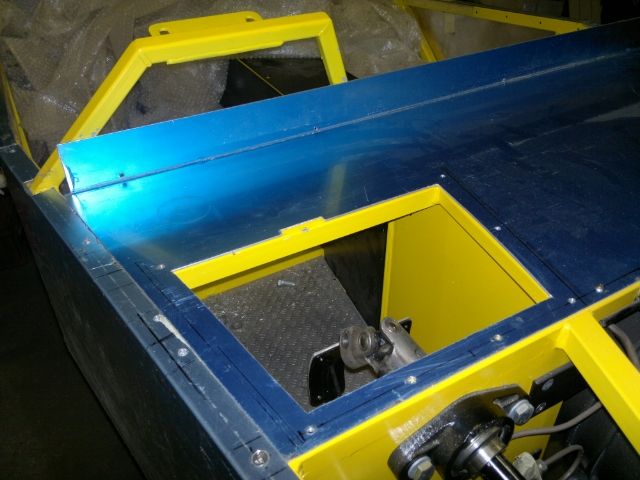 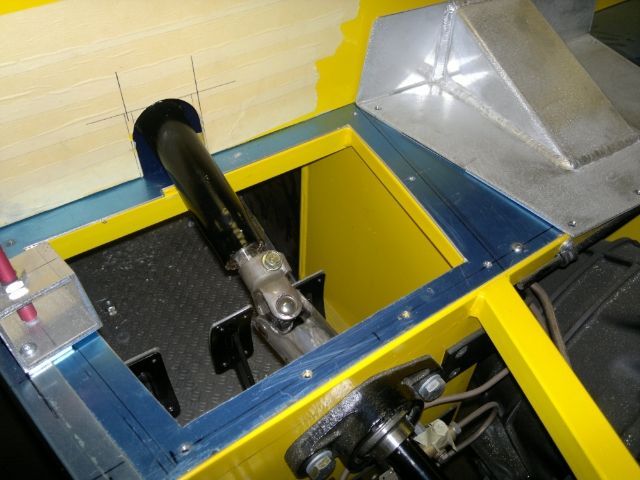 The dash I'm going to pad with foam and cover in vinyl or leatherette. Other parts will be powder coated. Next item on the list will be seat mounting and rear panel mounting..... |
Quote:
Well I'm back up and running.....:) Glad to see people ouside the UK are interested...:D I've got the bug again now so more posts on the way soon.:) :) |
Hi all,
Spent some time today working out how to make my wheel arch backing plates along side the seats. I've made them out of ally and they are also removable so I can get them powder coated. I'm quite happy with how they turned out..... 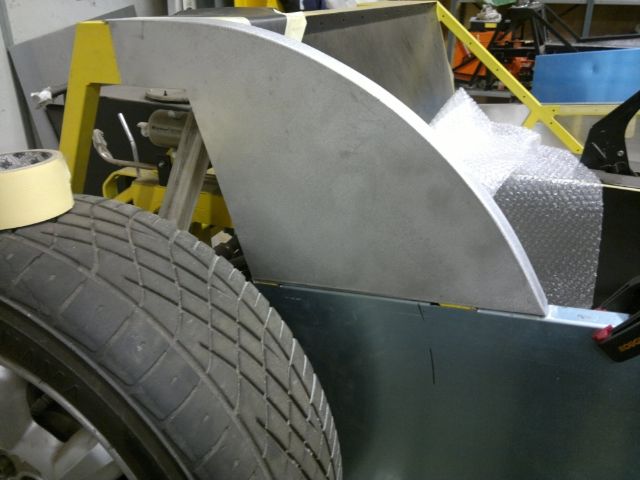 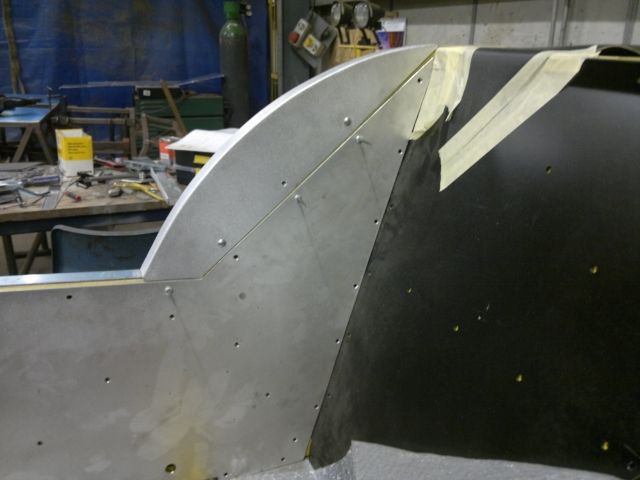 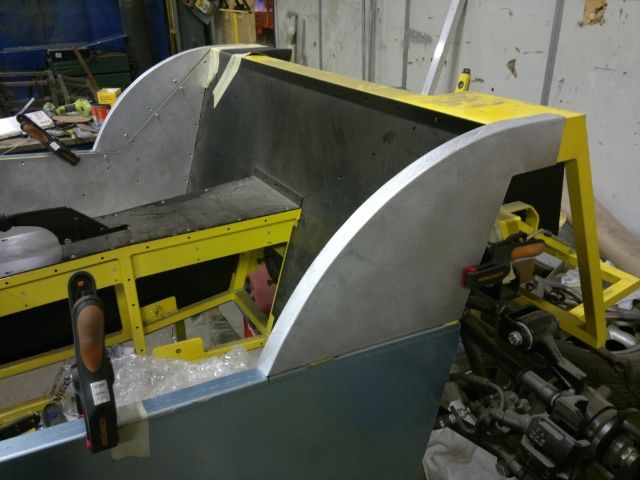 I'm hoping to fit my rear tub tomorrow night so I can see where to join the ally arches upto the fibre glass rear panel. On the AGM kit the joint is on view so it needs to be a good fit.. I also drilled holes in my lower dash for the hazard and fog light switches. Now I have moved the switches into the lower dash panel I had to make a cover to encase the back of the switches.. 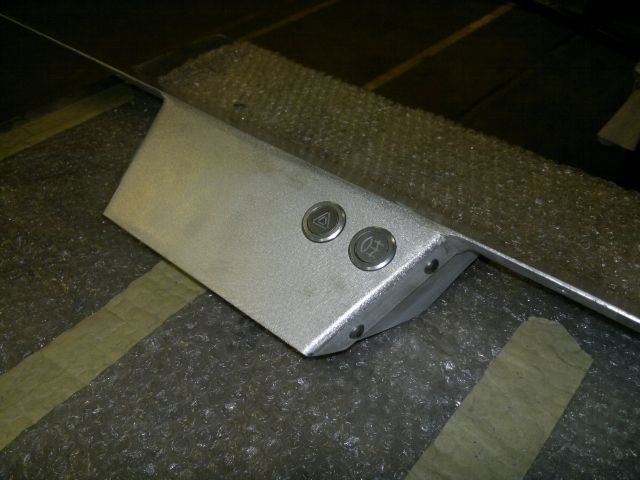 Well my goals this week are to fit rear panel, fit the seat and fit the harness. ps... I made a template of the dash cut out David and will send it this week...Ok |
Your build thread always depresses me Johno, it always looks far too perfect and professional!
How on earth did you fabricate those wheel arch panels :eek: :confused: |
| All times are GMT +1. The time now is 04:00 PM. |
Powered by vBulletin® Version 3.6.4
Copyright ©2000 - 2025, Jelsoft Enterprises Ltd.