Well done John!:)
|
The Vodou plugs were made so that the most popular 1.6 engine fits under the bonnet.
|
Any further news on when the grp will be unveiled?
|
Bonnet now fits!
 As well as moving the engine accross, I had to grind off some of the throttle cable mount. I think I should be able to add a new threaded hole futher down to replace the one I removed and just mount the throttle cable bracket slightly lower than it would have been:  Moving the engine has also fixed my clearance issue between the gearstick turret and fuel lines, which is nice! 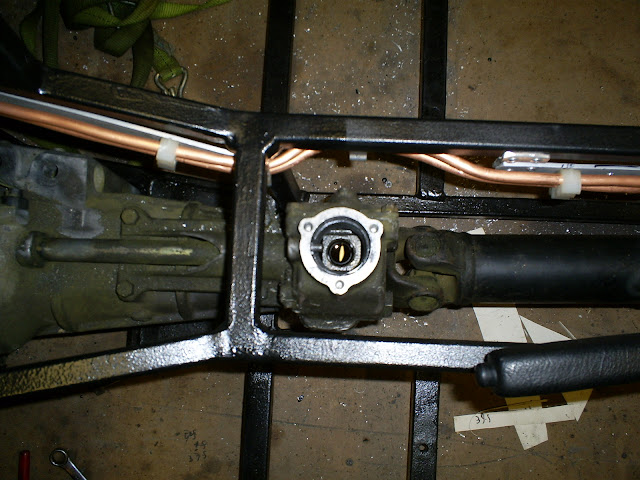 The propshaft runs at a slight angle down the tunnel, but I don't think it's enough to cause any trouble. The UJ's are running at about 2.5 degrees, which should be well within their capability. I'm pretty sure Westfield offset the engine in their MX5 chassis by a similar amount.  |
Looking good Skov
Pleased to see that you have managed to find a solution to your problem Skov :cool:
Looks as if that has worked out nicely, gearbox certainly looks a lot better in the tunnel. :) Looks as if I will be taking the same route with my Red Top engine, the Saturn wide scoop bonnet clears my engine fine but if I can budge it over a tad, I too will be able to use the OEM inlet manifold & throttle body ;) |
That's nice to see Skov, well done you had us a bit worried then. Westfield also chop there sumps to so we have scored there.
Cheers....AndyH |
Well done John I knew you'd sort it out. :cool: Now all you need to do is comunicate some exact dimensions for locating the engine to me so I can get my engine in before ordering my body work.:D
|
Got to agree with the gearbox position Bonzo, I much prefer it where it is now :)
It was your thread on the red top that gave me the idea to move the engine sideways a bit! Sorry to worry you Spud. Thinking about it, I've got about 10 speed bumps on my commute, and I've got a feeling I'm going to end up chopping the sump eventually anyway :rolleyes: glad I don't have to do it just yet though. Getting exact dimensions from my banana shaped chassis isn't going to be easy Chris, but I'll give it a go. The only downside with my engine move was that it made the propshaft touch one of the mounting bolts for my handbrake lever (wouldn't have been a problem if I'd put the lever where Spud has). Just been out in the garage and modified the lever so it's all good. |
Quote:
Cheers Chris |
I've added some pics with dimensions to my album Chris.
Just bear in mind my chassis probably isn't as millimeter perfect as yours! |
Thanks John but I just get "Sorry, that page was not found." for that link and your photoalbum2 sig link. Nope I think it's not public.
|
Quote:
|
Cheers Mate that's fantastic. Thank you. I'm pretty sure mines not mm perfect either, I know for a fact that it sorta got a tiny bit smaller after fully welding but what are going to do!?! Painting my wishbones at the moment and trying to get it somewhere near, a roller, it's going to help alot for me when positioning the engine.:)
|
No problem Chris. I think there's scope to move the engine back a bit too which will help with bonnet clearance.
You just need to be careful about how much room you leave for the clutch arm. Funny you should mention painting wishbones, it just so happens I popped to halfrauds this morning to buy some paint for mine! |
Halfords matt black for mine!:D
|
Hammerite Smooth Black for me.
Also got a tin of Dark Green for no other reason than it was on sale :rolleyes: Might have to use that for the first coat! |
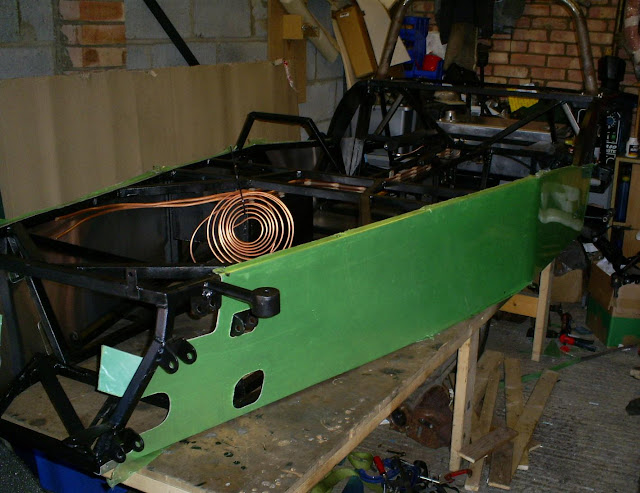
Just finished fitting my floor :D
 Now I just need to figure out how to get the sikaflex off my hands :confused: Should have waited until I'd bought a new box of gloves - I won't be making that mistake again! |
Cellulose thinners if your quick:eek: Nothing else I have tried touches the stuff:(
Bob |
Bu99er, looks like I'll be living with black hands for a while then :rolleyes:
|
Tank by K4KEV turned up today :D
 |
I see what you mean about it being a tight fit:rolleyes:
|
Quote:
|
Looking Good
How did you get that in...used a shoe horn:) Looks good in place nice and cosy.
Are you going to fit original sender and fuel pump? judging by the photo it looks a little shallow unless you intend to modify the original parts. We mocked our tank yesterday with the original unit unaltered and pressed them up today. How many litres will she hold out of curiosity? Cracking build....Johno |
Should hold about 7.5 gallons I think, and no I didn't use a shoe horn - I used a rubber mallet :D
It certainly won't be coming out again any time soon! I got a universal fuel pump and sender off ebay and junked the MX5 one. |
Thanks for the help
Hi John,
I hope you don't mind but seeing as we have no body panels as of yet we used your measurements as a guide to fit an engine in my chassis this weekend.;) We are using the same 1.6 engine from a 91 Eunos to set up the mounts for all our chassis's. We were gutted to find out your engine fouled the bonnet as we plan to use the same panels. Andy advised me to sit the sump 50mm below the bottom of the chassis rails is yours the same? I have seen somewhere on the internet a modified sump cut short by 30mm but be dammed if i can find it now.. I plan too shorten my sump as we have speed bumps where I live and at work "just ask TSM Locost about the ones at work...LOL...":rolleyes: We have been following your build with great intrest and only hope you carry on the good work. Perhaps one day we can all meet up as I believe there are a few other fellow builders around this area. If there is anything we can do to help in someway don't hesitate to speak to us as you have surely helped us.:) Thanks from all of us Johno, Simon, Tony, Luke and Martin. |
Hi Johno and co,
Thanks for the kind comments and whatnot. I've been watching your build(s!) with interest too, at the rate you're going I'm going to be looking to you for ideas and help before much longer! I've got my sump 40mm below the bottom rails, and bonnet clearance is borderline, so at 50mm you should be alright. I don't mind you using my dimensions at all - just don't blame me if it all goes horribly wrong :p If you do find the sump mod link I'd love to see it, as there's some evil bumps round here too. There's a particularly nasty one guarding one of my favourite 'scenic' routes to work. I used to grind the MX5 out every time I went over it, so won't have much chance in the roadster :mad: An East Anglia meet up sounds good when we've finished building, I'm aiming for spring 2013 if you want to pencil something in the diary! |
Sump mod...
Hi John,
Found this about Westfield build with sump mod.... http://westfieldmx5.devocht.com/?pag...n_album_key=21 Hope this helps. Johno |
Thanks for the link Johno - That looks a bit of a pain to do!!
It looks like the engine sits a lot lower in the westfield chassis, so hopefully I'll be able to avoid it! |
This week I have mostly been panel beating:
  I'm not particularly proud or happy with how they came out, but they're bonded/riveted on now so they'll have to do! It's certainly going to look handmade... :rolleyes: |
One thing I've noticed is the length of your headlight brackets. Mine were about that length and i found they fouled on the upper wishbone under load, i had to cut them down and re-fit. Worth checking now so you havnt got to get the welder out at a later stage. I may of course be wrong and they are fine as they are :confused:
|
You had me worried there Wyllie :eek:
I've been out tonight and fitted the front wishbones, upright, and wheel on one side to check! I think I'm going to be ok - I recon I'd have to lose a good inch off my sump before it becomes a problem! |
Well it's been a year and a day since I purchased the bible, so I thought I'd post a progress pic.
I'd planned to have it completed within two years, and I'd like to think I'm still on track for that. I may well be deluding myself that I'm half way there, but you never know! Haven't done too much over the xmas period, but slowly getting all the ali sheet cut to size whilst I still have the build table. Hoping to get it rolling within the next couple of months. 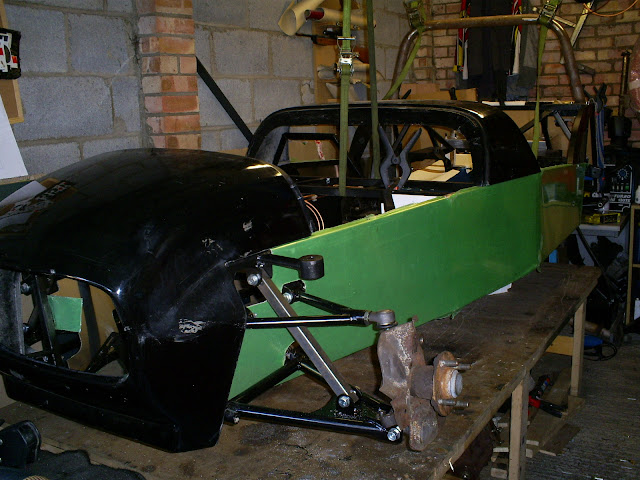 |
Johno was complaining I haven't taken any pics for a while, so here you go!
    |
Seat back, tunnel top, and side infill bits now cut out :D
Which just leaves the rear tub in the ali sheeting department. I'll save that until I've finished fitting out the rear end (and feeling a little more brave!)    |
Thats looking very nice indeed :cool:
|
looking good John, You're catching me up rapidly!:)
|
Very nice indeed....:)
Keep up the piccy's.. Johno |
Looking good! We'll have to come and take a proper look one day soon.
Paul |
Thanks guys :)
It's starting to feel like it's coming together now. With any luck I should have her on her wheels and looking like a car in another week or two. Can't wait :D |
Well, it nearly killed me, but I managed to get the chassis off the build table and onto axle stands this evening :)
|
| All times are GMT +1. The time now is 01:03 AM. |
Powered by vBulletin® Version 3.6.4
Copyright ©2000 - 2025, Jelsoft Enterprises Ltd.