Well its been 9 months since I last posted a picture of my build update but one is finally here!
I've nearly completed one of my sidepanels, I just need to trim the bottom edge, and put a few more clearance cuts in for a wishbone + steering rack. I hasnt been too difficult, but I think if I did it again I would go for fibreglass panels just for ease and speed. I think I will mount the rear arch once this panel is in place as it will give me a break from panel beating for an hour or two. I also need to fabricate the rear section of the panel for the curved part of the chassis, that will be done after this is finished. 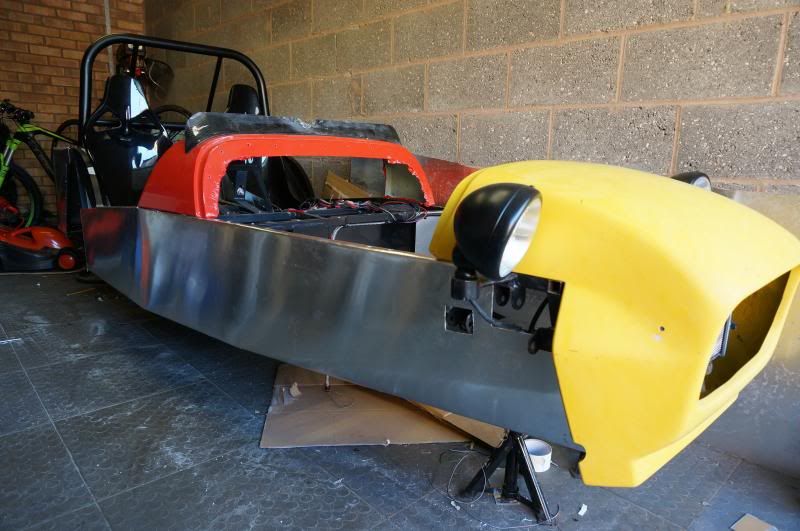 I'm hoping to have the other sidepanel finished by the end of next bank holiday weekend (with a couple of days mountain biking in Wales planned). |
Well I've now managed to finish the nearside side panel and mount the rear arch, I just need to cut a hole for the exhaust to go through and rivet it in place.
 I've also managed to finish off a lot of little jobs on the chassis I've been trying to get round to for ages but needed the engine out to do. So I've now put in a rivnut to secure the brake pressure sensor, riveted in a few more cable tie holders and made a new bracket/welded it in for the rear brake tee as previously it was secured by the way it is in the book, but with my braided lines I've made a new bracket to bolt the tee directly to it as I didn't think it would get through IVA with the old setup.  I'll try and get a picture of the new bracket later on today. Todays jobs are to trim a bit of aluminium on the rear tub so it runs flush against the chassis members, drill holes + cleco the side panels in place and to repaint the chassis in areas it needs it as it's looking a bit worn after 4.5 years of being bashed about! Then mid weeks jobs will be to put my wheel set back on and mount my rear lights to the arches and finish off the wiring for them. |
Well my build has been set back slightly, I was doing some odd jobs on the car and was going to put a hose clip on my fuel hose to discover that it has completely perished!
The hose is only about a year or 2 old and hasnt had any fuel through it yet. Its going to be a right PITA to remove it as now that my transmission tunnel panels are on I'll require a 90 degree drill adapter to drill out the rivets. Luckily I riveted an aluminium strip down the tunnel which only requires 6 rivets to be taken out rather than having to awkwardly drill out all of the p-clips. So I've decided now to instead of having rubber fuel hose running the hole length of the car I will have some metal pipe down the tunnel with rubber hose on the ends as it'll be a lot easier to replace in the future. |
I am doing the same, 'obtained' a length of pipe used to plum kerosene tanks in then rubber from roughly seat back panel to tank and rear of engine bay to fuel filter then carbs. Is also handy as I can reduce diameter one side of fuel filter.
Russ |
Ive managed to make quite a lot of progress on the car over the past week. The new fuel line is in, it was an absolute pig to fit and requires chiselling out rivets but one broken rivet gun later (on the final rivet I might add!).
This weekend I refitted the engine/gearbox/propshaft after making mods to my engine mounts, filling the gearbox with oil and giving it a bit of a clean up. Next job completed was to carry on wiring the engine bay, I've now figured out where everything needs to go and ordered the rest of the bits I need including a megajolt ECU. The brake switch has also been wired up. Ive also refitted the exhaust system and cut a hole in the side panel for it, I've ordered some black exhaust wrap and a clamp to finish it off. I just need to source a gasket for my ford manifold to seal the downpipe. Next job completed was to drill holes in the side panels for the brake flexy hoses and I've fitted some rubber grommets to make it IVA safe as well. Finally I have ordered the remaining bits I need for my cooling system and I some of the bits I need for my throttle cable. So all in all a productive but expensive weekend! Here are the customary pictures as proof it happened: https://onedrive.live.com/redir?resi...nt=photo%2cJPG https://onedrive.live.com/redir?resi...nt=photo%2cJPG https://onedrive.live.com/redir?resi...nt=photo%2cJPG Its safe to say I'm looking forward to finishing building some can start making it look more polished/painted as it has definitely aged a lot in the 5 years I've been building. |
Keep at Simon, We will both get there one day ;)
|
How is your build progressing Paul?
|
Where do I start Simon,it was a rolling chassis and then I changed jobs (unwillingly) so went on hold for a while with little progress.
Now fully powder coated (another story) and putting it back together slowly as time and money permits,plenty of time the grandaughter is only 3 3/4 lol. One of these days :rolleyes: |
Going faster than mine probably. I put the part finished loom in the corner of the dining room in November!
TT |
Well I've now completed enough engine bay wiring to get engine started, I'm just waiting for an engine earth strap to arrive and I need to buy some more battery acid to fill my battery up with. Halfords for some reason don't sell any so I'm going to try my local motor factors on Monday. Once all of that is sorted then it'll be time to fire it up!
Todays job is to continue wiring more things in the engine bay, wiring up my megajolt and bolt it in place along with the EDIS unit. I've got most of the bits I need for my cooling system so I need to cut hoses to length, it looks like it might turn out to be a reasonably near install, I was worried it was just going to look like a birds near of hoses. Then finally I'm going to try and fabricate an alternator bracket and mount that. |
If your battery acid level has dropped it might be time to buy a new one as when the lead plates start to dry out that's when the problems start, also you don't fill a battery with acid it's deionised water.
|
Talon it is a brand new dry battery which needs filling up with electrolyte (sulphuric acid), I stupidly only got half the amount required so I need to order some more to allow me to fill the battery to get the required specific gravity.
|
Didn't know you could buy dry car/van batteries thought that was only big storage jobbies, I stand corrected then.
|
Its believe its mainly with motorcycle batteries that you can buy them dry.
|
Well my new earth strap, 40A inline strip fuse and extra battery acid arrived, these got fitted today and the engine now turns over under battery power which I'm very happy with! Meaning my wiring, starter motor, solenoid and battery work as expected!
Tomorrow I will be hooking up my fuel lines and trying to fire it up and I will record the compulsory first start video! It has been a long time coming :D. |
It's ALIVE! After some faffing this morning and a few problems it has started! Unfortunately this wasn't the first start as I had to do a bit of faffing and thought my carbs were a bit dud as they were leaking but then give it a quick go after earthing my fuel pump (oops) it started!
The horrid noise you can hear at the start is the fuel pump kicking it, it's currently not bolted down so is vibrating off the aluminium panel. The engine is also running on a lot of choke in the video and there are a lot of air leaks as I haven't got my carbs tightened down, or my MAP sensor fitted, it's also running on EDIS only at the moment and the exhaust hasn't got a gasket fitted. The carbs also need rejetting and a bit more setting up. Also please ignore the smoking exhaust manifold :eek:. It's just several years of oily residue burning off! https://www.youtube.com/watch?v=KHZo...ature=youtu.be I am over the moon that it has started though! After owning the engine for about 4 years with it sitting there doing nothing and a second hand set of carbs I thought I was going to run into some real trouble with it. The next jobs are going to be finishing off the wiring, buying the relays I need for the lights and checking that it all works. I also need to buy a new alternator as I found mine makes some interesting noises when rotating. Then I just need to finish off the cooling system, which shouldn't take too long. |
Well done Simon!
Starting the engine for the first time is a very important step of your build, you should be very happy! Keep up the good work :) |
Nice one Simon ...ye should be aiming for next spring to be on the road so get a move on matey
|
Well todays job has been to finish wiring my ECU and mount it and the EDIS 4 unit to my bulk head which went without a hitch. I also tidied up the wiring under the dash so the cable runs are a lot better and they are nicely secured to the chassis.
 I then set about trimming my bulkhead so that it fit with the side panels, it now looks a lot tidier. I haven't got any photos of that though I'm afraid. Finally I finished my headlight wiring at the relay holders and ordered the relays I need for the headlights and indicators (LED specific one for my lights). Hopefully they will arrive soon and I'll be able to test the functionality of them. I need to order some new bullet connectors for my front indicators so I can connect those up and run some ground connections. It is feeling like the end is in sight now that I am finishing off jobs. I am now aiming for getting it on the road next spring, with a potential track session for a shake down prior to that. |
Just a quick update on my build. It is still progressing! I have now changed the CV joint boots, tested my lights and had my mushrooms re-machined to allow them to be used with my shorter transit drag links. Today I have ordered the remaining bits I need for the fuel system, cooling system, most of the bits for the electrical system and some other odds and sods like nuts and bolts, throttle cable, brake actuation etc, which should arrive over the next week.
I've got a friend coming up next weekend to give me a hand as well so hopefully progress should be quickly made. Next month I'm planning on ordering my alternator and digital dashboard which I believe will be some of the final bits I need other than IVA compliant bits and making it all look pretty. I've now set a date to be on the road by the spring. |
I've managed to make quite a lot of progress today after all of my bits arrived. Today I managed to fit my roll over valve + breather end cap/filter, fit my vacuum take off for Megajolt, finish off my cooling system (minus a few hose clips), including P-clipping hoses in place and finally I have ran my throttle cable, I just need to attach it to the pedal which is tomorrows job.
Tomorrows job is to finish off the throttle cable, wire up my front indicators, wrap my exhaust, finish off my pedal box, sort out my brake actuator to get it to the right length, fit pedal stops (both forwards and rearwards). Pictures speak more than words so here are some:     |
Looking good mate! Ive reamed my hubs today so will get your reamer back to you asap 👍
|
Getting there , bit faster than me ;)
TT |
I didn't get much time in the garage this weekend due to family meals, nights out and sorting out things around the house. I managed to find a couple of hours today and mounted my fuel filler cap. I've had the cap for about 2 years now so it's nice to finally fit it!
I'm using some cheap flexible fuel filler hose from CBS which has kinked slightly at the fuel tank end. It should bet me through the IVA test and if I have any problems filling up then ill be replacing it with 2 aluminium 90° bends and fuel resistant joiners.  |
Quote:
I don't think you'll have any trouble filling it up, but (depending on how you've done it) you might find you get fuel peeing out of the breather if you brim it! |
Skov that is a very good point, the breather uses a 1 way roll over valve which should prevent any fuel from spilling out when brimming, i'll need to see how it goes!
|
I had to move my filler to that position after having it on the back panel, as the 4 times I tried to fill the car up, I just got the petrol on the floor.
After advice on LB I ditched the 1 way valve and bought a 2 way (1 way free, the other vents at pressure) to cope with tank expansion in the sun. A few people have failed iva with the normal 1 way valve. Annoying as the vent is £35 ish from cbs. |
I know what you mean about the 2 way vent valve I've go one to go on my tank £35 from CBS and it is tiny
|
I have missed quite a few updates on my car recently!
I've been very busy work on the car as of late, pretty much every day I am in the garage. My IVA test is now paid for (awaiting a date) but should be around the start of April if everything goes according to plan. Since my last update I've done the following minus a few things I've probably forgotten: Wrapped exhaust in fibreglass wrap Finished cooling system Fitted side repeaters to rear arch Bought and fitted Acewell digital dash Fitted speed sensor to propshaft Finished brake system Fitted gaiters to handbrake and exhaust Trimmed seats in edge trim Bought and fitted alternator Fitted oil catch tank Finished engine bay wiring Made rear boot panel Remade brake reservoir panel Main steering column cover panel Wired front indicators Cover all cabling in spiral wrap I will try and get some pictures up soon! |
It sounds like you are getting close to the finish.
Are you able to test the speedo as I had a problem with my pickup on the prop. The prop was spinning too quickly. I ended up using a bolt on the rear driveshaft and the sensor in the upright, as its spins nearly 4 times slower. My dash is a race technology one though. |
hi there, been following your build as it as you are using same motor/ bike carb setup as i am, great build so far by the way. I hope you dont mind me asking as I noticed your Hand brake cable set up goes in from the rear, did you do that for any particular reason. It is a pain to position and did you have any issues getting it to seat properly against CP14 as the angle of the brkt would have been better if it was vertical position.
cheers tony |
Hi Tony, I can't remember why I put the bracket like that, I think it must have been a case of reading the book, welding it in prior to getting my handbrake cable and not having a problem fitting the cable once I eventually bought one.
SeriesLandy, I haven't had a chance to test it yet so I guess I'll need to see how it goes! |
Well it's been a long time since I've posted on here! I got very close to finishing the car but decided in the end to cancel my IVA and rebook for early next year so I can get the most of the summer.
My plan to keep me going is to finish the car to a track ready condition, fit a tow bar to my tin top and then do a track day or 2 to give the car a good shake down prior to IVA. It should also spur me on to finish the remainder of the IVA required items! I am currently in the middle of painting the car which is going quite well now that I've got to grips with it. All of my GRP panels except the bonnet have been etch primed, primed and I'm in the process of painting these red. There has been a lot of learning along the way and there will be a bit of work to get rid of a few paint defects like orange peel and a couple of sags. I am hoping to have all of my painting done by the end of September. Once the car is painted there are only a couple of jobs like changing the coolant and oil, putting my racey steering wheel on and checking everything works the way it should. My plan now is to have a track day in the middle of November. I will try and get some more pictures up soon. |
Do you know what the rules are for track days and cars without MOT etc? I was looking into this too but wondered how far along my build had to be..
Thanks |
Fuel tank vents have been placed up inside the roll bar,cant much higher than that.
|
Sounds good!
|
Ben, I don't think there are any rules on how complete the car needs to be. My boss has a track only Caterham with no MOT, no handbrake and no lights. I think it's a case of as long as it looks safe and nothing is going to fall off I.e. It doesn't look like a shed then I feel it will be ok!
|
I agree I had a track car no tax test or insurance one seat only never had a problem gettinv it in on a track day
|
Well I have finally gotten round to taking a picture of my car now that a few panels are finished/nearly finished. My side panels are drying in the garage as I write this and my rear arches need a bit of sanding a polish up. The bonnet needs a quick sand to get rid of a bit of orange peel and then a polish, but the finish in the picture is the finish straight out of the gun.
 I have to say I am pretty proud of myself for how the car is now looking! I've also discovered that the head gasket in my engine has gone and my battery is now a dud which isn't really surprisingly as I have been abusing it while testing electrics. So next month I shall be buying a new battery and then doing a compression check on my engine and if that goes well then take the head off, get it skimmed, lap the valves and replace the valve stem seals. I know I can pick up a cheap engine but the pre-95 engines are getting pretty thin on the ground and I would like the lax emission rules when I get the car IVA'd. Plus I've always wanted to rebuild an engine :D. I also realised I had my top wishbones on upside down when I made my cycle wing carriers meaning my cycle wings are no longer in the correct position, which is slightly annoying! However as I'll be putting it on the track first I'm not too fussed at the moment and come IVA time I shall sort them out. |
Hi Simon,
It's cool to see you and your car are seeing the end of the tunnel! The car looks very nice in deed, it is a very neat built, and you can definitely be proud of yourself. And I'm pretty sure that once on the road, it is going to be an amazing car! Don't try your engine too much, suspecting a head gasket failure, with the radiator on : I've ruined 2 radiators before I figured out the head gasket was dead on mine (I figured out that the compression from the cylinders was going into the cooling circuit, building up a pressure there that the radiator couldn't handle). Good luck for the end, and keep us posted :) |
| All times are GMT +1. The time now is 04:32 PM. |
Powered by vBulletin® Version 3.6.4
Copyright ©2000 - 2025, Jelsoft Enterprises Ltd.