Starting to look like a car now :cool:
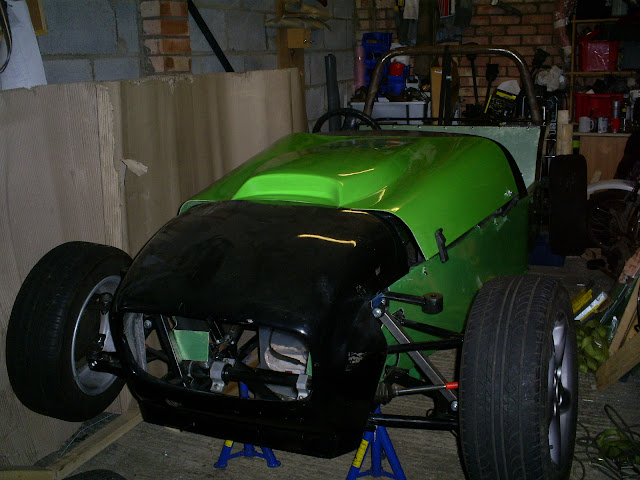 |
Looks Great John!
If you needed a hand getting it off the build table you should have given me a call I'd have popped over to give you a lift!;) |
Quote:
Thanks anyway James :) |
No progress on the car this weekend, but I did manage to build something else:
  Is it just me or does anyone else turn into a big kid when it snows :D |
Whats Snow? :rolleyes:
Terry |
I take it you haven't been blessed with any down in Devon :p
We woke up to 4 or 5 inches of it. Just a shames there's no hills out here in the Fens :( |
haha! awesome! looks like the hitcher off the mighty boosh!
|
The sun is shining, the dog been for a 5 mile walk. It's realy nice winters day.
Terry |
haha, brilliant john. :)
we have no snow where i live in scotland, but other areas do have. seems like its been south of the borders turn this time!!! good progress with the car btw! :) |
Car looking sweet John,
I notice on the photo you have negative camber on your rear wheel. Do you still have plenty of adjustment on the lower wishbone even with a half locking nut in place to take this out? The reason I ask is Lukes car is the same as your photo but has little adjustment left to take this out. Is it possible for you to measure the centres of both top and bottom wishbones (centre of bush to centre of hub upright fixing point) please...:) I just want to check that our wishbones are the same as yours as we made ours to SSC drawings and I know yours are from Andy.. Cheers Johno....ps I think we had the worst of the snow in our area as I had to dig our cars out.. |
Nice to see the build pictures coming along.
Did you take any measurements or did you draw a diagram when you made the engine mounts? I am using a 1.6 myself and want to get around the bonet clearance problems. If so please can I have the details David |
Haha, it does look a bit "Solo Polo Peeper" now you mention it Michael :)
Johno - that rear wheel is only on there very loosely at the moment, which might be why it's sat at that angle. I'll try to remember to investigate and take some measurements next time I'm out there. David, if you look through my photos there should be a load with measurements showing my intended engine position. Essentially I've just got the sump 40mm below the bottom rail, and the engine offset to the passenger side by 25mm. I've also purchased an inlet manifold from a Mk2 1.6 recently, which may or may not help with bonnet clearance - watch this space! |
My lovely shiny protechs arrived from NTS today :D
 |
I'm now officially rolling :D :D :D
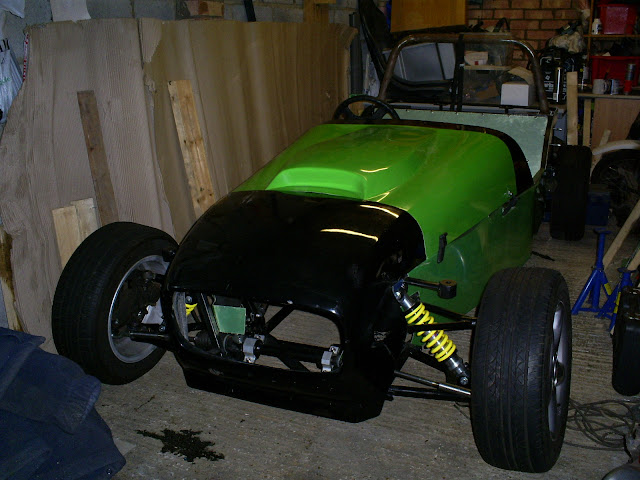 Couldn't resist getting in and going for an imaginary drive! |
Looking great :cool:
Nice to see that chassis on wheels :) Did you make "brum brum" noises ? :p we,ve all done it , well maybe under our breath :D cheers andy |
Quote:
Though to be honest it was a bit more "crazy frog" than "brum brum" :D Cheers Andy, I have to say it was great feeling getting it on it's wheels, I couldn't stop grinning for a while :) |
Got my Battery today. A dinky little Odyssey PC680, which should fit nicely in the passenger footwell without taking up too much leg room (not that I particularly care about passenger legroom!)
 |
Fitted the same to my car last year when I upgraded and its spot on
Reasonably powerful for its size too Mine came off the road at the end of September and the battery has been disconnected whilst Ive been tinkering, just got it all back together a couple of weeks ago and the battery cranked it over perfectly, as if it had just been charged that day! |
Hi Mark, that's good to know thanks!
I've got an optimate kicking around somewhere which I plan to use to keep it in tip top condition. The chances of me actually remembering to use it are pretty slim though :rolleyes: |
Where did you get the battery from john, that's what I've been looking at for my build
|
Quote:
I just checked and the seller I got it from doesn't seem to have any more listed :( |
Hi Skov.
Do you mind me asking where you positioned your seat belt anchorages (cp18). I am building a Saturn based mx5 chassis and have come to position them 140mm (from the back edge) from the front face of br12 as per the book but they are clashing with tt6 on the transmission tunnel. Im either think of cutting the anchorage down to retain the original measurement or pulling the whole bracket back so that it mates to the rear face of tt6. Many thanks Andy |
Quote:
Are you sure you've got TT6 in the right place? It should be in the book position too, so there shouldn't be a clash :confused: The position of the bottom anchorages isn't critical as far as I'm aware though, so moving them forwards or back a bit shouldn't be a problem. |
Thanks Skov. You were correct about tt6 being in the wrong position. I had them 50mm to close to the back.
Luckily its only a drawing i'm working on. hopefully i cut my steel to the guide and not my drawing. Ill check when i get home. Thanks again Andy. |
Didn't do too much on the build last week what with valentines day :rolleyes: followed by the winter vomiting bug running wild through the household...
I did venture out on Saturday and managed to revisit my steering shafts/linkages. I've now done it the same as the Saturn guide, rather than my original way which involved bodging a chopped up sierra column in there:    Worth noting that I used rally design part RD820F for the shaft to rack linkage, rather than the RD850 suggested in version 3 of the Saturn guide (which I suspect might be a typo!) |
looks good john. :) gonna be a real tidy car.
ive loads to update on mine, but not had a chance in a while. still wish i was further on, but enjoyin the build i guess!! lol dying of the flu currently! :( |
Thanks Stew :)
Hope you're feeling better soon! My work place paid for us all to have flu shots back in the autumn, so I won't be getting that thankfully. Hasn't stopped me getting ill with every other bug doing the rounds though! Make sure you get some pics up soon, it'd be good to see how you're getting on :cool: |
Finally got around to finishing my front diff mount last week.
I started it months ago before it had been added to the Saturn guide, which is why it's a tad different.  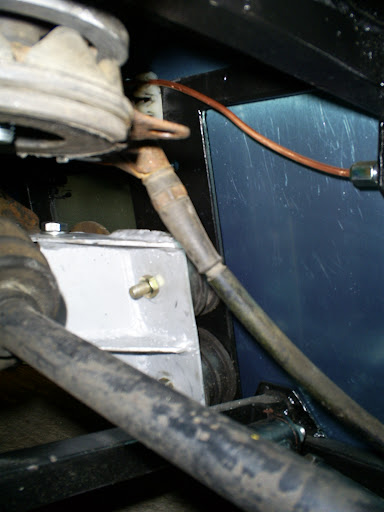 It's bolted to a plate on the chassis via a pair of landrover engine mounts, and to the diff itself using a pair of M12 bolts. The holes in the diff were a bit bigger than 12mm, so I sleeved them down with some ali tube to get a nice tight fit. I'm not 100% happy about using the rubber mounts in shear, but I think (hope!) they'll be ok. On a seperate note I replaced the OEM bushes in the rear uprights with some Strongflex ones this evenning:   It didn't seem right leaving them as 15 year old perished rubber when the rest of the suspension uses polybushes! And as an added bonus Strongflex very kindly supplied them with 12mm internal diameter crush tubes rather than their 10mm MX5 ones. I got them to do that so they match the 12mm holes in the Saturn wishbones, and mean I can fit M12 bolts. |
How much were the bushes and crush tubes John? And have you got a link for the tube you're using on the bottom. Just picked up yet another bottle of gas so I'm back to the grind again literally.:)
Oh and the steering shaft from the column to rack UJ, what are you using? |
Glad to see you've come out of hibernation Chris :D
Here's the tube I inserted into the lower holes in the rear uprights (you need 80mm per side if memory serves me correctly): STEEL PRECISION TUBE 14mm OD x 300mm LONG 1mm WALL And these are the bushes I stuck in the top of the uprights (£22.70 for a pair): Mazda MX-5 Rear Upper Inner & Outer Suspension Bush SPORT poly STRONGFLEX My column to rack UJ is rally design part# RD820F Hope that helps! |
Quote:
I've ordered the tube, thank you, but for the bushes did you just spec the 12mm int.dia. crush tube or do you have to speak with them first? Understood you're using the RD820F for the rack UJ but what about the entention between it and the mazda column is it a sierra part or is it an extended mazda part. Cheers Chris |
For the bushes I sent them a message asking if they could do them with 12mm internal diameter crush tubes. They replied saying no problem, and just told me to add a note saying that when I placed the order.
My steering column/shaft/linkages are pretty much the same as the Saturn/NTS build guide now. The top part of the steering shaft is from the MX5, and the bottom part is the Rally Design steering shaft (RD849). The bit joining them together is just some chunky mild steel tube (3mm wall I think). I couldn't tell you the diameter though - I just took the Rally Design shaft to my local steel supplier, and they let me stick it in various bits of tube until I found one that was a snug fit! |
Quote:
|
Yep, you've got some catching up to do :p
Got my NTS pedal box fitted last night, that was a bit of a chore... If anyone's reading this - unless you have arms like Mr Tickle, make sure you bolt the pedal box in place BEFORE you fit the side panels, scuttle, and scuttle bulk head... Could I reach both sides of the box at the same time to tighten the bolts up? Could I bugger! |
Quote:
Also an idea to attach the clutch & throttle cables & fit the master cylinder pushrod to the pedals before fitting the side panel ;) ......otherwise you,ll end up with your upper body in the footwell with legs in the air .....don,t ask how I know :p :D need some more pics please John, sounds like you are making great progress. cheers andy |
Quote:
It wasn't too bad until I tried to get out again and got stuck! I couldn't figure out how to get my head back past the steering wheel and was starting to worry I'd be stuck there all night :rolleyes: |
Hi Skov.
When you used the diff mount to secure you handbrake cable did you use the existing mx5 brackets of did you make your own? Cheers David ps. can you put some photos up of your pedal assembly. |
Quote:
I then just moved the cables, bending the brackets in the process, until they weren't fouling on anything.  I'll take some pics of the pedal box and get them posted up in the next few days. |
Good progress,
Looking good Skov. Bl**dy hell you've been busy.:eek: Next weekend my engine should be out of the donor so hopefully soon gonna do the sump chop... Not forgotten our deal....:) Johno |
Been searching for these....
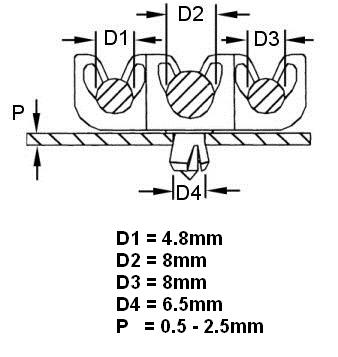 but cant find any of them anywhere. I dont suppose you happen to have any links for them as going to need some :) |
| All times are GMT +1. The time now is 01:03 AM. |
Powered by vBulletin® Version 3.6.4
Copyright ©2000 - 2025, Jelsoft Enterprises Ltd.