Yeah, it might look a bit daft if everything else is a different colour :)
That red and white scheme does look nice, might have to think about stealing that idea :D I can't make my mind up what colour to go for, so for now I'm just going to rattle can the bonnet black to match the rest of the bodywork. I'll worry about giving it a proper paint job and making it look nice at a later date, maybe over the winter. |
Quote:
|
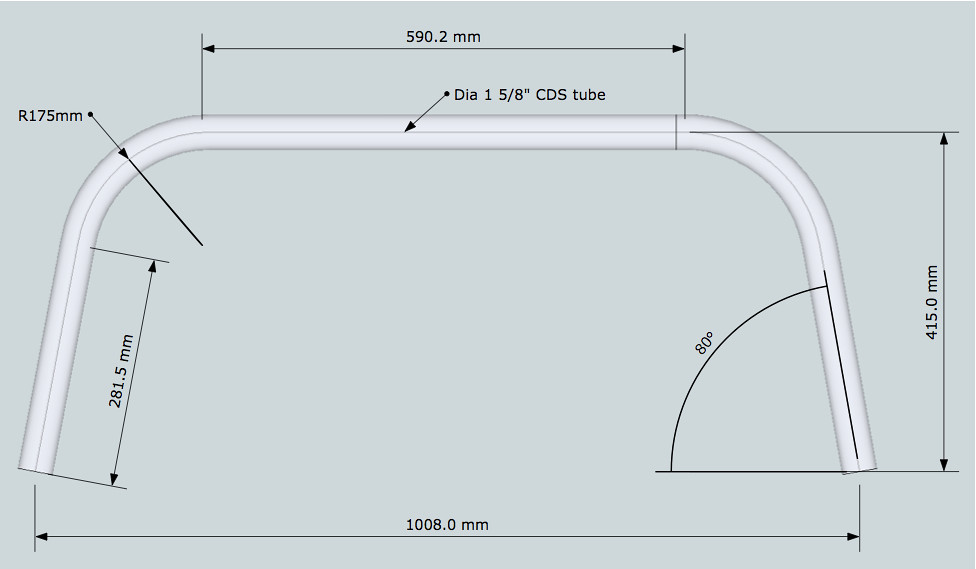
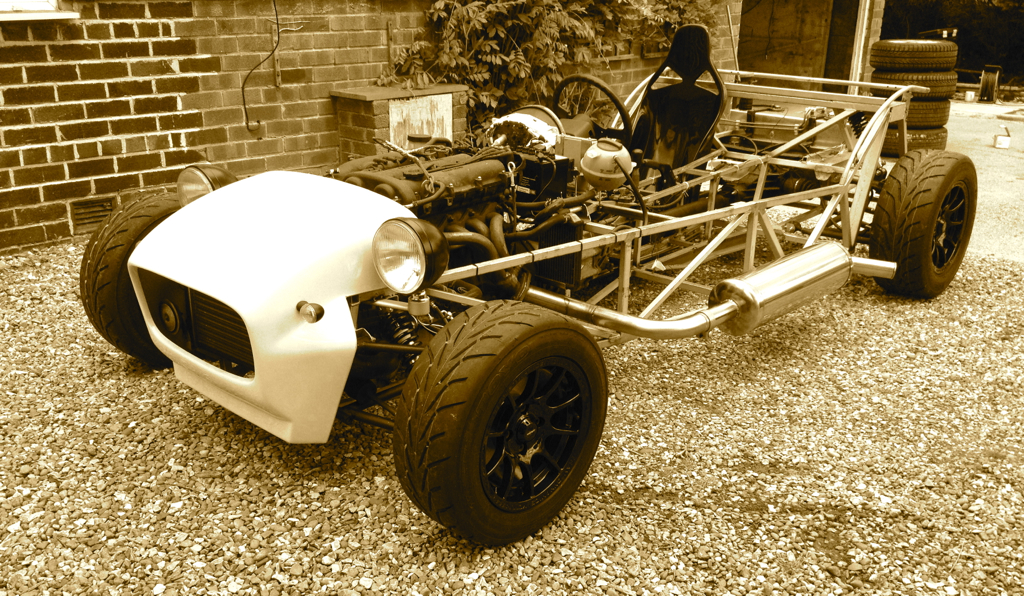
MX5 rack extensions from Phil at talonmotorsport turned up today and I have to say the look excellently made. Thanks Phil. Got my Prop off for retubing and balancing at a local firm (£60) and just waiting on my rollbar to arrive hopefully this week after finally finding a firm to make it out of CDS without charging an arm and a leg, £85 delivered! :D
 Hopefully when I put the supports in it will look like this...  Trying to save up for some Team Dynamics 1.2 race pro wheels in 13" x 7" but it's not easy when ebay is the only funding source atm. 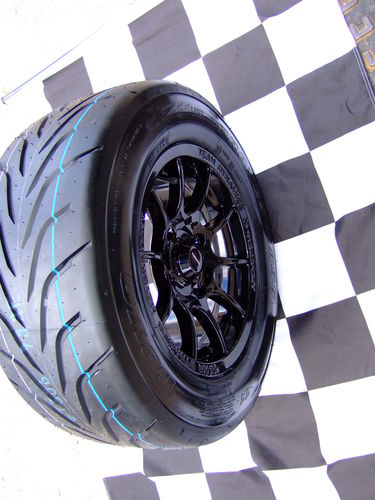 |
Wheels Ordered! Phew!:cool: Paying for CDS rollbar supports and cross members in the morning.:) Money well spent!
|
Regarding the wheels I'd did some research and measuring and I've ordered 7'' wide 13" wheels with 205 60 rear and 185 60 front ET15 all round. I thought about spacers and did try some cheap ones but I really didn't have much confidence in them. Front might cause more bump steer but we shall see.
|
Quote:
|
MX-5 1.6 brakes and balljoints can clear 13" wheels as I have read on mx5 car forums once the heatshield is removed but I measured and checked for haynes roadster use also. 1.8 brakes need modification to clear, I have read.
|
Its great news that 13`s fit Chris, all the decent track day slicks come in 13`s:cool:
Bob. |
Quote:
Good news David |
Before the end of June I should have them on the car. :D I'll do the rack stops at that point, but then I have to take it all to bits to finish the chassis and pedal box and paint the bleeding thing. Not looking forward to that job at all. :(
|
Quote:
|
Well the wheels arrived today and I just test fitted them and they easily clear everything, I even had a set of 1.8 brakes there so I tried them and they clear well too so all in all nothing to worry about. I don't know for sure about other 13" wheels or offsets but with these wheels everything has 10mm clearance but difficult to measure accurately.:D
|
Nice one Chris, didn't doubt they'd fit for a second :D
|
Car with new wheels. :D
 Took loads of photos which you can see in my photostream, some are of clearance etc. I can just push my fingers up inside between the rear arch and wheels. 1.6 brakes look tiny behind even these 13" wheels. I've now started stripping the car down. :mad: Which is a bit depressing. |
One more....:D
 |
Nice wheels Chris!
Those tyres look suitibly sticky too :cool: |
Quote:
|
Quote:
sorted out the steering stops. I just welded in some spare hex and box section to stop the rack as required! :D |
Quote:
David |
Meant to put up image last night but forgot.
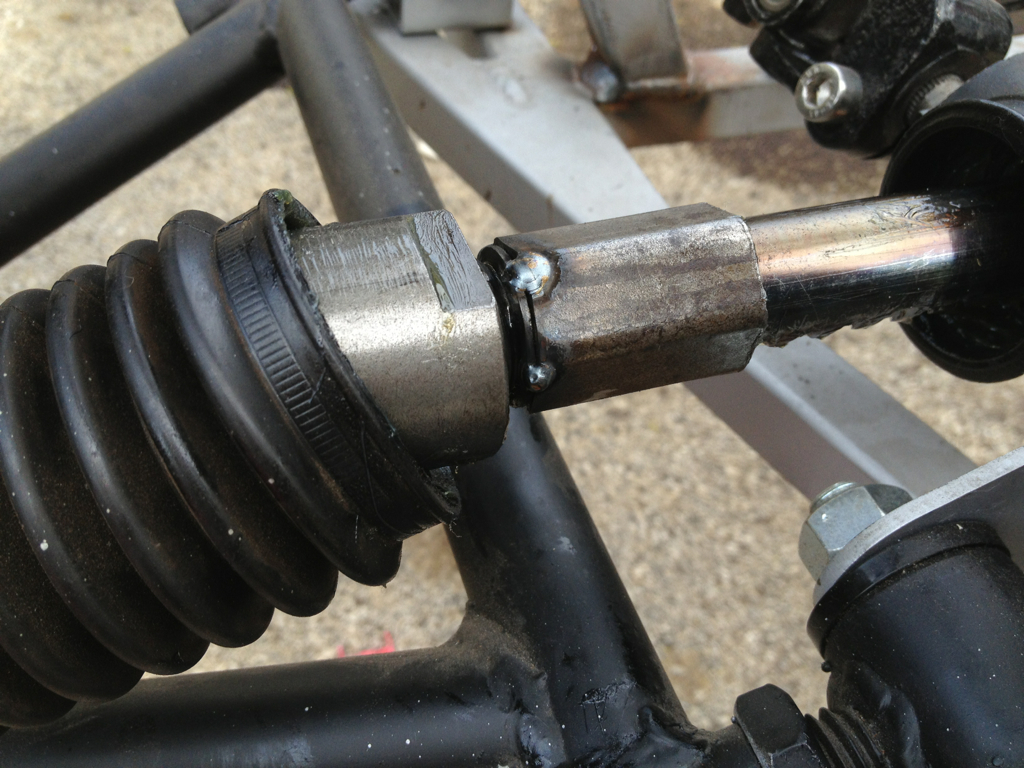 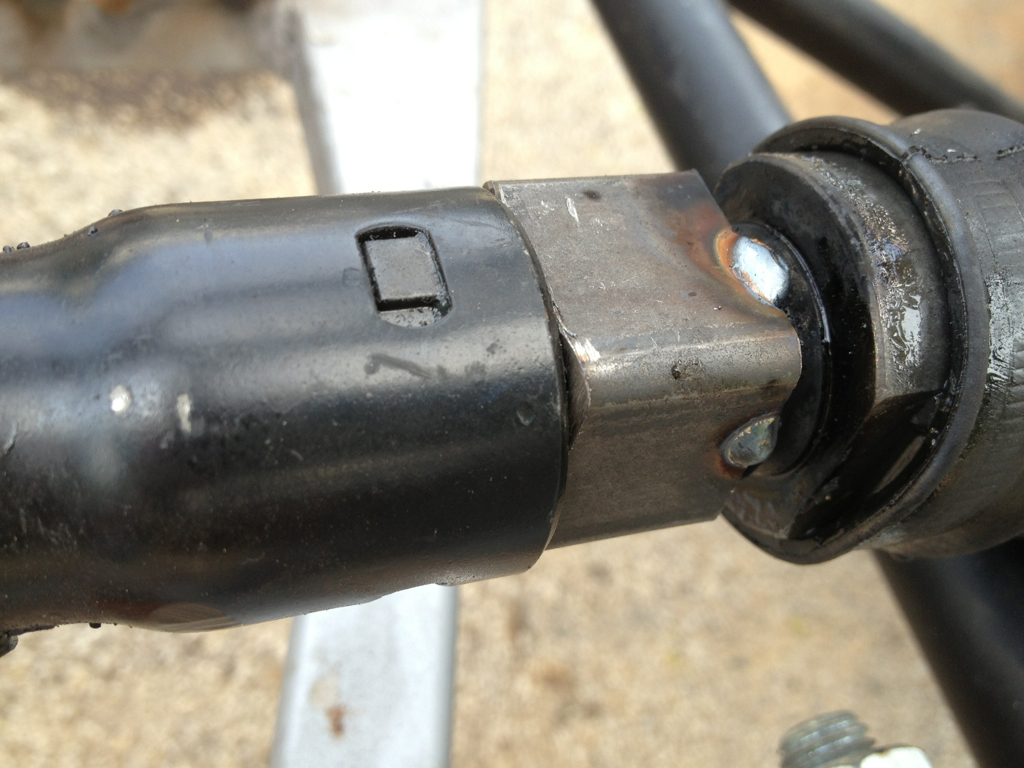 I would of used hex tube on the other side as well but I didn't have anymore of that old tool left :D , I pinched the tubing in the vice giving it a tight fit and then just gave them each three tiny welds to secure them in place. Quick and dirty but reversible and it does the job. |
that looks like a good solution .the wheels look great to:)
|
Quote:
|
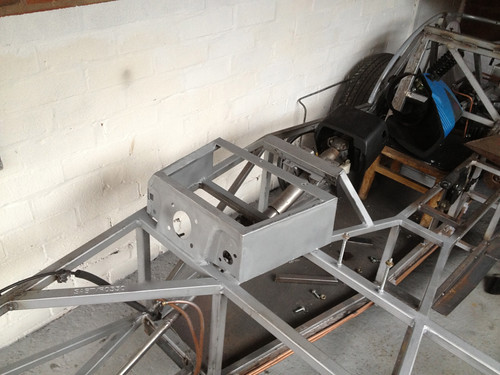
So I've got my pedal box/support sorted and clearing everything what a PITA. Lots of seam welding and grinding, probably more work making them fit than making the standard haynes pedal box but it was cheap I suppose. Pedals are like a rock when pressed to the max which should please mr IVA man.
 |
Quote:
so back to the hunt for something suitable may be a mix up of donor parts ive seen a merc 220 rear axle but its expensive .....over 300 quid. I am also looking into a hybrid of Haynes and locost i.e live axle . but not giving up on the build and any suggestions are appreciated. loz |
Quote:
|
Pedal box looks good, I'm using mx5 pedals in mine too I have mocked it up and got the steering column over the rail and I'm using the bearing as NTS Saturn design, did you alter the loud pedal?.
I bent mine the other way and I think I will have to make it longer to clear the top of the servo, with it as Mazda made it I would not be able to get it to clear the side of the bonnet, I'm going to make a plate 280mm wide x 200mm high out of 3 plate and a frame of 20mm angle iron each side back to the steering column support and 30m x 3mm flat iron across to bolt the back of the pedals to and then make the top and sides in Ali back to the bulk head/fire wall when I make it. |
Quote:
Quote:
Quote:
|
Quote:
Unfortunately not any import car here however old it is goes for silly money eg I saw a mk 3 Cortina advertised for over £10,000 yes that is ten thousand . so I have to just get on the search . |
Thanks for the reply, I don't have the donor to cut any bulk head from but I will look into the rest of your suggestions when I'm ready to make that part, but when I mocked it up with the steering column in place it all seemed to fit except for the top of the loud pedal being to far over to miss the bonnet, I ground off the pedal pad and welded it back on straight
Regards Mick. |
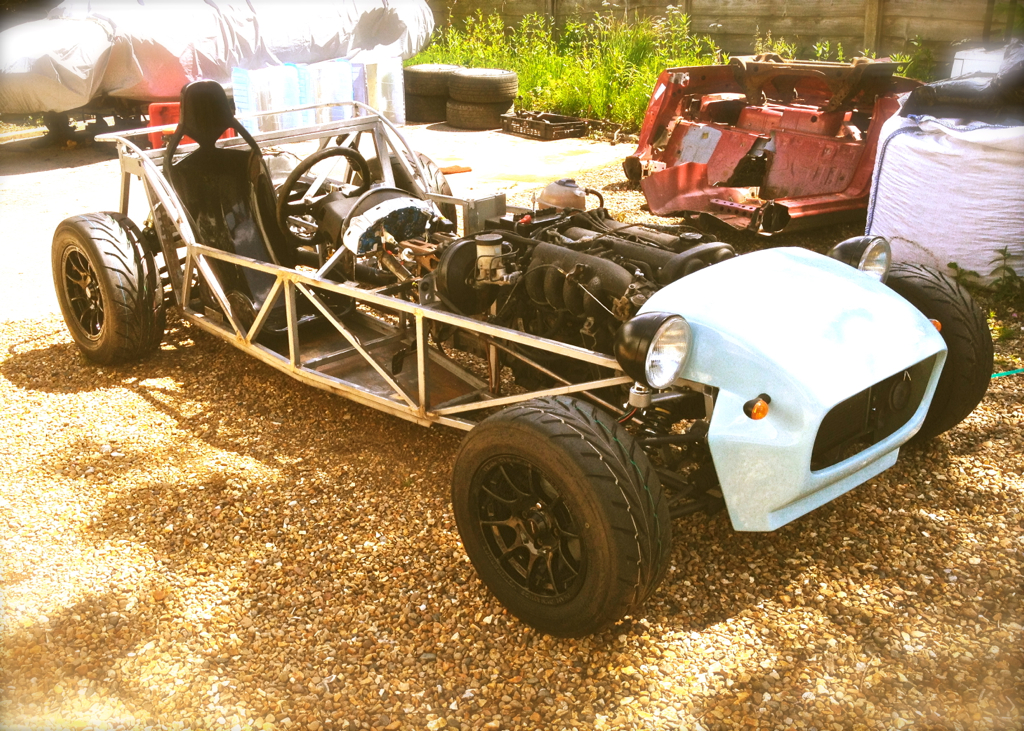
No pictures but I'm slowing finishing off the chassis, loads of final welding and grinding to do. steering column UJ is sorted now and column bearing and plate, pedal box needs a bit more to finish which I shall do tonight when it's cooler.
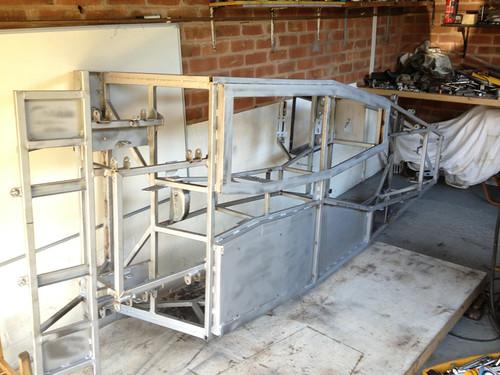
Then I need to get the drivers floor welded up. Passenger floor needs some welding from underneath to finish. Then it's just the backend to sort out but I think it's just brackets that need fully welding and maybe redo the underside welding on the strut towers as I wasn't happy with them last time. Think I'm going to go for a fibre glass kit from AGM as I really can't be arsed doing the sides and back in ali I just don't have the space, tools, patience or skills, binning my custom rear end as it's still not finished, nosecone brackets will go, heater matrix and brackets are being deleted, it was leaking, and moving the waterbottle to the front of the car. No more steel to be attached to this car not even going to do the round bits near the seats, just going to leave that to the fibreglass side panels. All Ali tunnel in 0.9mm with foot rest, thin I know but cheap and easy to cut/bend. Done some measuring and the AGM kit should fit fine, worse case is a bonnet bulge. Got my paint, paint brushes, seam sealer, brake pipe, clips, unions, still to sort roll bar but think I'll just buy that one off ebay as I give up trying to get a CDS item made for reasonable money, but I will be cross bracing it and doing the supports with CDS. Looking forward to having a finished chassis all painted and getting on with putting things back on for the final time! :D |
|
Quote:
|
I wish I could smuggle stuff in but also shipping is expensive so I am just gonna have to use what I can find here :(
|
Bloody hell when will this bit be over, it's killing me! "just a few brackets to weld" my arse!! Even the welder had to have a 10 minute break to cool down yesterday. Neighbours must love me, sat in there gardens listening to me grinding on this baby for over an hour continuously with the garage door open. Sounded like some epic battle between me and some giant steel dragon.
 I really don't know how any of us manage to put these chassis together and build these cars it's a herculean task of gargantuan proportions! We should all be supremely proud of ourselves! :D |
Car's slowly coming back together. Whilst it's upside down I thought I'd get the brakes done and drill the rivet holes on the underside for the side panels.
Also managed to catch a cold at the weekend hanging around in a wet n windy garage. I'm enjoying this part now that the welding, grinding and painting is over.:D 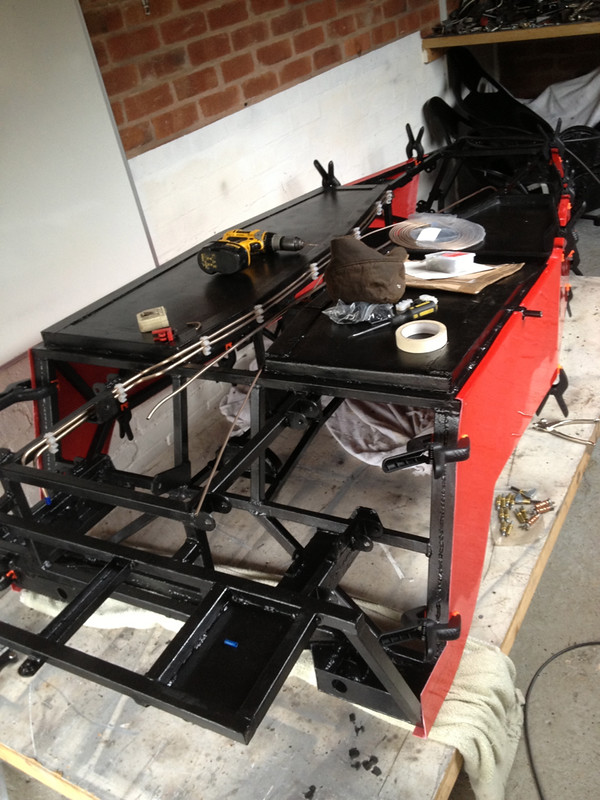 |
Quote:
David |
Quote:
|
This little bit of warm weather has spurred me on some what, car's now the right way up, pedals are in, diffs in, tanks on, pipes are nearly done for fuel and brakes. Wheels suspension and steering next. I'll get the back end finalised and then start on the front.
 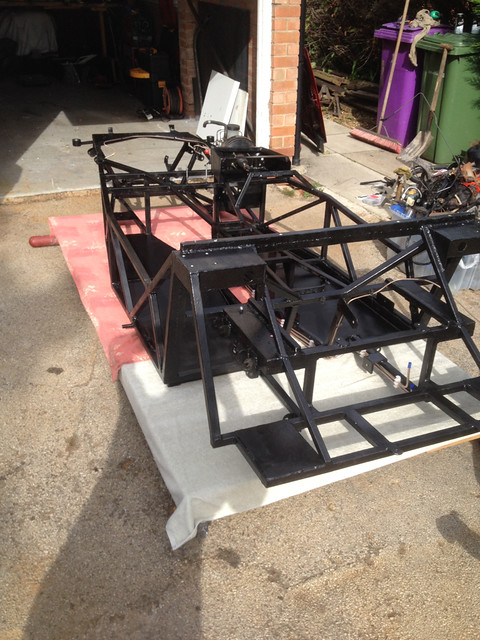 Decided to move the fuel filter down lower, wasn't happy with the original routing. The return pipe now comes up in the diff cage area where that pipe does a 180˚ turn. Sorry about the mess! 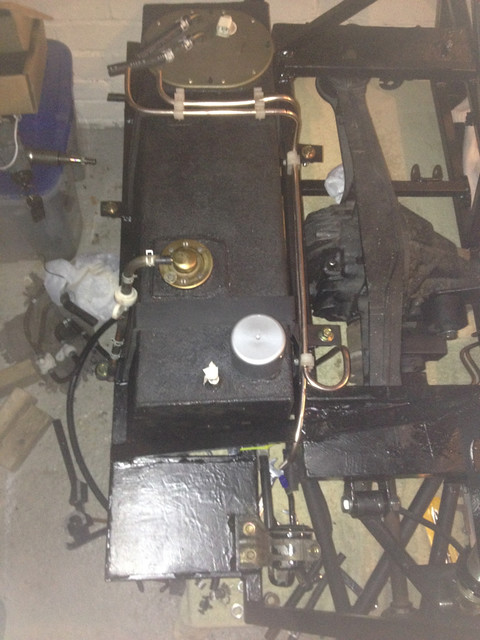 Pedal's still fit, just, after fully welding and painting the chassis. Top of the brake fluid reservoir clears the bonnet by a fingers width. Phew! I was going to paint the the flash rusted pedal supports but then I remembered, I couldn't be arsed! 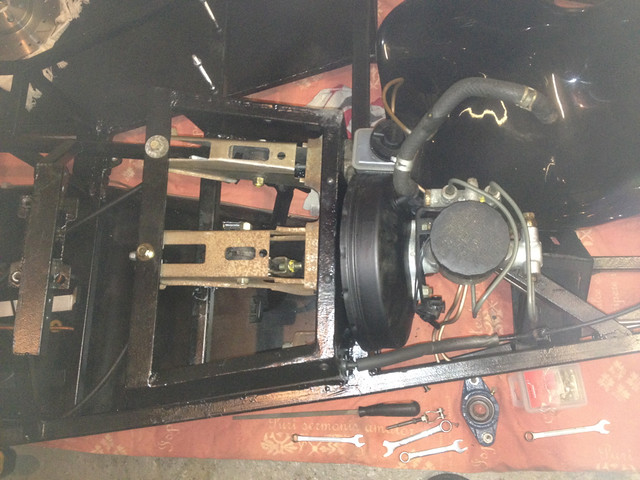 |
Haven't really done much this week, but today I got in the garage and took the diff back out and replaced the rubber mounts with poly mounts. I wasn't happy with the standard rubber and tired plate washer rubber thingies that go underneath. I could just see the nose being held still while the standard mounts jiggled about under load and between gears etc. Forgot to take any pictures but the old ones were a **** to remove, had to use every stone age brutality I could think of to get them out.:D
|
That chassis looks spot on, glad to hear that the mx5 pedal box is fitting good, that's what I am going to do now. I have been following your build thread with interest, just to see how the mx5 pedal box planned out. :D
|
| All times are GMT +1. The time now is 05:24 PM. |
Powered by vBulletin® Version 3.6.4
Copyright ©2000 - 2025, Jelsoft Enterprises Ltd.