Quote:
David |
Finished interior
Tonight I finished off my interior sort of...
All the carpets are in, the side panels that I covered in leatherette are in and I have also put in the kick strips on the sills and along the rear of aft bulkhead. I am really pleased with how it looks. I did try fitting a map pocket that I purchased from ebay buy this turned out to be the biggest heat of sh*t when I went to fix it and now in the bin. I still haven't put the steering column cover on as this can only go on once the dash has been re-fitted. This is something that I am going to do once I have finished my dash surround. Here is a photo. It quite hard to make everything out as its all black...  Ps I've also got a nicer steering wheel to go on at the last minute as well |
If you do fit the heater you will be surprised how effective it will be at keeping the lower half of you warm !:p
|
Quote:
|
Quote:
How is yours coming along? I am thinking about going for some westfield front cycle wings instead of using the agm ones. I think my tyres are too thin for them to look any good David |
Quote:
Quote:
|
Nose grill
I've finally mounted the grill inside the nose and made my indicator extensions.
Here is a photo. I made the extension using a bit of old tent pole from a friendly neighbour who is building an ac cobra replica. I secured the grill using industrial epoxy resin from east coast composites.  I have also had some vinyl stripes delivered so they will go on the car as soon as we have a warm day! I'm still wondering what to do about my shortened handbrake cable David |
OMG vinyl stripes! That's "nearly finished" type stuff! :) I started back again with mine after new year, and have been thinking about grill mesh and front indicators. Does the mesh have to be automotive specific or not. Where did you get yours' from?
Indicators and mesh look good.:cool: |
I have some black metal tube from a standard lamp we got as a wedding present ( but was falling appart ) to use as my indicator tube.
Got some mesh free, an ex-colleauge and freind whos parents now live across the road found it unused and as said freind now lives in Vienna they gave it to me :) when clearing his stuff out ;) I may make a bit more progress. over the comming months ( Possibly ) Nose looks spot on Dave.. TT |
Opinion ? is there any reason pre IVA not to fit them under the headlight by some means as opposed to the extension on the nosecone.
|
Quote:
I had thought about mounting the indicators under the headlamps but I'm ok with the extensions. Will probably leave it like that after iva as well. They could easily be shortened if needed. David |
I only have one job left on mine to get it ready for IVA.
Finish it. |
Quote:
My attempt but it looks very temporary so I don't know if it will be ok or not.  Front carbon indicator pod by Series1Landy, on Flickr |
Looks like the extension route then .:rolleyes:
|
First class job on the interior Dave. That looks like it has just come out of the factory ! Changing the subject, does anybody recognise the headlights on the haynes roadster featured in complete kit car magazine in the latest edition ? It was a 2 part feature on a scratch build haynes. The headlights look really different, in a good way. Wouldn't mind a set of those. I don't think it was a car from this forum, I don't recognise it, he gives a bodykit manufacturer a little kick about quality. He has a changed the bulk head ever so slightly to allow the Zetec unit to be set a little further back, build quality looks tidy enough, but the engine really needs some tlc. It looks like it has just been lifted straight out of a focus & dropped straight into the bay. I thought that he would have at least painted the rocker cover as it's a feature car ?:eek: :D
|
Quote:
I'm sure the builder is a forum member as they would have bought the bodykit off spud or Nathan. David |
It's baz-r's car in CKC magazine; SVC, Europa or CBS will likely sell those headlights.
|
Headlights
This looks like the headlights, http://www.s-v-c.co.uk/product/hella-oval-headlights.
|
Dashboard
Tonight I spent a bit of time making my dashboard. It just needs to be fitted into the car. The bolts are being reached by some black dome headed bolts as soon as they arrive from ebay.
I will eventually put in a carbon fibre dash as soon as someone makes one wide enough with the radius on the bottom. I'm almost happy with the result. I wasn't going to use the padding underneath but when I measured my radius I was slightly under the 19mm so don't want to risk it at iva. Here is a photo.....  I will post a photo of it in place and that will be the interior finished apart from the harnesses (not enough in piggy bank / car fund) at moment for those. David |
New photo
Here is a picture of what the car looks like so far.....
 David |
It's defo bin Tango'd Dave:D :D
|
Nearly there David, well done, looks like you will be no. 2 finished, where did you get your roll bar made?:)
|
Quote:
David |
Update
Everything has been going brilliantly with my build over the last few weeks. My list seems to be getting smaller and smaller...... However tonight I have cam to the conclusion I may need to buy some new seat runners.
I bought 2 pairs of these about a year ago http://www.kitpartsdirect.com/produc...versal_Runners and there is so much movement in the seats I cannot ever see them pass the iva. I am therefore looking for an alternative... Has anyone else had similar problems with these runners? I'm therefore thinking my runners are duff so happy for any suggestions. Do you thing it would be ok to weld the so they don't move? David |
I used those, and was worried about the amount of play in them too!
IVA man clearly wasn't as concerned and didn't even mention it :cool: |
Quote:
David |
Fiat Punto could be made to fit and most small cars have split runners where the adjuster bar could be cut and joined for the width of the Haynes.
|
We need to see some more pictures David.:) Is it done yet?
|
I've finished the wiring to the back lights now. Lots of crimping later and all my light flash in the correct sequence! I also put my roadster sticker on the rear panel. Here is a photo.
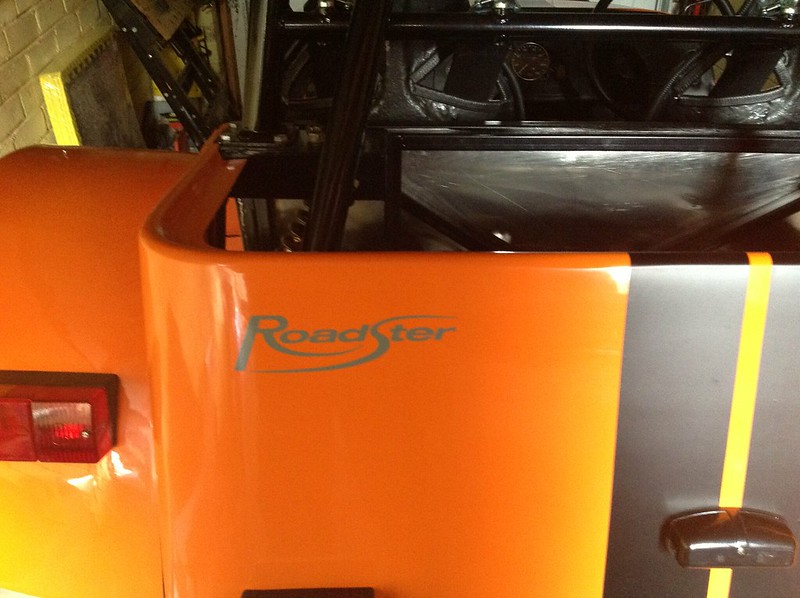 I'm not sure if I mentioned this earlier but I put my harnesses in which I ordered from prima Motorsport. Titan 4 point items. They are really nice, wide and had a good aero style buckle. More photos to follow. |
Ooo, that looks good!:)
|
Seat belts
Here is the photo of my seat belts mentioned before.
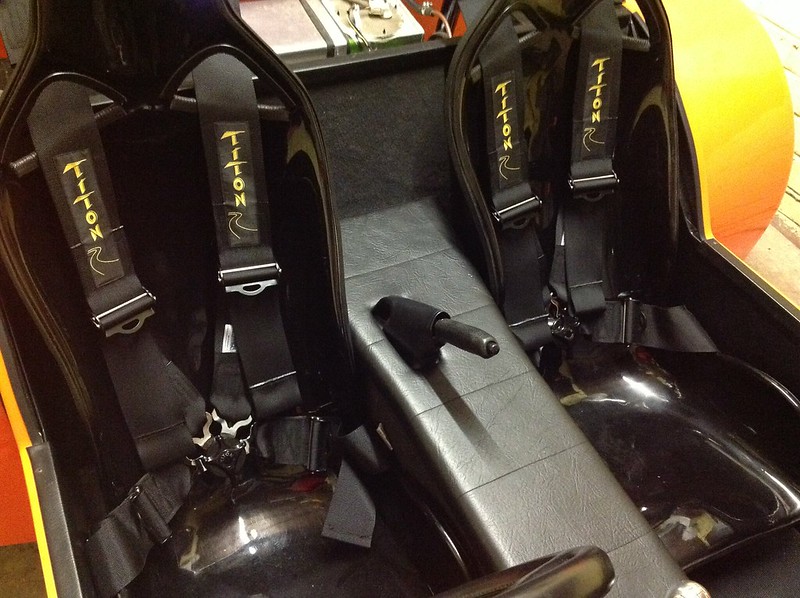 David |
You know Dave your car is really coming together now, and looks really good. I notice your not giving too much away with your shots. Love the belts, they goreally well with the colour scheme.
|
Comming on very well.
TT |
Looking good David. Love the stripes :D
Have you booked your IVA yet? |
Love the title on the belts :eek:
|
Quote:
I am hoping to be 100% finished soon and will post some photos online. Im still finding little niggly bits to do. I dont want to spend the money on the IVA until im sure it will pass 1st time! One area I have been looking at is the length of my handbrake cables. everyone elses seem shorter than mine? Min are so long they extend over the diff arms but everyone elses seem to stop short. I may need to re-rout them around thr driveshaft like Johnos |
Video
Here is a link to a walk around of my car... So far.
Please ignore my wonky reverse light http://youtu.be/4CTmo9jDKlM |
Looking good. What rear view mirror is that? I'd love one like that in chrome.
Cheers Stot |
Quote:
David |
Big thanks to chris
It's been a while since I posted anything to my thread.
As it does everything was coming together nicely and then I noticed that the bellows on my steering rack were permanently touching the wishbones! A bit of a bummer I thought as surely when I bought the kit this bit should have been a simple bolt on job. I looked a chris' build and he had placed aluminium plates under the rack to lift it a little. Very generously he sent me enough aluminium froc so I could do the same. After a quick dismantle and rebuild everything now clears nicely. By lifting the rack though this did cause the steering rack to fouls the heater pipes. When I was installing my radiator I was paranoid that it would be too high so I put this in as low as possible. To solve this I bought some 1" billet aluminium and salted it to the existing radiator mounts. This has lifted it so there's lots of clearance. The radiator is in a much better position as its more in the airflow for the big hold at the front! Now to fit the cycle wings. I'm sure this will come with its complications! David |
| All times are GMT +1. The time now is 01:58 PM. |
Powered by vBulletin® Version 3.6.4
Copyright ©2000 - 2025, Jelsoft Enterprises Ltd.