very nice work.
Well done |
Very cool. Love the TIG work.
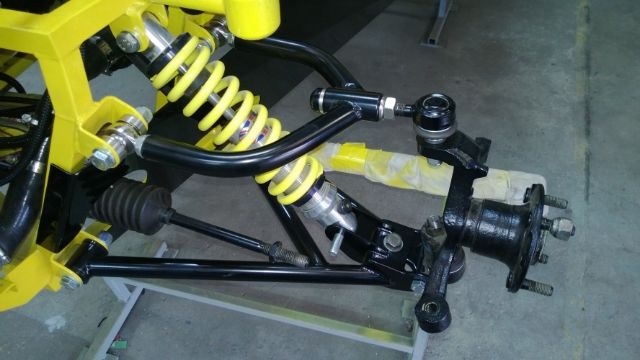
I was considering my rear uppers recently too but from another angle. My handbrake cables are really close to the seat-back framework. I thought that on the roadster with MX5 uprights it would be better to mount the uprights on opposite sides so that the brakes are to the back and the handbrake cables mount at the rear. A flip of the upper wishbones with repositioned shock mounts would work but I already have my shock mounts welded in so it is in hindsight but I would look at it if I were doing them again. Cheers Stot |
Thanks guys,
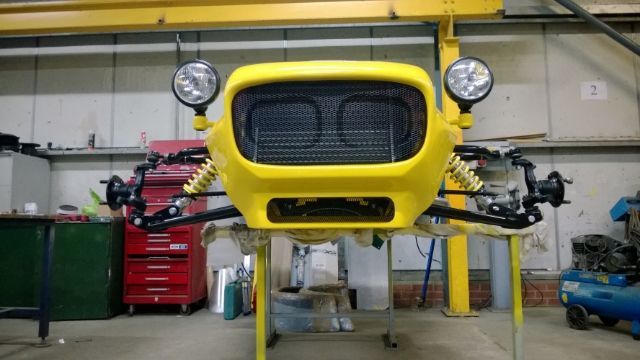
I thought the same about turning the uprights round at one point but like you Stot my upper shock mounts were already welded in place. The upper wishbone would have to be a strange design to accommodate the offset of the upright when turned around with the original upper shock mounting point. I made my grill for my bonnet scoop this morning.....:) 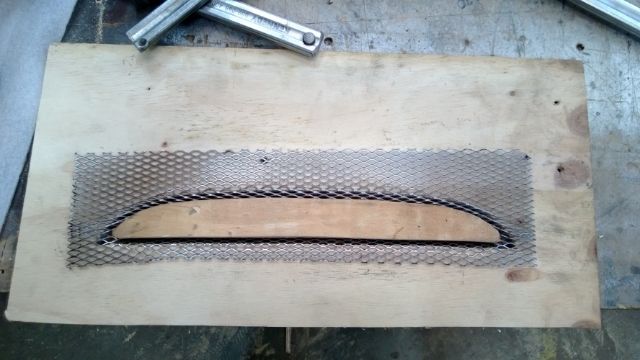 The formers were made from 12mm ply with a 5mm gap between the two. Placed the mesh in place and then clamped down with a bit of support from a bit of box. 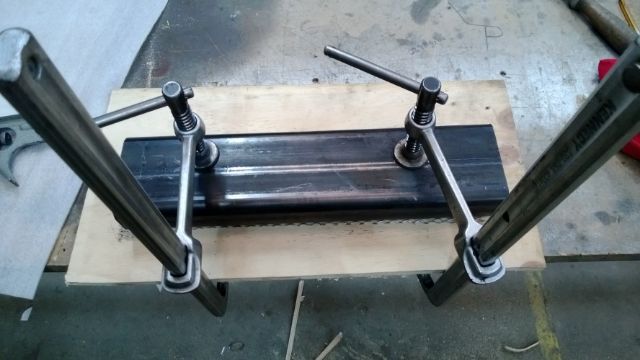 This how it tuned out, just needs trimming and a coat of paint ready for bonding in place... 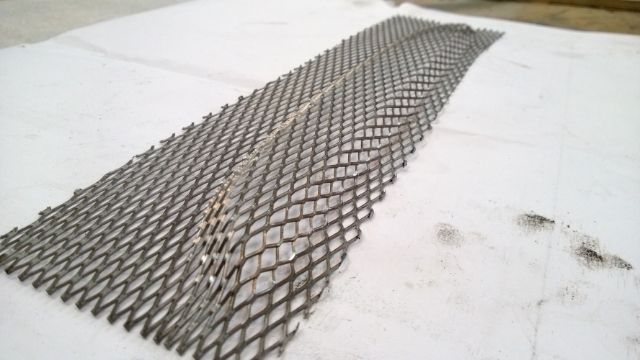 |
I saw this build last night - it's all brilliantly made and looks better in real life than in the pics. It cheered me up no end after an arduous journey to get there in the first place!
|
Hats off Johno, your build is amazing ! Lol. Most of us are more than chuffed to get to the stage of a functioning roadster, but yours is better than factory quality. By the way, I love the rose joints on your wishbones, they are really trick. How do you think they are going to compare to poly bushes ?
|
Hi all,
Well unfortunately I wasn't around when Porkchop turned up last night so didn't have the chance to have a good old chat...:( I've been taking the car to bits so it looks like I'm going backwards with my build and it's covered in dust (surprising that in an engineering workshop) I really would have liked to try the aeroscreen Dave:( as I plan on getting one from the same place. Hi Jason, Thanks for your kind words. I'm hoping it will look a bit more complete soon if people send me the parts and other stuff back. With regards to the rose joints I believe they will be more precise to setting up the car for handling but less durable and a harsher ride. I guess time will tell.....:D I plan to rubber boot the joints so I guess this will help with the durability. Well if anybody is out this way they are more than welcome to pop in and have a chat and a cuppa......:) |
Well at last I've got some stuff done and parts delivered.
I've been spending the last few weeks collecting stuff ready to crack on with it. Just couldn't resist seeing what it looks like with the side panels rear wings on. 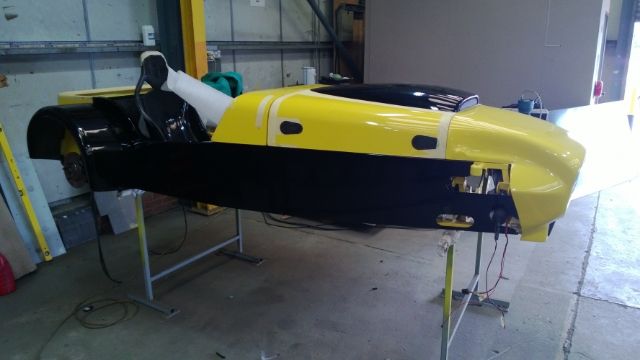 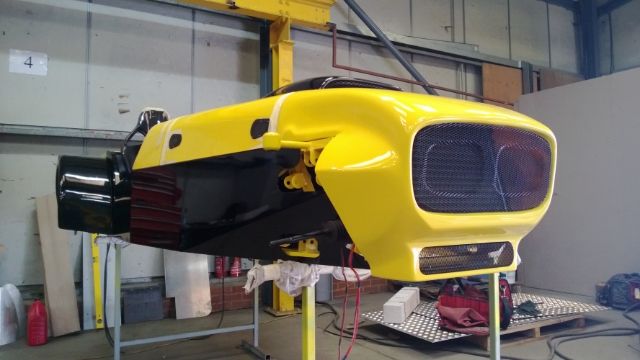 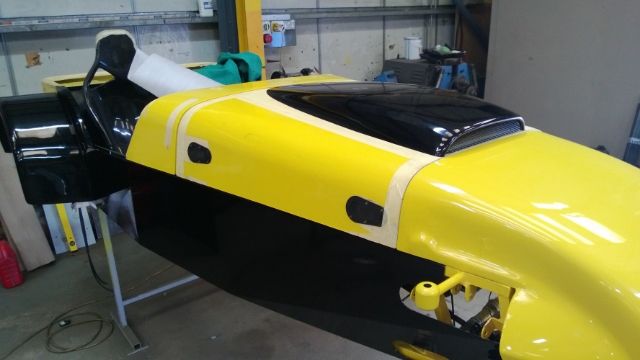 So now got loads to get on with..:D |
Looks really nice. Where did you get your side panels from or are they powder coated alloy?
|
Amazing what you can do when you're not distracted, eh? ;)
David, those side panels are powder coated alloy. |
Hi Porkchop,
Good to meet you face to face at last....:D I thought I was going to be in trouble with the missus for being late back.... (she bought herself some flowers with my money of course). Hi David, yes they are powder coated. I'm close to a local powder coating firm and the price I paid for the powder coating I couldn't even buy the paint for if I was going to spray them. :eek: :eek: I did think about carbon wrapping at one point so that's still an option for the future if the powder coat doesn't hold up. |
Well been a while, but I have been getting on with things when work permits..
Finally got round to fitting my exhaust. Made the down pipe from stainless to go into my R1 can from "PieWerx"... 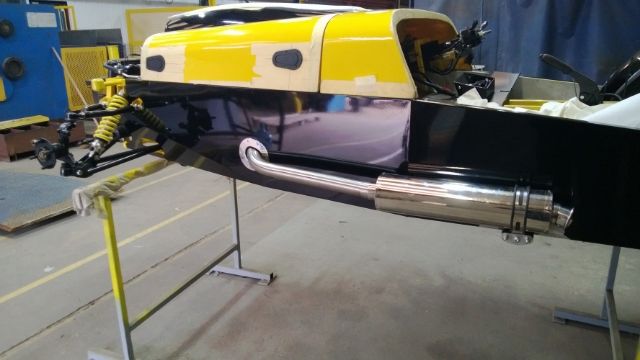 Also made an aluminium bezel to go round my side panel where the exhaust goes through and gave it a polish (filthy job to do). 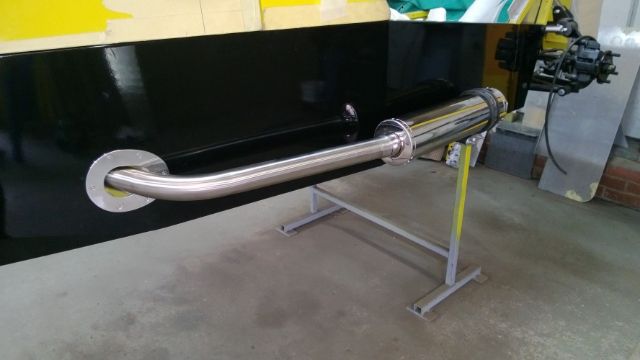 Managed to get most of my electrics in and tidied up... 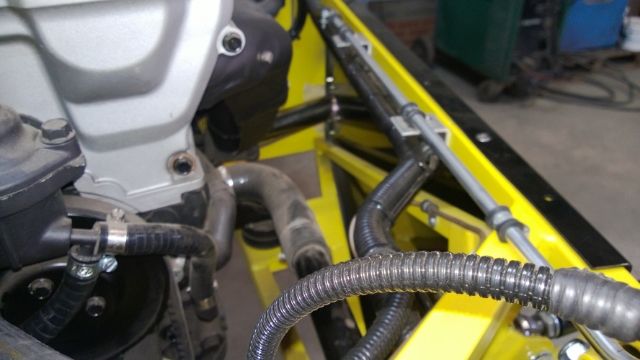 All the electrics in the engine bay have been put in split conduit and the ends or joins finished with self amalgamating tape. High and low horns fitted... 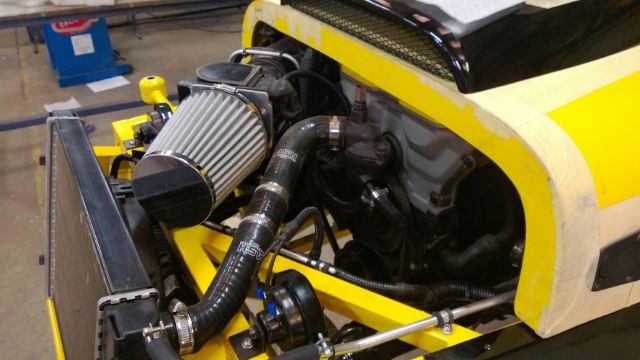 |
Also started fitting my front suspension..
 Got some bolts to change and stainless spacers to fit on my rose joints. Nothing has been set up regarding camber or castor yet. 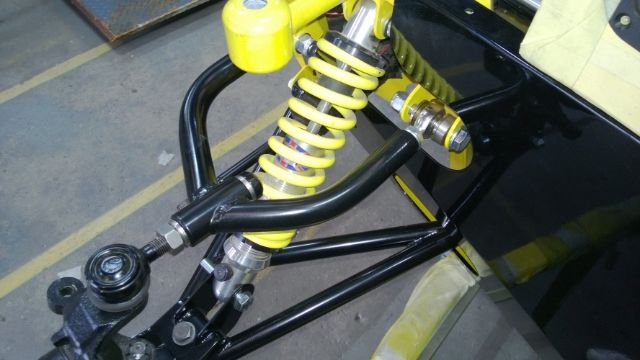 Chassis number at last stamped to stainless plate and fully welded to chassis cross member.. 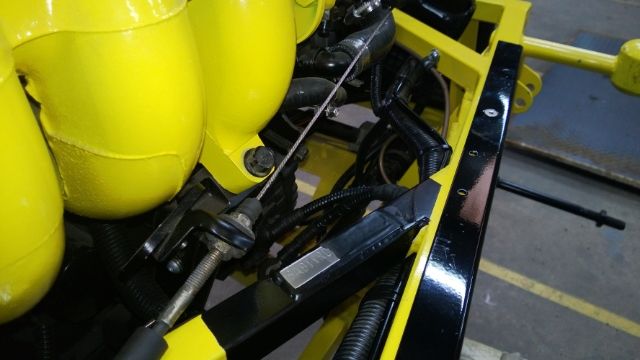 Radiator and cooling system all plumbed in and air filter fitted.. 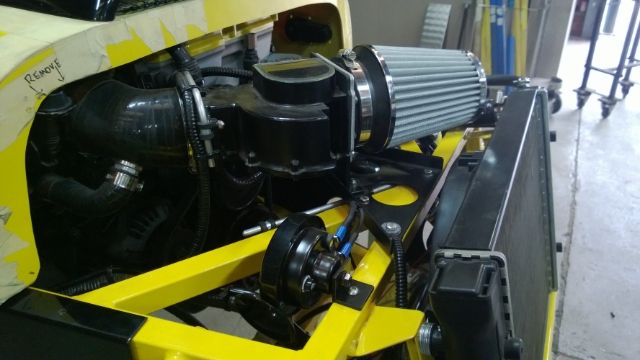 |
looking very nice.
bit of an inverse colour to mine ;) TT |
Quote:
Where abouts did you get you air filter from? Also have you ran the engine yet??? David |
My guess would be these guys David as the air filter has ASH on the end which stands for Auto Silicone hoses
http://www.ebay.co.uk/itm/89mm-Inlet...item4cefd8b3cc |
Quote:
Yes I guess it is.:D The wife and kids were with me when I was looking at your build photos and they liked the look of black and yellow body panels so I guess you had an input in my car...;) I was going to go nearly all yellow but changed my mind.... I guess that's why this forum is all about. |
Quote:
Kev is absolutely correct..;) No I haven't started my engine yet....:o I was planning on getting it off my stands first in case it vibrates it self off them (if it starts)...:eek: |
Been a while but I'm still working on it when I get a chance work permitting...
I've been re-fitting my body kit to get the panels in line now I'm bolting parts on that are staying on. Aero catches lined up and bolted in place (bl**dy fiddly trying to align 4 catches though...LOL). One thing to look out for is make sure your oil cap is fitted when you fit your AGM body kit, It's dam close as well as your front cam cover.... 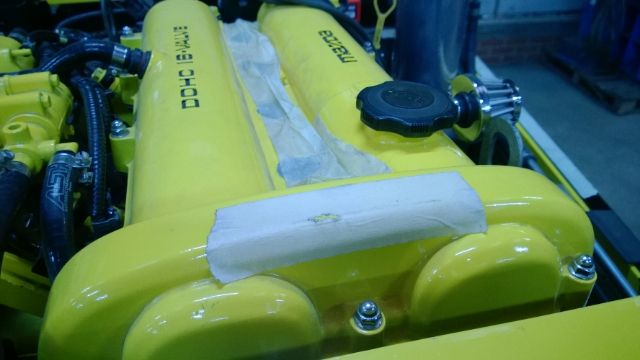 You can see where the bonnet just catches the masking tape on the middle of the cover. It was an easy get out for me though as I was always planning to fit a large bonnet scoop just meant I had to cut a bigger hole... 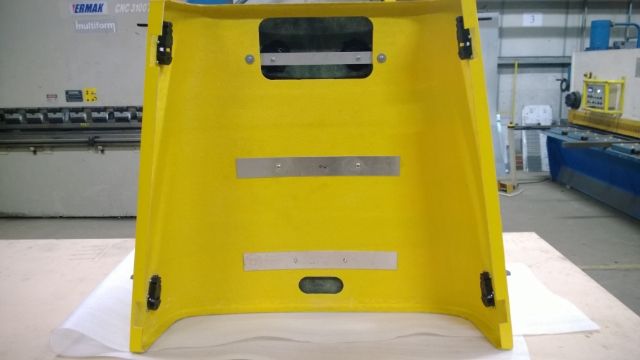 Front lights fitted with wiring hidden from view as it's all going through my light brackets..  Also started fitting front drivers side suspension... 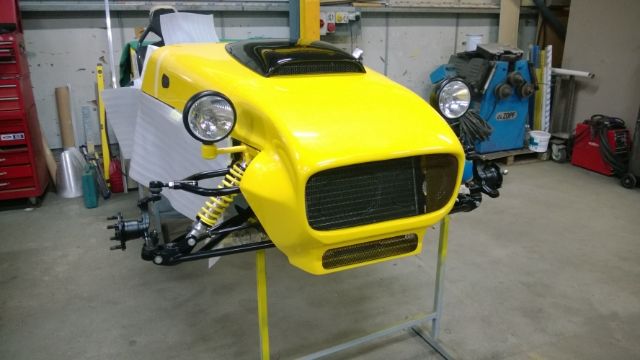 |
More photos...
 Exhaust is nearly finished just need to modify bracket a touch and have spoken to Pipewerx about supplying an outlet with a 45 degree outlet to clear the wing more which they said wasn't a problem.... 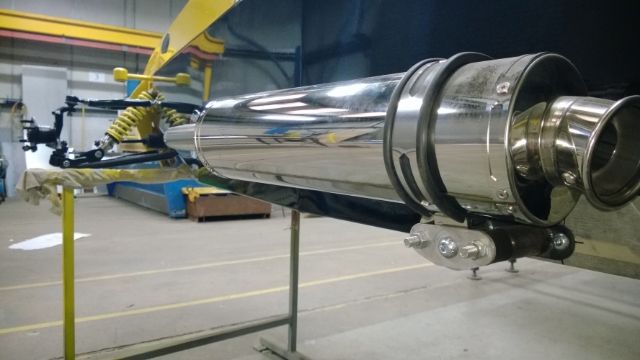 Hopefully will be able to have some quality time on it this weekend to get more stuff ticked off my to do list..:) |
looks super
and the car too, not just the workshop. ;) my light wires are being hidden too. just need to get to that phase. TT |
Quote:
Looking awesome. Can I ask where you sourced the mesh for the grill? David |
Can I ask if you know the melting point of the rubber or plastic edge trim on the soon to be very warm exhaust?
|
luvin the quality John luvin it:cool: :cool:
|
What can I say, it absolutely stunning, I too noticed the rubber on the exhaust.
You have beaten me too it as I too am planning to send the headlight cables through the arm and out of sight, can I just ask a question though have you drilled through your top rail as that is my plan and to weld a section of pipe in to return some of the strength back then where it passes through add a couple of layers of heat shrink to protect the cables Arfon |
Not sure how it's been done here but I just have a 6mm hole through the top tube to route the headlight wires into the headlight tube.
TT |
Quote:
I appreciate all your comments guys (good and bad) means a lot to me, helps me stick with the build. Sorry David nearly forgot to reply.. We had some mesh kicking around at work which I believe is expanded galvanised mesh. I'll see if I can find where it came from. I used a bit of 19mm cds tube for my light bracket passed through both side walls and fully welded both sides like a crush tube. I then covered my cables in split conduit which was just the right size to fit in the tube to stop the cables chaffing...simples.:) |
Hi Phil and Arfon,
Not too sure about the temperature for the rubber:o You're both right though it needs to be removed but at least it stopped me scratching the silencer whilst I positioned it (poor excuse I know).:D Well I guess I'LL shorten the strap at the back to tighten things up again, it will look better without the rubber I must admit. Thanks for the input...;) |
Hi all,
Well I'm getting to bolt stuff on and leave it on...LOL Well I've been fitting my rear wings today at last. I've been working on the car from front to back finishing off all those tedious jobs. Here's the results.... 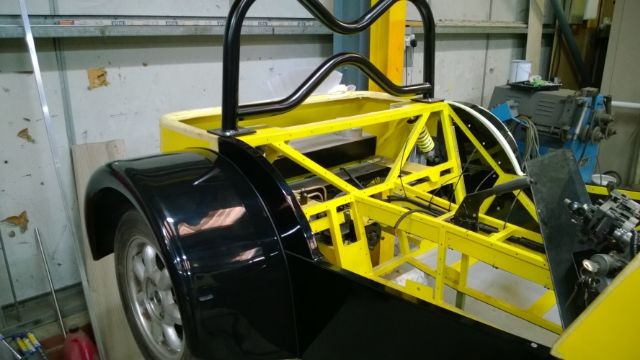 Fitted front indicators with extensions. 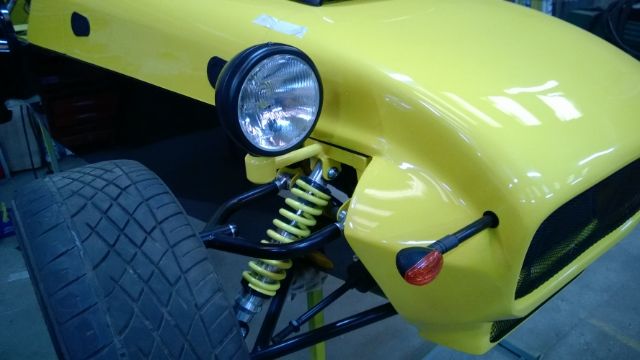 In the process of fitting IVA trim to front suspension.. 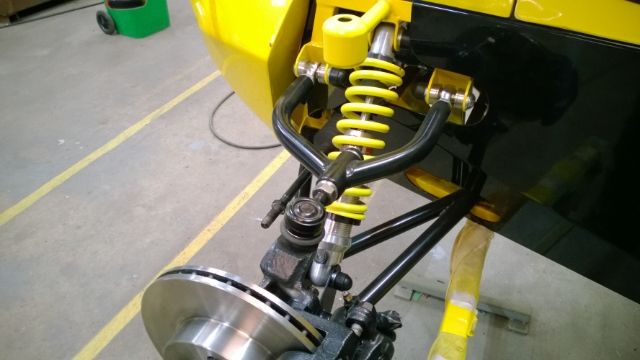 Started to install rear suspension. 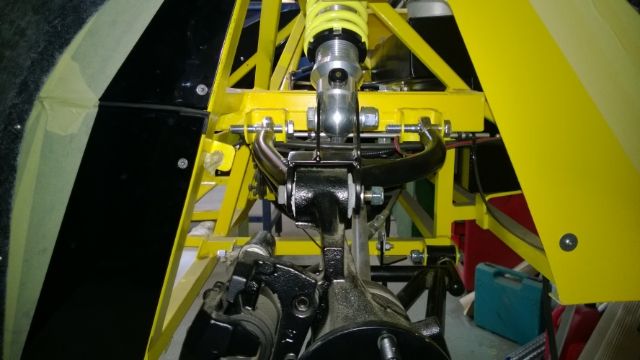 The only problem I've got at the moment is finding time to work on it. Work is a 6 day a week schedule and son now plays football on a Sunday and daughter show jumps at weekends, dog needs walking and wife just keeps moaning about what I haven't done around the house.... |
Hi all,
Well I've been thinking about making a diffuser for my car from ally. Now do these really make a difference to the handling of the car or do they just look good.:) I would think covering the rear under tray would help somewhat but unless you know about aerodynamics would it make a difference in performance/handling.:confused: |
The exposed diff area would benefit from being enclosed. IIRC, the word parachute was used when I was talking about diffusers with another forum user a while back.
|
Quote:
|
Speaking of aerodynamics, I have seen a few 7 replicas going around with little wings attached to the front nose cone, apparently it helps with front downforce. But I haven't got a clue about aerodynamics either. Lol:D
|
Ok I made a rear undercover panel which I hope will stop this "parachuting" effect people are talking about. It's not going to be to everybody's taste but I might make some alterations if it doesn't look right when it's fitted.
I cut some holes in the middle outlet to release some of the air coming through the transmission tunnel. I'm thinking of adding a mesh grill to this outlet also to give it a bit of character. 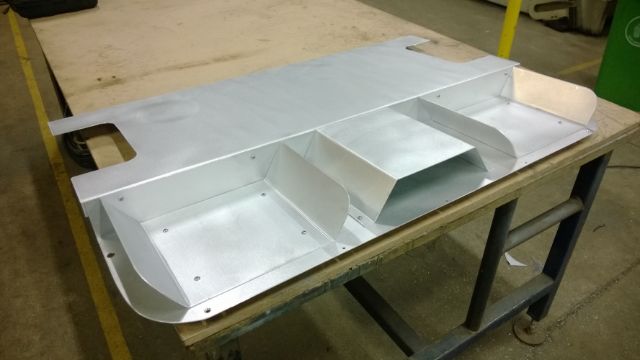 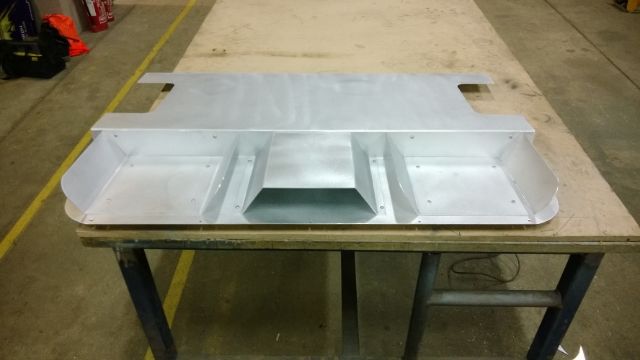 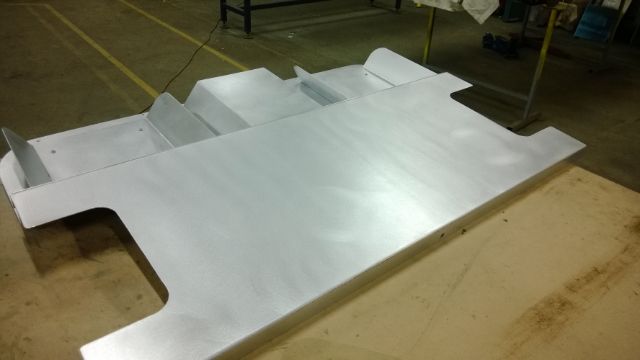 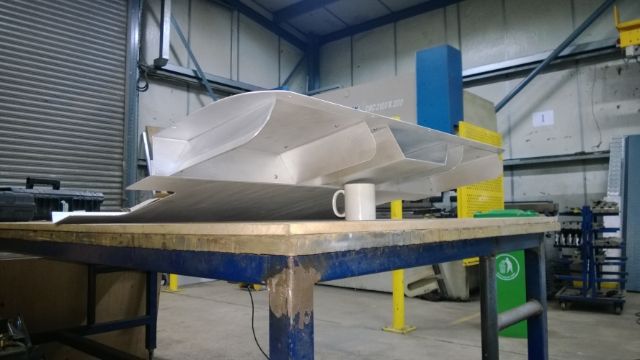 Hoping it will look better when it's black and fitted to car. |
I like it! I think you could sell them to others!
|
I'll second that. Very nice indeed :)
|
Very nice. I am trying to get my rear panel lined up. Is it possible you could take a picture of how you have lined it up in relation to the back and the bit of the chassis that goes along the back of the tank.
Hope that makes sense. David |
Well I've slept on it and I'm going to make a few changes:eek:
Not happy with the back, should have thought about it a bit more before ploughing in.....:o :o sorry but that's the way I am..lol I might have time to change it later after watching my son play football at Grimsby, depends on what time I get back. Thanks for your comments guys anyway. Hi David, not quite sure what you mean? Do you want me to take photos from above and below the rear tub with or without the fuel tank in. Just out of curiosity how do you multi quote people as I haven't a clue.:o |
Quote:
However, as Phil said on a previous threads about rear diffusers (quite a long time ago), it might help to reduce the "parachute effect", but certainly not stop it, as air will always comes from the wheels openings, where the wishbones are. Unless you close this area (and it would be quite difficult to do, considering the wishbone arms and drive shafts has to go through), air will always find its way and the rear tube act like a parachute. The only good way to suppress this parachute effect would be to cut holes in the rear tube so the air can escape. Just my humble opinion ;) But the rear diffuser you designed and built can't be harmful anyway, very nice job :) Quote:
|
Quote:
David |
Ok I had another go at my under tray tonight. Not quite finished yet, got to make some pressed covers to go under the wishbone cut outs and cut more holes into the rear outlet panel and a few other tweak's.
I've created a slot at the rear above the strakes to allow some of the air to be released from the rear tub area, I guessed it might help. I took Phil's advice and was hoping he was going to post his revised drawing (why did his original post disappear) so I took a stab at it on my own. The angle at the rear is about 12 degrees and the whole assembly is made from 2mm aluminium. 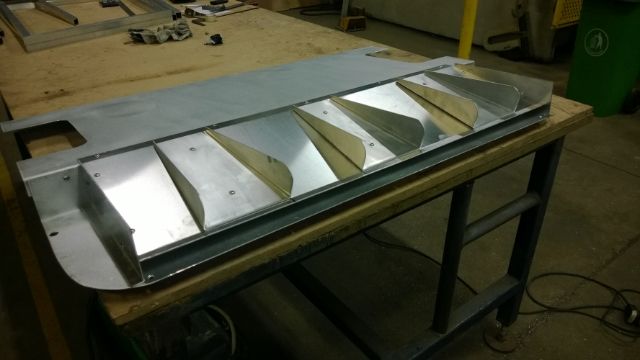 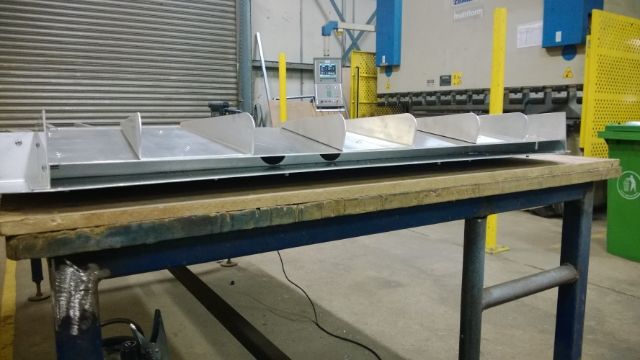 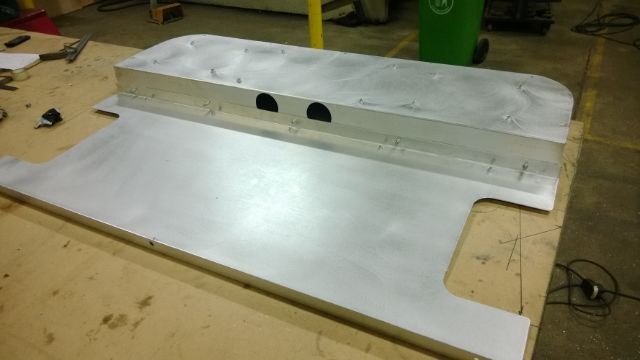 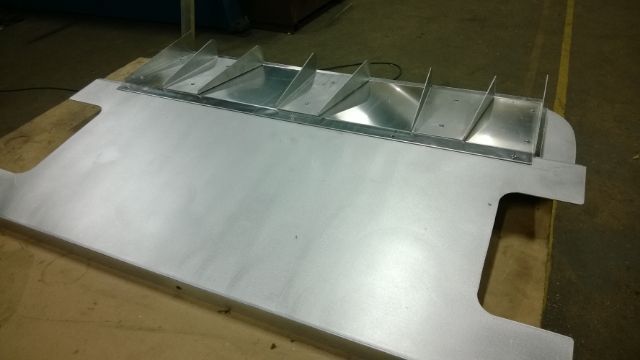 Well that's it for tonight...cya. |
| All times are GMT +1. The time now is 03:55 PM. |
Powered by vBulletin® Version 3.6.4
Copyright ©2000 - 2025, Jelsoft Enterprises Ltd.