From what I've heard on other forums you are the one supplying the information about the engines peak power so if you want 8k then that's what it is!
My peak power on my MX5 engine is going to be 3000 rpm - er - no I don't think I'll get away with that - so as long as it half sensible ......... |
Quote:
Quote:
|
Not many photos tonight but it doesn't mean I've not been busy, got my driveshafts from j&r on eBay greased, built up and fitted
Got a type 054 battery, think it's going in the passenger footwell behind a foot rest, so made the foot rest fit and made a strap out of stainless   This will bolt through the floor from underneath, all bits need a bit of padding here and there  Then spent most of Sunday drawing and deciding how to do my air filter First try was with a k&n filter but looks to big,  |
Next is to suit an itg sausage filter over the top, this is what I'm going to do, I've got to make a new fuel rail and a base plate
  Std injectors which will fit in the new rail/bracket  This method seems the simplest, easy to make, most compact and uses an off the shelf air filter |
Well got all my anodizing back today, looks sweet
 Gear shifter  Roll cage bungs, I admit I got carried away with these, but I do love it! Made a bit of a logo with my initials   |
Brake tags bonded and riveted on (I spoke to the tech iva man at the dvla about this and he said it's fine as long as there secure) also got all my brake pipes back on tonight, I just need to rivet the p clips on
  Rad brackets fixed on and fan fitted  Brake res fitted  |
My air trumpets turned up yesterday so now I have 4 short ones
 Started the fuel rail bracket  Back plate drawn up  Just need to order one of these filters  |
Well finished my fuel rail bracket off tonight, just got to make a few bosses for it
 Then onto the handbrake cables, I thought this would be an easy job but it wasn't, the cables weren't really long enough and not sitting nicely, I was ready to leave it for tonight then I thought about making some exstention tubes  The cables are a snug fit in the tubes and locate on 50mm also it stops them from rubbing on the diff  [url=http://s133.photobucket.com/user/corsaboss/media/September%202015/B44B1114-E9A5-4D6E-9CB4-B761C1846667.jpg.html] 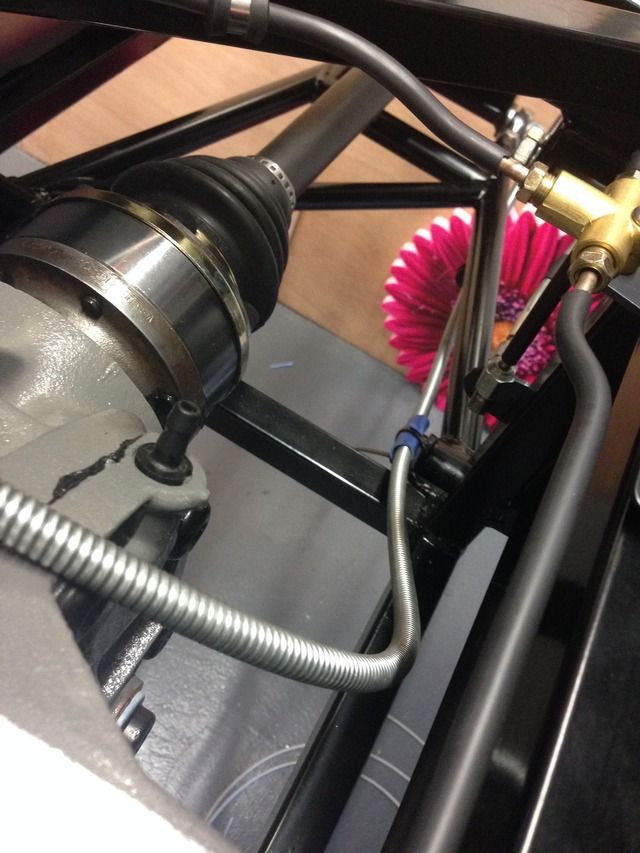 |
 I just need to make a couple of brackets to hold the cables in place off the wishbone bolts  I've removed the adjuster from the cable but I will still have adjustment on the cable end fitting as it has grub screws in |
Don't be tempted to have a "few" notch handbrake as you don't get leverage to give you good brake force,4-5 notches is good .
Nice build . |
Quote:
|
I seem to recall from my youth it was 7:)
|
Long time ago ....:p
|
As long as you get good leverage and it does not run out of travel it should be ok.
Once its up and running try it on the road or MOT rollers,probably not a good idea to rely on adjusting it at the caliper ends and IVA man might not like it either. Basically what you are doing is turning a shaft/bolt against the pads to produce the effort. |
That's looking super, really polished. Can I ask, what's your trade? Do you work for McLaren?
|
Quote:
|
Quote:
|
Ah, so there's some work place skills that come in handy!
I guess it'll be able to move under its own steam soon... |
Quote:
As you moving, yeah not far away, need some shocks and wheels, only thing is I want to get my bodywork first so I can work my wheel offset out so its sits nice |
Well more done today, made some little crush tubes for the fuel rail, also I've vapour blasted the bracket to make it look at bit more factory
  Also I've started making a new gear lever, just the lower bit with the bearings in as its a bit of a bodge lol |
More done today, loads of bits and bobs to do, got my clutch cable sorted, had to make a bit at the pedal end and solder a bit on the other end, it wouldn't solder to start with, to hot I think, but got it done in the end.
Also got all my aluminium engine cradle spacers back on and tightened up. Then went down my dads and made my air filter backplate ready for the itg filter, I got a drawing from ITG for the outside  Came out mint   Pretty much there now, just need a few holes in it for wiring, air temp and the fuel feed, also need some 3mm spacers under the trumpets to replicate what was there before as it's got orings that seal everything |
Steering rack and track rods re fitted
 When I re fitted the steering shaft my break pipe was in the way so I had to make a new one  Rear discs and pads fitted  Done a bit more on my inlet, fuel rail all fitted and fuel piped up  |
I removed the pins from the injector plugs ready to pass through a grommet but then decided I'm going to cut the lot and put a connector inline so it's easily removed
 Also my air filter came last week and fits sweet!    |
Had a morning on my dads cnc today
  These are to go under my trumpets on the inlet to replicate the thickness that was there before  Handbrake cable tags  |
 Works like a dream to!   This is a bracket for over the diff, just need some more grommets  |
Is that a home brew cnc machine?
|
Quote:
|
Well got a few jobs done this week, got my handbrake bracket fitted, really pleased with this as its held the cables dead in the right place
 Decided on what switches I'm going to use for my dash, and got some switch guards, only thing there 4mm not 5mm so I think they will fail iva so I'm going to have to push some rubber tube over them I think  Also made a mount for my wheel speed sensor, there was a spare hole on the engine so I used this, it's going to pick up off a long bolt on the prop adapter  It sits closer than it looks, it's just the angle of the pic  |
Right update time, been bitting and bobbing all week really
Rear lights temporarly mounted and wired to the front   Makeshift dash sorted so I can start to get things wiried  Battery cables done  |
  I'm using these terminal bars for my wiring  Toggle switches for my dash  |
New gear lever made
  Also made a bracket for the starter relay   |
Looking spot on like normal.
I've got a dash2 as well and had problems with the Hall effect sensor picking up the diff bolts (prop side). I would loose speed after about 20mph. I put it down to the prop spinning too fast. I ended up putting the sensor on the half shafts and haven't had a problem yet. It may just have been a 1 off but it was a pita to change it as I had pretty much got the car finished. A mate also used the studs on the front front uprights but he had the other type of sensor. It also caused Problems at iva as they couldn't do the speed test as the wheels went driven |
Quote:
|
Almost two full days of wiring!
All dash wires into terminal rails  These are the ends, crimp forks soldered on  Two 13 way plugs fitted on the end of the bike loom and fly leads out the other side to the rails  Engine loom in position and getting neater  |
Water pump removed, need to block the hole in the block, I'm going to run an electric water pump
 And that's it, doesn't look a lot, got a few more plugs to fit and get my switches mounted then I will be linking the rails together, I might get rid of the rails when it's all wiried but I will see, I did it this way as its all laid out and I'm hoping it will be easy to keep track of |
Look great as always? Why the electric pump?
|
Quote:
With an electric water pump, like the EWP's from Davies Craig, if it is connected to an electronic controller, the water circulation in the cooling system does not depend on the engine rev, as it does with a mechanic pump. And the cooling needs of an engine are not always propositional to its rev (overheating when the engine is idling in traffic jams for example, or too much cooling at high speed, when not necessary) The electronic controller is normally connected to both the electric water pump and the electric cooling fan. It detects the water temperature, and adapt the speed of the pump (and the fan when needed) to maintain the optimum temperature in the cooling system, independently from the engine's rev, providing the engine with a very constant temperature. The electronic controller can be set to the optimum working temperature of the engine. The second advantage of an electric water pump is that it does not take mechanic power from the engine (as a mechanic pump does), so a few hp can be gained. Hope this answer your question :) |
cheers for that Sylvain, yeah that's it really, but im not going to be running a controller to start with as i do have a budget to keep to :D
the main reason is heat soak once the engine is turned off, with an electric pump i will be able to keep the pump and fan running once the engine has switched off |
Quote:
|
I need the same continuation of circulation after powering down for my PC...
Is there no diy controller out there that could be made to manage the pump? |
| All times are GMT +1. The time now is 01:46 AM. |
Powered by vBulletin® Version 3.6.4
Copyright ©2000 - 2025, Jelsoft Enterprises Ltd.