They didn't look under my tunnel panels during iva. He didn't even want to look at the photos in had on my iPad. I have carpet with Velcro over the Ali panels.
|
Thats what I wanted to hear. I can do a far neater job if I don't have to make it a quickly removable part.
|
Quote:
Car's looking great. Who made the tank? dash buttons seem like a good idea for a clean column, but in reality it's simply dangerous when driving fast on the roads. I tried it and hated it. kept the dash buttons for now but never use them. Sorry to be negative but you'll see what I mean if you try it.:) |
Im going for just switches on the dash for everything, did you see my tunnel edge trim? Starting to look like a car now!
|
Hey, yes I saw your tunnel trim, looks lovely and I will confess to trying to replicate it but I just can't cut my sheet ally with the same precision so mine would look gash. Cover it, that'll do!
I have had some success in making a sheet metal brake and the first job was to make a petrol tank clamp that hugs the tank from front to rear, errr, much like Roscos (you'll see a theme occurring here) and I can crack on with my fuel pipes which then means finishing the tunnel trim. With these jobs done I might tackle the ally side and rear panels before I think about them too much. I've been distracted from the car lately as I needed to make a new tv unit and desk for my PC however I'm now back on track again. |
Tank is fitted! I painted the brace I made and lined everything with rubber. I've drilled and tapped these see flange which I'll fit with studs. I've also adapted the sender float by rotating it 90 degrees and reforming the float arm. It now reads absolute full and just above completely empty so there's a little reserve.
I can now crack on with running fuel lines along with some wiring clips along the tunnel.    I also got organised.  |
[quote=norton;103356]Tank is fitted! I painted the brace I made and lined everything with rubber. I've drilled and tapped these see flange which I'll fit with studs. I've also adapted the sender float by rotating it 90 degrees and reforming the float arm. It now reads absolute full and just above completely empty so there's a little reserve.
I can now crack on with running fuel lines along with some wiring clips along the tunnel. I sometimes have to remind peeps about that wee mod required on the sender/float arm.... although it is quite obvious how to do it when you come to imagine how it fits when you hold it up to where it would be at the back of the tank |
Yeah it didn't take long to realise it was a straightforward mod to get it functioning perfectly.
Oddly, fitting the tank feels like a significant turning point, like I've hit the halfway point. I like it. |
looking good mate!
we need some pictures of this sheet metal brake to!! |
So after a bit of a break I'm getting rolling again. I've got a vintage old bandsaw to finish restoring the. I'm going to get cracking with the rear and side panels.
 I'm aiming to have it done by next summer, the deadline is set! |
And join us on our Scotland tour :)
|
Scotland? Jeez I'll be anxious about the end of the let alone the other end of the country!
So, I've ordered the nose cone, bonnet, scuttle and aero screen and whilst I'm waiting for those I'm going to crack on with the side and rear panels. I'm going to make them myself from ally which should be a giggle. Does anyone here have any techniques for folding sheet ally without buying a metal brake? |
lol it's called a sense of adventure .......
I did silverstone in her yee ha ( just make sure you add breakdown to the insurance ) Good luck making the panels I made my side panels from 1.5 steel marked out and cut to shape allowing for the return edges I then got a substantial length of 3x2 oak clamped it in place on the sheet corresponding with the top rail and started dolling along tedious it got there once that was done and the v notch cut to allow the bend I marked the diagonal fox this very technically was done by standing on said oak and pulling the bend by hand back on the frame mark the lower edge and do the return as for the top then make a carboard template for the wishbone mounts feeding rack exits once happy transfer and cut out Sorry can't help with the back panel Gary |
I've been busy today.
  |
I'll be starting on the side panels Monday. Hopefully they'll go well. The plan is to vinyl wrap the back and side to match the bodywork vmax is putting together for me.
|
Nice job looks well
|
Nice job you've done there. Looks a lot smoother than I managed.
|
Thanks guys, I'm really pleased with it and looking forward to the side panels now.
|
One side panel is coming along.
   I'm a bit stuck on the lower arms rear mounting hole. I was naive in thinking I didn't need to put a fold in the panel where the front most lower rail kicks more inwards than the top rail. I saw various grp panels that didn't but I can't see how that won't interfere with the lower arm. Bawlz. |
Hi,
First congratulation for your rear tube: it looks excellent ! Second, as you say, some GRP panels are straight, as mine are. It does not interfere with ther lower wishbone, as the pivot point is 25mm (bottom rail) + 30mm (bracket) = 55mm higher than the lower face of the bottom rail, so it allows a bit of downward movement to the wishbone. 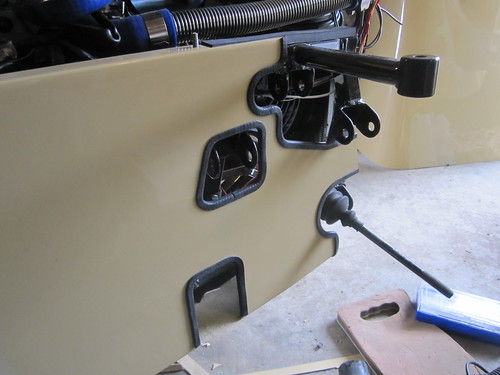 2014-08-07_15-42-02 by Sylvain ROIG, sur Flickr 2014-08-07_15-42-02 by Sylvain ROIG, sur Flickr 2014-08-07_16-36-22 by Sylvain ROIG, sur Flickr 2014-08-07_16-36-22 by Sylvain ROIG, sur FlickrThe main question for you, is how are you going to attach the front of your rear panel to the bottom rail ? That is also the reason why there is a fold in the book's ally side panels. My GRP panels have a 90° return underneath the panel.  SidePanel-NoDims by Sylvain ROIG, sur Flickr SidePanel-NoDims by Sylvain ROIG, sur Flickr |
I should have said I've used the mx5 plans which includes a bar between the lower arms inner pivots. They're a lot more substantial on the inboard side. Having thought about it I can chop out a big window from the side panel to allow for them. I don't have much choice I think. Regards to mounting I was planning to make some brackets to go between the rail and panel. Annoyingly, in hindsight I should've made the ally panelling user the engine a lot wide to bridge that gap.
|
That's exactly how I want the back of mine to look
Was it easy enough to bend around the rear frame? Quote:
|
It was far easier than I thought it would be. If you watch this video about caterhams somewhere in it shows a guy folding the corners. https://youtu.be/Y3EbtLoROhU
Definitely start from the middle though and work outwards and pre bend the basic corners over a tube (or welding gas bottle) first. |
What size sheet of aluminium did you use for the rear?
Quote:
|
It started life as 2500x700mm (1.2 thick) and finished a lot smaller.
For the record I used this saw WORX WX423 85mm 400W Compact Circular Saw Worxsaw https://www.amazon.co.uk/dp/B01AI44P..._v7Xryb0RQJ7RG with this blade https://www.ebay.co.uk/itm/112033399307 for chopping up all my sheet ally. Sails through it like it's not there. |
The offside side panel is nearly done. I decided to just chop a big piece our to clear my suspension arms.
  I need to find a tidy way of capping the inner edges of the cockpit along these rails. The curved one might be an issue. I've been looking for trim and mouldings that can flex/stretch without buckling as it travels along this radious.   |
Nice work there as regards the top edge I used some aluminium angle with pipe lagging cut inhalf then wrapped in matching / contrasting leather cloth gives a nice finish and a bit comfier for your right elbow lol once wrapped simply attached with tiger seal can add a pic if required or I think it's in my build thread
|
Thanks Gary, I like the sound of that, I'll give that a go thank you!
|
Can anyone tell me how far back they've mounted their silencer? I want to get going with building my cars exhaust but don't have a wheel arch yet to guide my silencer placement.
|
Hi,
The wheel arch follows the curve of SS1/CP11, so you can have a good idea where their front tip ends up on BR5 or BR6. Otherwise here is a drawing of the Equinox rear arch with measurements I made. If you print it or redraw it at scale 1:1 on a cardboard and cut it, you'll have a mock up of where the wheel arch will be on your chassis. Be careful to respect front and rear side, they are not the same. https://drive.google.com/file/d/0B-i...ew?usp=sharing https://drive.google.com/file/d/0B-i...ew?usp=sharing Hope this will help :) |
You're s star thank you! I'll hopefully be able to start it this week now.
Thanks again! |
Exhaust.
 I had welded the 90/rolled tip together by here and tacked together the cat. I'll crack on with the pipe between the cat and manifold this weekend. I need to rig up an argon back purge then I'll weld the rest. Tig welding stainless wasn't as straightforward as I presumed...   And some white vinyl wrap!  |
Lookin good fair play.
Where did you get the exhaust parts they look nice |
Thank you, they're from several different vendors across eBay and the net. Wherever was cheapest! Profusion exhausts had the bends and cat which was much cheaper than most. I wanted to future proof the exhaust as I will turbo charge the engine after iva so went with an admittedly excessive 3" diameter setup but it certainly looks good!
|
Looking good mate how was the vinyl to put on ?
:D Gary |
It wasn't too bad once I'd gotten the hang of it. Definitely a two person job. One to hold it tight once started and the other to squeegee it on. It looks good though.
|
yea I agree top job I get the arse hanging wall paper :D
Gary |
Quote:
|
I did similar with my exhaust system but felt I would have an issue with the edges of the silencer facing front and rear at IVA. To get round it I got an old saucepan lid (don't tell the management) and cut a hole for the exhaust pipe, fitted a treat and looked good as well
|
Quote:
|
| All times are GMT +1. The time now is 02:57 PM. |
Powered by vBulletin® Version 3.6.4
Copyright ©2000 - 2025, Jelsoft Enterprises Ltd.