Quote:
|
Quote:
Bob |
I decided to separate the engine and gearbox the other night.
Can of worms comes to mind! The bell housing is full of gunk and engine oil. There's pretty much zero friction material left on the clutch. The clutch release and flywheel spiggot bearings are knackered. and the flywheel is covered in cracks! :eek: I think the source of the oil is the cam angle sensor, which sits on the back of the head just above where the engine and gearbox mate. CAS seal leaks are very common on the MX5 and there's evidence that this one had a massive leak judging by the amount of oil below it. I think it had been working it's way into the bellhousing for quite some time. Saying that, I'm not 100% sure the crank seal isn't leaking too... Not sure what to do about the flywheel. I took it to my local friendly garage and they advised me not to put it back as it is. I might be able to get away with getting it re-faced, but I am slightly tempted to replace it with a lightweight replacement :) Just not sure funds will allow that! |
I was thinking of replacing the flywheel eventually too, check these guys out
http://www.flyinmiata.com/index.php?...500%20%2010.30 Not too bad in my opinion |
Quote:
|
Quote:
I almost bought the 4kg Ultra Light Weight one from ILMotorsport yesterday: http://www.ilmotorsport.de/shop/article_detail.php5?aid=3889&oid=12&depth=0&page=0 &count=6&PHPSESSID=eb6dbcd7a70582bdd4310ca19a45e67 e But then I stuck a post on MX5Nutz and someone's offered me a standard flywheel plus a low mileage clutch for £30, and being a cheapskate I think I'll get that instead :D Quote:
The car had allegedly done about 60k, but I'm starting to suspect it had done rather more than that... :rolleyes: |
Quote:
|
Quote:
Must say though, I had a lightened flywheel on my old Vectra and it was one of the best modifications I ever made. Still have that engine sat in the garage, will be going in my build, some time after I have enough funds to even start! :D |
 |
Hi John.....looks like it has been drifted to within an inch of its life, the engine I have displays similar cracks but I have a junshop lightened flywheel and my crank is going to be reground.....dont really think you will get away with that level of cracking but maybe its a case of giving it ago.....nowt to lose is there.:)
|
I have to say I wouldn't want to risk using a cracked flywheel, as when it goes it goes, and with already being cracked it is just a matter of time before the cracks grow long enough until fast fracture can occur.
Not really something you want to risk :eek:: http://www.youtube.com/watch?v=0NYZV...eature=related |
Reduction valve
When you installed the brake pressure reduction valve in your rear brake line what size of union was used on the input side? It seems a lot bigger than 10 x 1.
I was trying to work out which way around it went until I came across the question you had asked on the ma5da racing forum. David |
Quote:
My local friendly garage had a dig through their pot of brake unions and found one the right size :) |
I think it must be time for an update!
Haven't had a huge amount of time to spend on the build for the last couple of months, but slowly managed to strip the engine down and replace the head. Also swapped the scary cracked flywheel with a decent second hand one I picked up via mx5nutz. The free engine stand I got from the tip came in handy! 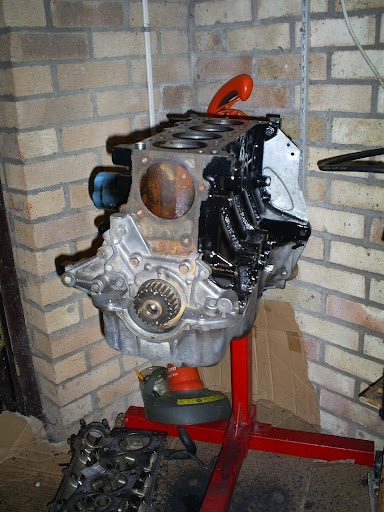 Actually got a decent session in the garage for the first time in ages tonight, and managed to get the engine into the chassis:  The bonnet fits, which is nice!  |
Good effort, just need to get it running now ;)
TT |
Quote:
 |
Wow, your spaghetti looks super tidy compared to mine. I'm trying to use the Sierra fusebox, and it looks like a tangle of wires.
|
Looking really good skov. I was looking at your photos. In the second album what is the blue cylinder shaped item. It looks like it is the last photo on there.
david |
Quote:
If you mean this, it's my fuel pump.  I'm currently figuring out where to stick it! I think I'm going to do something similar to Alga here: http://www.haynes.co.uk/forums/showthread.php?t=8197 |
Are you not using the in tank mx5 one?
|
Quote:
|
Nice to get back in the swing of things John I bet...:)
Cars looking especially good with the bodykit on.:cool: So how did you overcome the bonnet clearance issue in the end? I bet you're glad you got over that problem. Wirings the one part of the build I'm not looking forward to but you seem to be progressing well with yours. Well hope you keep posting the piccy's... Johno |
Quote:
The number of times I've dropped/kicked/knocked/scratched/chipped them is unreal :rolleyes: I would have been well peed of with myself if I'd bought brand new ones! I stuck with the engine position detailed in my photos (i.e. sump 40mm below bottom rails, engine offset 25mm towards passenger side). Also had to move my throttle cable bracket down slightly by putting the top bolt in the bottom hole and tapping a new hole for the lower bolt if that makes sense :confused: The bonnet fits, but it's tight. I think its just touching the inlet manifold, which might come back to bite me when it's running an the engine is bouncing around on it's rubber mounts... |
Quote:
|
Glad to hear it Chris :D
The build's progressed quite well this week, so should have some more updates soon! |
So I see! Just had a nose through your album.:cool:
|
Time for an update!
Just about finished my fuel routing this weekend:     Just need to add a few more jubilee clips and connect the fuel pipes up in the engine bay. The pump is a cheapo Bosche copy off ebay, the red/clear filter is a mesh/gauze pre-filter to protect the pump from the swarf in my tank, and the main fuel filter is a TKF516 (used on loads of cars from a 0.9l Cinquecento to a 4.2l A6). |
Hi John,
You'll be running out of things to do soon...LOL:) I see you have a join in your return line, just temporary? Are you planning to vent your tank with an inline valve with the spare outlet on top of your tank or go or just take the pipe up high and then route it below your tank? I don't know if you have done it yet but have you fitted your earth strap/wire from your tank to chassis. Johno |
I can't see me ever runing out of things to do on it!
The join is probably permanant - but I will add a couple of jubilee clips! It's a reduction joiner to go from 10mm hose for the tank outlet to 8mm hose for the copper line. Haven't decided how to vent it yet, I think I might still have a valve from the donor kicking about somewhere that might do. Thanks for reminding me about the earth strap! I've got a threaded hole in the tank ready, but haven't fitted the strap yet. |
I have one of those pumps somewhere, bought about 3 years ago for our golf MK1 EFi conversion and not used,... Have not seen it in ages though :confused:
TT |
Accelerator Cable
Hi Skov,
The pictures are looking really great there. I have a question. I noticed you had put up a post a few weeks ago showing the accelerator cable. Did you use the original one or purchase a new item. Thanks David |
Quote:
Quote:
I'll post up the details when I'm done. |
This evening I have mostly been playing with hose.
At the rear I've used a Polo expansion tank and T'd it into the heater matrix hoses:  Up at the front I've just about a figured out the routing of the hoses to the radiator. I'm pretty happy with the bottom one, but the top still needs a little work, and probably some kind of support bracket somewhere:  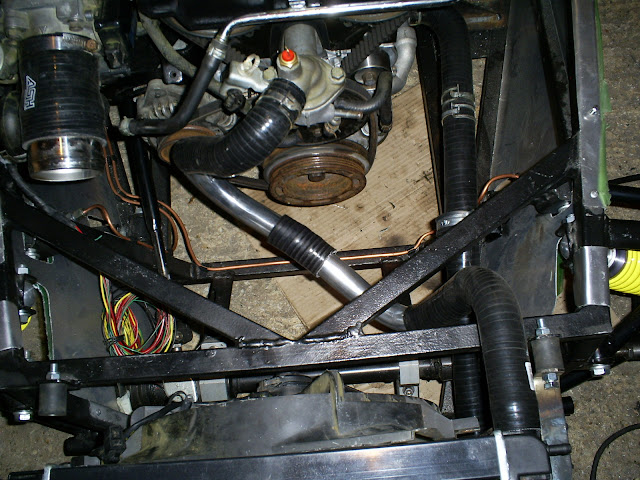  damn 4 pics per post rule... |
...the routing of the top coolant hose is a bit on the convoluted side in order to make space for my air intake components:
  Still need to finish the brackets for the airflow meter and airbox, and probably add some ducting to bring cold air into the airbox, but it's more or less there. |
You've been a busy bunny haven't you....:)
I bet that's really rewarding putting those components in. I guess by your photos you routed the air components in first then sorted the cooling side? She's one hell of an air filter you got there, what make is that? So come on how long before you bring her to life....:D Lots of progress there John and excellent workmanship...:cool: Johno |
Quote:
The build is really coming along nicely Skov - it'll be up and running in no time :) |
Having water in makes a whole difference to the mind set. Mines mocked up and sort of holds water . Would not want to preasurise it though LOL...
TT |
Nice Job John, I've been scratching my head over this plumbing for weeks. Think I've got it sorted now though.
|
Thanks guys.
The airbox is a Carbon Dynamic Airbox (CDA) made by BMC. A mate at work offered it me for a fraction of the new price, so I thought I may as well use it :) I wouldn't fancy filling my system with water yet TT, let alone pressurise it! There's still a couple of small bore hoses I need to fit/replace, not to mention several missing jubilee clips. Oh, and my filler cap doesn't fit, which I'm slightly annoyed about... I suppose I'm going to have to get around to doing the wiring soon, I keep putting it off, but I'm running out of other things to do now! |
Just a quick observation, but it looks like your inlet / airbox will be sucking in air from around the exhaust manifold? Wouldn't that be red hot air? I know my stainless manifold exhaust runs at a couple of hundred degrees when I shoot a infrared thermometer onto it.
I find the heat soak on that side of the engine is pretty high after I've been driving for even 15 mins. I've had to use some aluminised glass cloth on a few bits and bobs to keep the heat off components. |
| All times are GMT +1. The time now is 11:56 AM. |
Powered by vBulletin® Version 3.6.4
Copyright ©2000 - 2025, Jelsoft Enterprises Ltd.