
 |
Testing your welds !!
I have been meaning to make a post on this topic for a very long time.
Been a nice day today and having nothing pressing to do, I thought it was time that I did. This post is very relevant to a recent thread elsewhere but I guess this is the correct place for this post as it is mostly relevant to building the chassis. Spent an hour or two this afternoon making a few welding test pieces. The test pices were 25mm X 25mm, 16 gauge ( 1.6mm ) ERW square tube off cuts. The welder used was a Lincoln Powertech 191C ( 180 amp ) .8mm wire & sheilding gas was, BOC Argoshield Universal All of the test welds were un-prepped & but welded with no weld gap. None of the material had been subjected to heat & all welds were started from cold. Once the test sections were welded, the welds were cut out from the square tubes to produce, flat test strips. Here is a sequence of photographs. 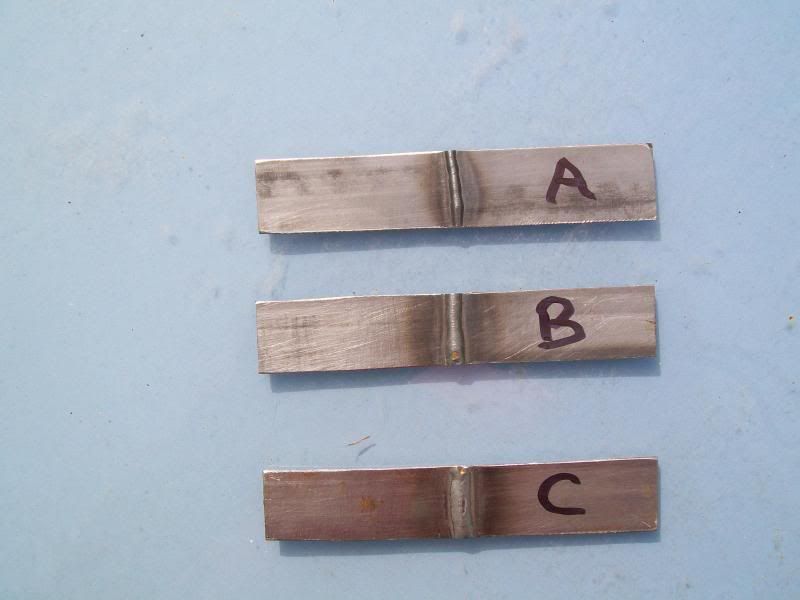 For ease of identification the test pieces are marked A, B & C Looking at weld A you may think it looks reasonable. Nice narrow weld bead that will not take too much work to fettle & make flat. However, looking at it with a trained eye, allarm bells start to ring & the weld looks cold. Weld A used a low current & wire speed setting. Weld B looks fine & used a sligtly higer current setting with increased wire spped Weld C looks fine with exception of visual evidence of being a tiny bit on the hot side !!?? This was performed with another increase in current & wire speed. Now we flip the samples over to reveal the truth. 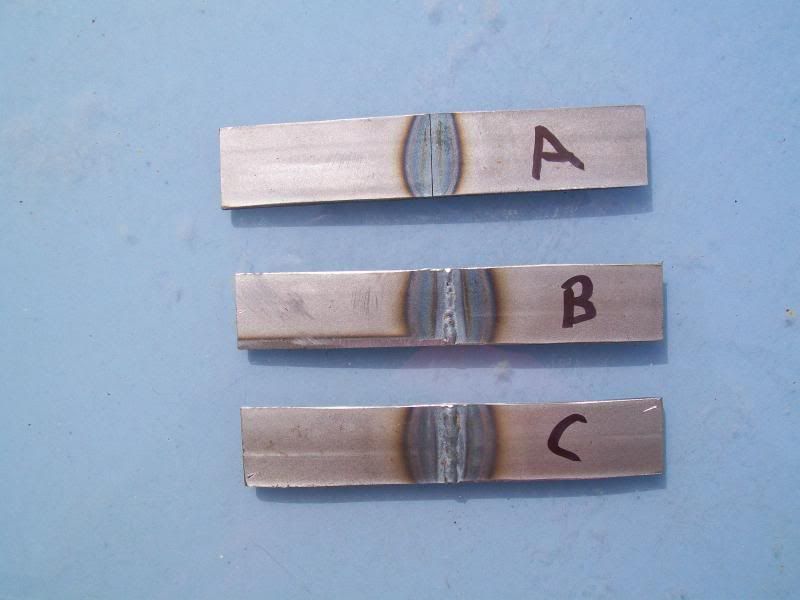 Instantly it is evident that weld A lacks any form of root penetration. Weld B has a full root penetration ( A tad shallow ) Weld C has a good root penetration ( A tad too much ) To be ideal, a weld setting in between B & C would produce an ideal weld, one that I would be happy to submit to any form of testing. That said, in my humble view, either weld B or C is more than suitable for the Roadster chassis & would easily pass BS standards testing. More to follow in part 2 , just as soon as it is typed in a few moments from now ;) |
Testing your welds part 2
Here we go for part 2 of this post.
Here is a picture of welds A, B & C after the weld cap has been removed ( Fettled flat ) 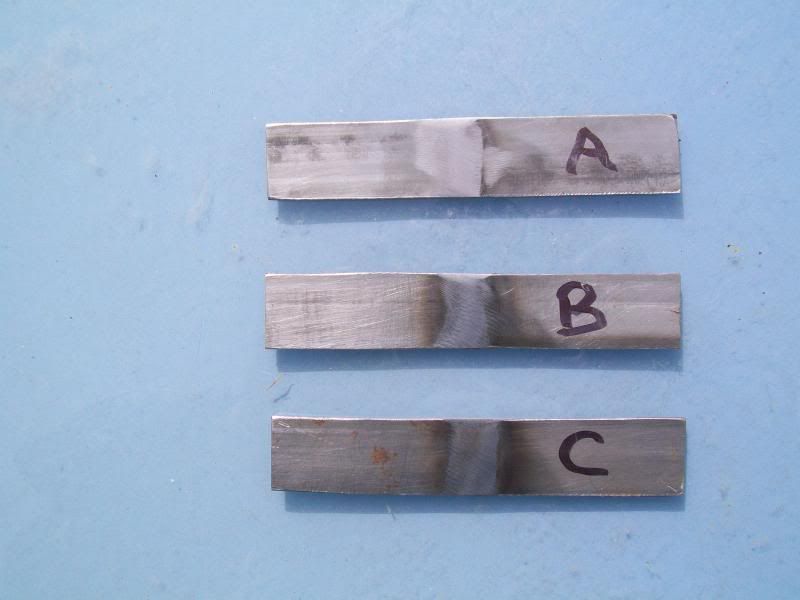 On close visual inspection of all 3 welds, from the outside face of each joint there is nothing visualy to distinguish any one from another. No porosity evident, no inclusions evident. Without polishing & etching, all welds appear to look as they should do when making a simple visual inspection of a weld. Now here is a picture of wels A, B & C after they have been subjected to a very mild bend test of about 100 - 120 degrees A true test would be made by bending the sample through a full 180 degrees, with a radius appropiate to the thickness of the material being tested !! 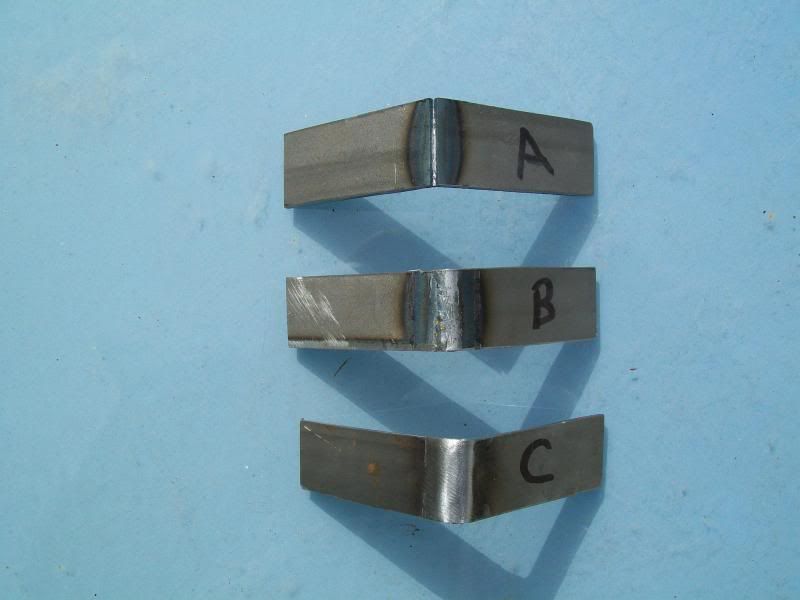 It is self evident that sample A has failed the bend test miserably & is a totally unsuitable weld joint for the Roadster :eek: As there was really nothing to choose from between the next 2 samples, I chose to test the strength of the root weld sample B ( Could be argued that it looked the weaker of the 2 remaining samples ) Tested sample B buy bending pressing the dressed face to put maximum stress on the welds root. The root held firm & I am confident that it would bend to 180 degrees without showing any signs of stress fractures. Sample B was tested in the other direction to test the front face of the weld. Nothing undue was observed. In sumary, if you are unsure of your welds, keep practicing & don't be afraid to test your welds frequently .... It won't take long & will give you peace of mind, knowing that you will be building a safe, sturdy chassis :) I hope this helps some of the novice welders on the forum. |
Thanks
Nice work Bonzo, thanks for putting in the effort and posting it up
|
Ronnie,
Thats a really useful thread , very informative & with pictures that actually shows what we,re looking for in a good weld ( a picture tells a thousand words so to speak ). Nice work Ronnie :cool::cool: cheers andy |
What a useful and informative thread. very well put together and very well executed. I salute you, sir:)
Enoch |
Very nice work there Ronnie, perhaps you could put what rough amps you used to weld A,B and C.
|
Just to tidy up a few loose ends
I thought it best that I completed a full bend of the test pieces :)
Here is a picture of the fully bent pieces. 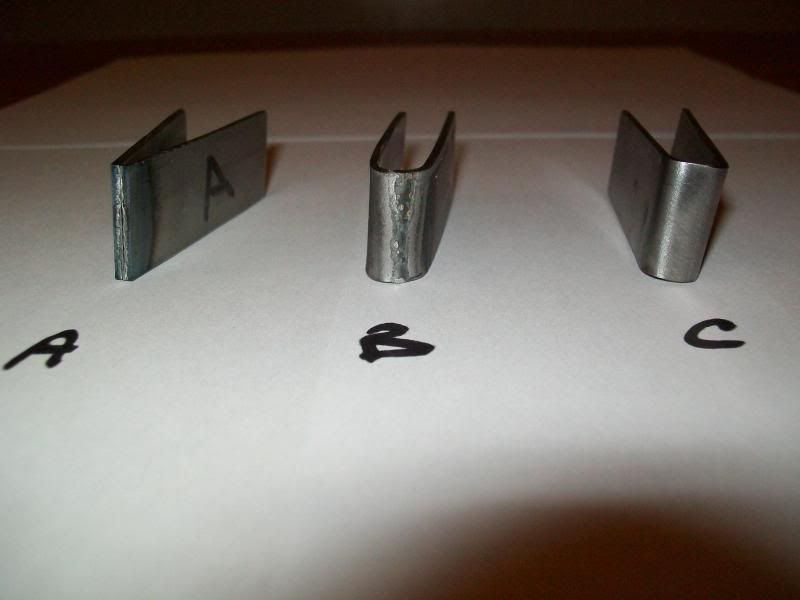 Test piece A folded in half by hand !!, if I were to try & straighten it again, one piece will become two again. The other two samples exhibit absolutely no signs of stress fracture, if test piece B looks a bit iffy, I can assure you that it is only a bit of mill scale as the test pieces have not been cleaned/polished :) Basic testing of a weld sample is quite simple to do at home, well for thin material anyways. If you do not have a press, a simple vice and an appropiate piece of round bar will do the job fine. Open the vice a little, place the piece of bar directly over the centre of the weld on the test piece & strike with a suitable hammer. This will allow you to bend the test piece a fair way. To complete the bend, just pinch the piece in the vice until fully bent, when I say fully bent, I don't mean squished flat :D Once bent, examine the surface of the welded area for signs of stress fracture. If you want to examine in more detail, fettle & polish the weld with emmery paper, this will help to highlight any imperfections in the test piece I have not gone into fine detail of the weld settings used for the test pieces because. A: My welder does not have any digital read out of the weld current. B: The settings will vary between welders, even identical machines !! Hopefuly I have a least covered the basics of testing your welds. Setting up the welder & weld prep is another story waiting to be told. |
Quote:
To be honest, the settings I chose for the test pieces were deliberately askew in order to produce test pieces best suited to ilustrate this particular thread .... Came out quite well considering that the 3 pieces done were the only ones I did :) My welder is a 180 amp set with power settings of 1-8 & a wire speed range of 0-10 Sample A was using power setting 2 with a wire speed of 1.5 ish ( Blatantly too low a setting for the material thickness ) Sample B was using power setting of 3 & a wire speed of about 2 1/4 ( not that far off the mark for 1.6mm, I would say ) Sample C was using a power setting 4 & a wire speed of just over 2.5 .... A tad on the hot side for a down hand butt weld. My personal preference is to weld a tad on the hot side, in my view, there is no worse sin than a cold MIG weld :eek: I also hold the view that a properly set up weld job will do more to aid the war on distorton than trying to reduce the heat put into the job .... The propper weld procedure/sequence will help greatly in the fight against heat build up |
Thanks for that, very informative and great pictures. Although I bought my chassis complete I still need to weld a lot of brackets and such like. At least now I know what my welds should look like, even if I cant achieve it !
|
Well done ronnie im sure this will help lots of people with their welding.
its hard to make the welder misbehave once you know what your doing isnt it ronnie :D i remember writing the welding articles for ckc and i found it really hard to do bad welds on purpose. |
As a retired qualified boilermaker with 35 years hand on experience, during my tenure at that also held a coded welders ticket, I will give my humble view on this.
Plate C in my view was the best piece looking at post one without even looking at the other pics posted. Fusion was excellent with parent material, the cap really very low / flat that will lessen HAZ in a big way. On the flip side of the plate one can see that the penetration was good. For the non professional welder; big fat caps / beads are not stronger, in fact the opposite is true. When I still welded as a coded (X-ray), the max allowable cap was only 1.6mm and that's on big bore pipes. Bigger caps were failed due to the unwanted stress resulted from that. I agree Bonzo, it is better to weld rather hot than cold,. The common sin of most amateur welders are the fact that there current is to low. A simple trick to set one's welder to a specific electrode (rod) thickness, is to multiply the diameter with 40 and that will put you in the range of a good weld - vertical up welding needs some downward adjustment if needed. Eg; 2.5mm (12#) electrode x 40 = 100amps. Furthermore, Im always skeptic of nicely grind-ed welds as your pics shown for the simple reason you hide the tale the cap has to tell... A nice bead such as "C" looks more professional than a grind one and I would rather see such a weld bare. At the end, a destructive test - like the bending test you did - will be the decisive factor for quality of weld. Lastly, kudus to you for the effort to post this excellent post and the trouble you took to do it. I believe it is an eye opener for a lot of people not well versed in welding strength:cool: . |
Really nice example of welding, should help people get their welding set up correctly.
|
Great Post Ronnie
Im sure this will help lots of people with there welding tilly |
Brilliant!:)
|
Well done Ronnie, a cut across the welds would reveal what to expect from bad welds.
Did some NDT and ultrasonic weld testing in my spotty youth as apprentice welder,very interesting. |
IMHO this is so informative that it should be made a sticky, questions are asked all the time about welds, and having such informative images gives the novice welder a clear image of what he is trying to achieve, you can talk welding all day but a few good images like the above make all the difference.
|
Quote:
so, I,ve asked permission( afterall, its Ronnies thread) from Ronnie if he would be happy for this thread to be made a " Sticky", & he is more than happy for this to happen, Thanks Ronnie, great work :cool: cheers andy |
I feel as tho its a competition now :) i have a pic that may be of help and certainly dont mean to blow on ones own trumpet but i have a pic of a t fillet i did when i was about to do my coded , i feel this may show how the weld profile should sort of look :)
http://i1134.photobucket.com/albums/...r/IMG_0503.jpg was done with a migatronic 545 i believe :P mmm beautiful machine! |
Oh well my chassis might a well go in the bin then :-(
|
Nice weld ! I was always taught to fill the crater and have noticed on some welds this is not done,comments please.
A weld without gas cut in half would be interesting. |
Quote:
i cant say my chassis welds will be that nice the amount of practice runs i did to get to that ! haha and with that migatronic machine, praise burn back time ;) |
Quote:
|
Thanks Chaps
Thank you for some of the kind words chaps
If I manage to help just one novice welder, the effort would have been worthwhile :) I will try to add some more content to this thread as & when I have the time. Ash Yes it can be quite difficult to deliberately produce a particular weld with a known defect/defects for the purposes of illustration .... Spent an hour this afternoon with some fillet welds, even the ropey ones passed the bend testing !!?? I guess natural instinct kicks in to overcome poor welder settings. Rob & Nathan Don't be so hard on yourself, I have a massive respect for folk picking up a welder for the first time & are willing to learn. I personaly do not like to judge a weld purely on looks alone, A neat weld is not allways a sure sign of a good weld ;) Function over form for me anytime. Lost count of the amount of BS 4872 trainees we have had in from factories, some of them thought they were amongst the elite of welders ( A few years in a booth with no formal training ) Some very neat welds indeed, just a pity that some of their work lacked any physical strength .... Most indignent when advised that the icorrect procedure/weld current is being used. The number 1 reply was .... I'll have you know that I have been welding for XXX years :rolleyes: Given the choice, I would much prefer to train a total novice, at least they are willing to listen to the advice given & usualy turn out to be darn fine welders :) Get the strength of your welds right first & do plenty of testing, neatness will come with experience. |
Choice of machine plays a big part in the proceedings,I have had to buy one as the one I used to use went with the job I had been unfairly dismissed from so purchased a Siegen 180 and after a little fiddling the bacon is frying nicely even though its using cellar gas c02 at £10 a bottle.
|
I test my welds with a big hammer!:D
 It was 90˚s beforehand. by CTWV50, on Flickr It's not pretty but the 2mm box started to bend before the welds even thought about breaking. Need to see if I can fold into two but I'm a lot more confident thanks to this thread and some further reading. Big BOC Argoshield bottle and £40 reg helped, just need to refine my technique a bit to be more economical but happy all the same. Tried to switch to 0.8mm wire but the wire just kept exploding on contact with the work piece so I panicked and put some more 0.6 in could be down to the feeder but not sure. |
|
looks as tho that took a good beating!! :p
|
Can anyone help, started welding my chassis today and I'm getting bubbles in the welds and having difficulty creating decent weld!
|
Quote:
most of the welding is down to the prep work in my opinion :) same as most things i guess :p Michael |
Thanks for the reply Michael, I did grind back the steel and bevel filed the ends of the tubes so shouldn't be contaminated. I'm using BOC Argoshield at 10 L/min. Might try heating the steel first see if it helps to remove any contaminates. I'll finish the weld and then a big bubble will grow where I finished. I'm not a great welder as I'm inexperienced, should I try more of less gas? I'll also try a test on some other steel I've had more luck with.
|
Are you working on a wooden top build table? As the heat from the weld sets fire to the timber it causes contaminants in the weld by pushing the gas away. You can get round this by using a 50mm+ hole saw where the joints are then you can run straight down the joint. Hollow section or black realy needs to be weld preped with a 45' grind and it's worth taking the material back to clean steel where the earth clamp is too. If your using a small shroud or hobby type torch it might pay to take it off and clean it every 5-6 welds as it gets blocked with splatter it reduces the gas flow.
|
:) as talon says, and also check the condition of your welding wire thats assuming your using a mig :p
|
Thanks people, had a play this morning and I ended up knocking back the power a little and the wire speed alot also checked the welding shroud which I think was also contributing. Welds are now nice with no bubbles although I need to work on being a little more economical with my welds. Yes I'm migging and am using a wooden table. Letting the gas flow for a few seconds before starting to weld has helped get a clean start to the weld too. I have a lot to learn.:) Including not welding in a vest (it was warm), I got a little UV burnt! Doh!:D
Oh a deeper V cut has helped get a solid weld too. |
|
Procedure at Complex Joints?
This is a very nice thread and the photos and commentary make it crystal clear in terms of flat plates and T-joints. However, one if the things I've worried about is how to do a complex joint. I'm thinking both of the distortion issues and also the best sequence in terms of welding strength and perhaps grinding flat after each fillet or butt weld is completed?
An example in my mind is the joint where BR1, D1, U3, BR3 and D3 all meet. I'd guess the only practical way to test a practice piece with similar joint would be to cut through it and see how it looks on the inside? |
|
Tig welding
Very useful posts! When I first though about building a Roadster I took an evening course in welding and found that I was most comfortable with Tig - maybe because I've done quite a bit of soldering/brazing in the past. I've also done some commercial courses and am booked in for testing end November. Then I discovered that most people use MIG welding and this seems to be what most of the posts cover.
Couple of questions - does anyone have any experience of tig welding a chassis? Any tips would be most welcome! Secondly is it necessary to produce any test pieces or results for the IVA? I've had a reply to a different post saying that it's likely the IVA inspector will look very closely at any visible welds (to be expected), I was wondering if people generally have some form of welding test results to hand. Thanks |
Quote:
That said, There are a few places on the chassis that may be very awkward to get to with a TIG torch ( Very acute angles ) If you are intending to use the TIG take care to keep yor joint gaps to an absolute minimum, this will make the task of welding much easier ) I had originally intended to TIG my chassis but soon got bored with the time it was taking & reached for the MIG :D As far as I am aware, you will not need to provide any paper evidence to prove your competence as a welder when it comes to the IVA test. It is a visual inspection only, as a general rule of thumb, if a weld looks poor, the IVA tester is likely to pick you up on it. ( A horrible looking weld is seldom a strong one ) |
I would have thought none of the IVA guys would be qualified to inspect welds in an official capacity and they would need NDT and in reality its not going to happen.
First impressions will go a long way. |
Quote:
tig's are a two handed job, real sensitive to dirt,oil and drafts, more prep is needed and gas and filler wires would be more expensive also take an age to do. if your not skilled in tigging there is a chance you might not get full penitration of the joint. too meny cons and not enough pros tbh on the plus it would be ideal to tack up chassis as heat is kept to a minimum befor migging it fully |
| All times are GMT +1. The time now is 05:37 PM. |
Powered by vBulletin® Version 3.6.4
Copyright ©2000 - 2024, Jelsoft Enterprises Ltd.