Bonzo's progress
It has dawned on me that I have been very sloppy about keeping folk informed about my progress !!
Even worse, I have progress reports/pictures scattered throughout the forum in all mannner of assorted threads :rolleyes: I have started this new thread to keep those that are interested in my build, informed & will endeavour to keep all of my drivell posted in this thread :o Latest progress Firstly, the grand workshop clean up never happened !! .... For some reason, I can't leave the build alone, all I want to do at the moment is to be making things ?? My motivation to crack on with my build seems to be on a high & as they say, make hay whilst the sun shines. This morning I made a wee mod to the pedal box. First picture is of the aditional metalwork involved. 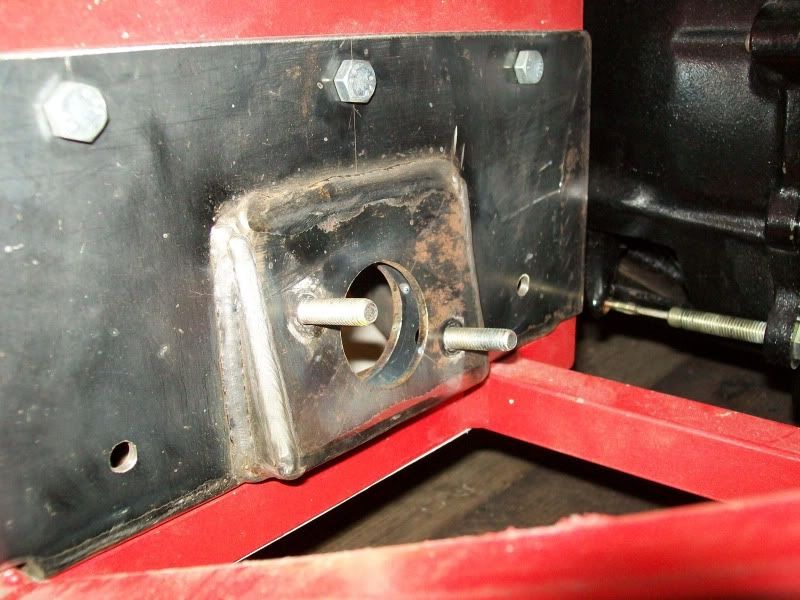 Second picture is of the master cylinder in it's new position. 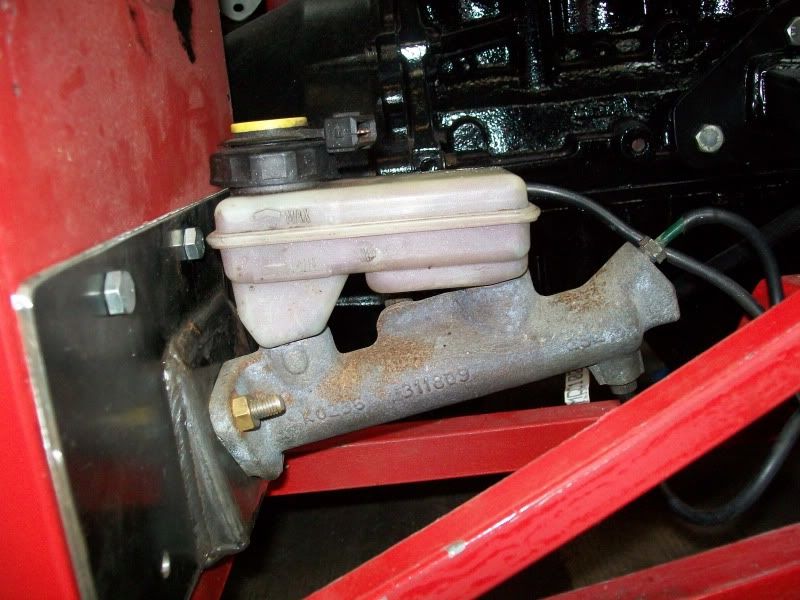 Why have I done this ?? When I offered the master cylinder up to the pedal box, I was not entirely happy with the angle it was sitting at !! mostly, just how low the bottom brake line was going to be .... Without using a Banjo union on that one, it was going to be difficult to keep that pipe above the chassis. In it's new position I feel that the following advantages have been achieved. Master cylinder now working at the angle that is was designed for, Fluid bottle now more or less level, cylinder tilted at an ange that will encourage any trapped air to work its way out, better angle for the pedal actuating rod & most importantly to me, more room for the bottom brake pipe. The material I used for the pedal box was 4mm plate, had some kicking about & thought it would be stiffer than the 3mm plate I had. The keener eyed of you may notice that I have placed U6, square to the bulkhead !!, yes a cock up on my part & not noticed untill the chassis was fully welded. Here's thinking about this afternoons jobs |
I like that modification, very sensible, nice welding too.
|
Buy some flat washers you tight bugger !:p
Nice welding !!!! |
Thank you Mr H :)
Paul Believe it or not, I havn't got a M8 flat washer in the place :eek: Got to order some up & knowing me, when it comes to final fixing .... They'll get flat washers, shakeproof washers, nylocks & loctite :D :D |
Looking good Ronnie;) . I think the mods you've made are very sensible and I agree with your logic. I need to find some inspiration and time for my build as it has come to a grinding halt at the moment. I've gone back to working on the camper conversion and then we've decided to get and kit out an exhibition trailer for next year's show diary so even Winter's going ot be tough to find time for the Dragon.
D. |
Doooohhh! Wish I had thought of doing that!!
I was a bit concerned about how low my pipe was, with a very tight curve it is ok but your idea is a damn fine one. Very well executed too. Enoch |
nice bit of welding that ronnie. not bad for a half blind old codger :D did you get one of those esab auto masks in the end?
one thing i would say is check the pivot of the push rod, as now the cylinder is angled up, it wont be travelling in a straight line which could frag the seals pretty quickly. |
Nice work Ronnie :cool:
As you have given thought to air in the system, where abouts are you putting the brake light pressure switch? only reason I ask is due to, my system got air in the pressure switch (Which gave for a lazy brake light activation) & was a bu@@er to get out, tilting it solved the problem ;) :) Its great to see your build is progressing more & more each day :cool: cheers andy |
Cheers Ash :)
Yes I did buy one of those screens mate, it made a whole world of difference & has a very low minimum shade setting, Ideal for using the TIG welder :cool: I think the biggest thing I found, was using my reading glasses whilst welding .... Stands to reason really, if I need em for reading, probably need em for welding too & hey presto, who turned the lights on :o Good call with the pedal pivot point mate. When I first fitted the cylinder ( As per book ), I had to drill another hole further up the pedal because as you say, it was snagging as the pedal was pushed in. After my little mod, I am now able to use the original hole & the pedal now feels really smoothe. I will check the continuity of the braking system before it is used in anger :) |
Hi Andy
Yes I have a hydraulic brake switch & I am minded to fit it upside down as per Paul's sugestion ;) ( If I can ) That said, I am still going to chew on the idea of fitting an electrical brake light switch .... I dare say that will involve a few days of head & ball scratching :D :D Feels really great to be out in the workshop once more .... Long may it last :) |
Another small thought, a couple of Nyloc nuts on the master cylinder retaining bolts might keep Mr IVA happy love the mod, im thinking of doing the same thing now myself.
|
The pedal box is very much a job still in progress, needing to sort out the clutch & throttle cable fittings.
Forgot to mention that the plate I made for that mod has 2 captive studs welded to the reverse side ( 8.8 set bolts ) I'll be using flat washers/nylocs throughout the build & loctite on anything captive ;) Now here's a little thing I personally like to do for peace of mind. When it comes to final assembly, in particular, fixings. Personally, I like to put a small dab of paint on any fixings that have just had it's final tighening. I use Blue for anything that has been loctited & yellow for anything else :) Silly I know but if it is done at the time of final tightening of each fixing it will give you a visual indication of any fixing that may of been overlooked :) |
Quote:
Coupled with Nylocs, this attention to detail I,m sure would impress Mr IVA man, Hope you don,t mind Ronnie, but think I,ll go & buy 2 little tins of model makers paint in blue & yellow:) cheers andy |
great Ideal, i never thoguht to use to colors ive always used tippex sounds good tho
|
That's a great idea Bonzo, we use the same thing in the Aerospace world. The name escapes me, but it's something like proof paint or something similar, and we put a line of it across the nut, surface and bolt, to prove that not only has the fastening been tightened (to torque usually), but also that it has not moved in use (by vibrations etc).
Definitely a good thing for piece of mind! |
we use paint pens at work for marking off safety critical fixings and earth connections blue yellow white
edding paint markers :D http://www.cultpens.com/acatalog/edd..._Marker.html:D |
in work i use touch up paint, can get it for pennies at car boot sales or find some in the car cupboard in the garage from past cars.
|
Quote:
He served for many years in the fleet air arm & moved into civil aviation prior to his retirement. I can take no credit for the idea at all :D :D Andy Those small tins of model makers enammel will be great .... If you are feeling really brave, you could raid Sue's nail varnishes :eek: |
Quote:
Plus, I don,t think her choice of colours would "look the part ":D cheers andy |
Hi Ronnie,
you've got a PM ! Thanks, Wim |
Sorted Wim :) :)
|
Sneak preview
Woke up this morning, the sun was shining & was looking like it was going to be a really nice day.
Well I could not resist the temptation any longer .... It was time for the bodywork to have a coming out party, been dagging to have a play with it ever since Handy Andy bought it down to me, earlier this year :cool: Here's a little teaser for you. 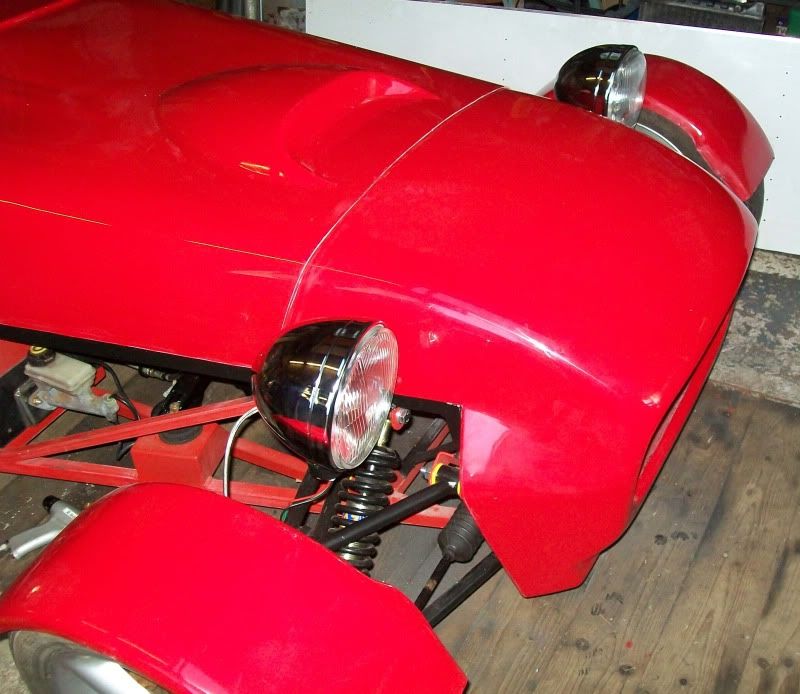 I have a load of other more important bit's of the build to do but as they say, a change is as good as a rest. Promise it will not be too much longer before I post some better pictures but as usual, the workshop is in chaos, it would be hard to tell the build from the mess :o A big thank you must go to Spud at Saturn for making my colour choice possible & a huge thank you to Handy Andy for the personal delivery. Oh well, I guess it's back onto the more important stuff tomorrow .... I could put the seat's in though !!?? :D |
Looking good there Ronnie, I'm almost inspired to take some photos of my progress!
|
:cool: Looks great on your Roadster Ronnie, can,t wait to see a full photo when she,s all dressed up :cool:
You are certainly cracking on with your build now, great to see :) cheers andy |
Hounds hydraulics Ronnie !!!, I think someone mentioned that Mr IVA mentioned flat washers to be fitted to "spread the load" hence the mention.:p
|
Ok, I might as well
Yes Andy, I think I will be made up when It all comes together :)
Here's a couple more that are not too bad. From the front 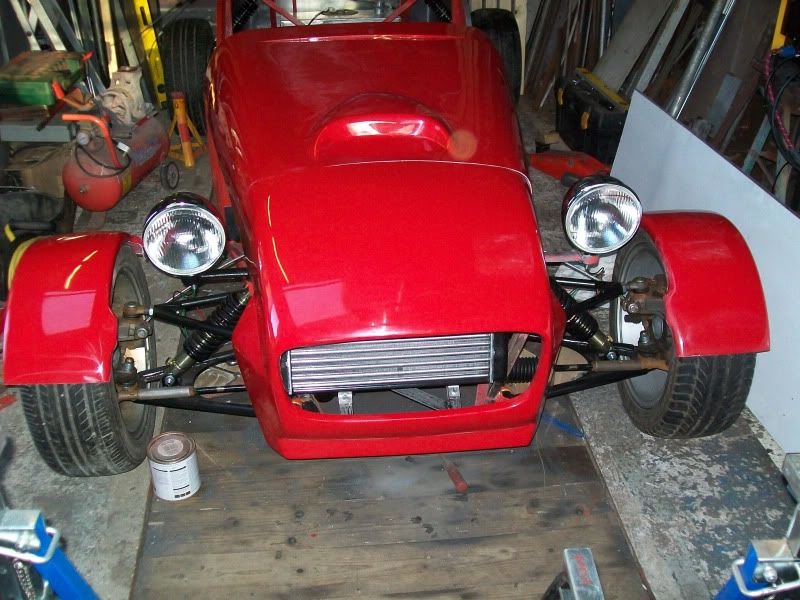 Looking from the rear  As you can see, I still have align the bonnet correctly but that can wait for a while. Really need to get on with some of the more important stuff :o |
nice photos Ronnie :cool: :cool:
but there,s an echo :D go on, get them seats fitted then have a proper sit in & admire the view from the drivers seat :cool: cheers andy |
A senior moment mate
My fault Andy
I double posted by accident .... Double tapped the stupid touch pad on me laptop :rolleyes: :o Funny you should metion the seats Andy .... They just happened to fall down from the loft this evening .... Junior has his uses :D Now where did I put that steering wheel .... Brum, brum, brum :o |
for someone that was meant to be taking it slowly thats some bloomin good progress in a week. at this rate it should be at exeter :D
|
1 Attachment(s)
There i was thinking i would be the only one with a red body in the west country doh.
Terry Attachment 967 |
Looking good Ronnie:) I love the colour, very striking.
Enoch |
Very nice Ronnie, and good to see your build coming on. Does look nice in that colour to.....;)
Keep it up.....AndyH |
Yea yea yea....Traffic Red Rocks:D :D must get on wi mine:(
|
Quote:
Looking awesome ! Nice job ! :p |
Some progress today .... It fits
Some of you may have read that I wanted to try a plastic inlet manifold out for size !!??
Got busy first thing this morning & took the hacksaw to the engine bay brace ( TR5 ) .... Ohhhh, that felt so naughty :D Before I did any cutting, I had a quick measure up just to make sure that I was not going to run into any major setbacks ( Concerned about the engine mount ) Well, what a difference, fits like a glove :) I'll have to re-route the steering shaft a little but I can live with that. Here's a couple of pictures, I have placed a batten accross the scuttle & nozecone to give some idea of levels. Here's the original Alloy Zetec manifold fitted, way too tall !!?? 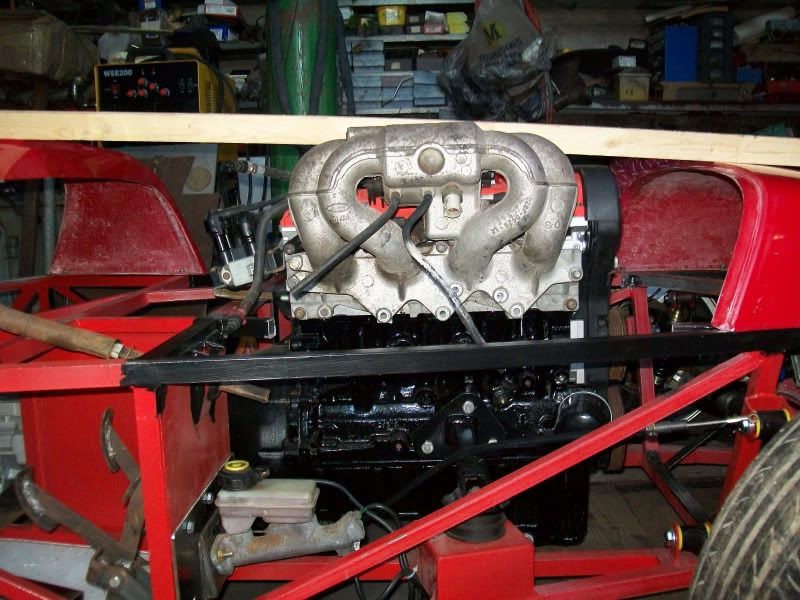 Here's the plastic inlet manifold fitted, see how much room has been gained. 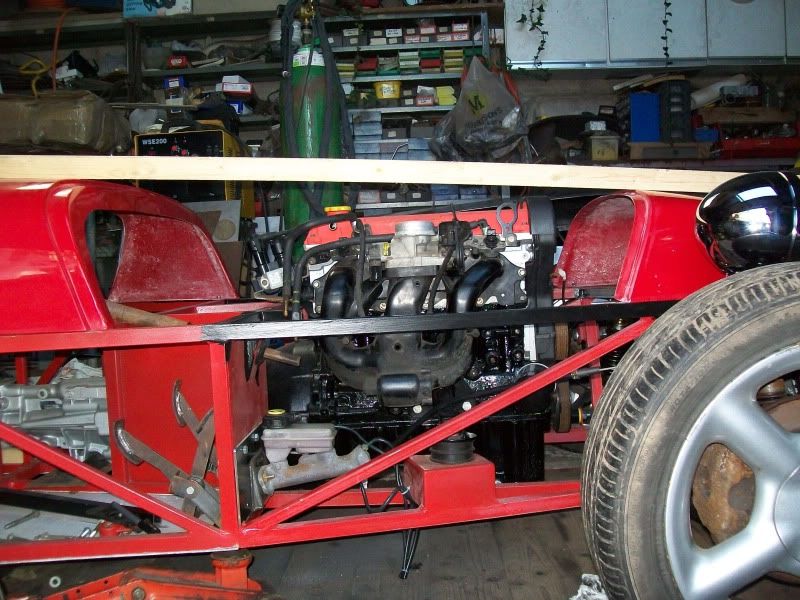 All in all, it should give me a head start towards an early engine run .... who knows, even a wee test drive !! |
Nice job Ronnie !
Did you made the plastic manifold by yourself ?? Greetz, Wim |
Hi Wim
No, the manifold is a standard Ford one :) It came from an 1998 Ford Escort Mk5/6 .... Alloy inlet manifolds were originally fitted to the earlier models & were replaced by downward hanging plastic inlet manifolds in about 1997/98 ? They were fitted to the late 1.6 & 1.8 Zetec engined car's I am not sure if this manifold was also fitted to the later Mondeo's !!?? The one I picked up was from a 1.6 litre model .... Easy got as it was laying on the floor, next to the car. Next time I am at the breaker's I will collect the correct 1.8 Litre version, I strongly suspect that there will be a difference in the size of throttle body between the 1.6 & 1.8 ;) Just need to do a slight modification to the steering extension shaft & the job will sorted :cool: |
Nice work there Ronnie, glad things are improving for you as well my mate, Car looks fantastic and that colour is going to look very striking indeed. Take care mate and see you next year hopefully!
Rich |
Thank's Rich :)
This year has been a long hard slog for me but at last Things are moving in the right direction ;) I would love to park up alongside you all next year but more likely to be 2012 :o Mind you, if my energy & motivation holds up .... Never say never, long time between now & next May :D |
Always nice to see progress pics! Nice job, Ronnie!
Wim, this manifold has been fitted to Mondeos. I have one of those. Ford Focus blacktops have a similar one too. |
| All times are GMT +1. The time now is 04:54 AM. |
Powered by vBulletin® Version 3.6.4
Copyright ©2000 - 2024, Jelsoft Enterprises Ltd.