
|
|
|
|
#1
 4th August 2012, 11:12 PM
|
|||
|
|||
|
A little bit about the method we use to get exactly what we want from the guys we use for tube bending exhausts and water pipes without having to generate a drawing . The up side to this method is you get the chance check that what you are asking for will 100% work. Long runs of silicone hoses and bends cost a fortune and its not hard to end up with top and bottom hoses costing £100 + and involving dozens of jubilee clips and interconnecting pipes. It looks shit and is hard to clip , its also a load of joints that dont need to be there. The same applies to the exhaust, you can buy a rake of ready made bends that are nearly right that will leave you loads of welding with the associated cleaning up afterwards. Stainless steel pipe is half the price of silicone pipe and can have as many twists and turns in it you want. It makes for a far better job to use the stainless pipe where you can and just have short silicone pipes on the ends .All you will need is a few lengths of 15mm copper tube and a plumbers bender. I will give you a quick demo of how I was shown to get exact center to center bends in tube. Any tube bending outfits worth a toss can then copy your models in whatever size pipe you choose.
Just as a quick demo a piece of tube say a water pipe running from behind an engine. pipe starts at a ends d. Everthing with this type of bender is measured from pipe center to center. So here is the makeshift patern  The first pipe is measured from end to the first center which is 5", set the pipe in the former using a square.  Next bend needs to look down from the first at 6" center so set in the same way with a square.  Last bend needs to look up so set in the guide the same way. It should come out mm perfect.  This is a really easy example but its good enogh to hand in and have bent in any diameter you want as a pattern. Will do the headers next. Bob
__________________
When The Results Disagree With The Theory: Believe The Results And Invent A New Theory If I had two brains I,d still be a halfwit The cave http://s1116.photobucket.com/user/my...deshow/mancave The build http://www.haynes.co.uk/forums/showthread.php?t=12669 Last edited by robo : 5th August 2012 at 12:40 AM. 
|
|
#2
4th August 2012, 11:23 PM
|
|||
|
|||
|
The exhaust can be modelled the same way as above by making up a 6mm ply port flange and setting a block on the side of the chassis to represent the collecctor. I aint got no car here to play with so say hello to the exhaust mule. I will do the rest tomorrow.
 Bob
__________________
When The Results Disagree With The Theory: Believe The Results And Invent A New Theory If I had two brains I,d still be a halfwit The cave http://s1116.photobucket.com/user/my...deshow/mancave The build http://www.haynes.co.uk/forums/showthread.php?t=12669
|
|
#3
5th August 2012, 09:19 AM
|
|||
|
|||
|
The wealth of knowledge and inovation on here is what makes this forum what it is.
 Nice one.....
__________________
Cost : Little as possible. Thanks : To those who by their generosity my build has progressed. Its a handmade sports car not a flaming kit car !!! If at first you dont succeed,avoid skydiving... No parachute require to freefall,only if you want to do it twice.
|
|
#4
5th August 2012, 10:56 AM
|
||||
|
||||
|
What a cracking post Bob.
 I am sure this will be a lot of help to folk, myself included. Pipe/tube bending has never been a strong point for me, I have always been the Monkey to weld em all up after someone else has done all of the hard work.   Look forward to the next set of tips.
__________________
I am not a complete idiot...........Some of the parts are missing !! Ronnie www.roadster-builders.co.uk
|
|
#5
5th August 2012, 11:15 AM
|
|||
|
|||
|
Nice tip Bob, I already have a set of copper pipe benders but would probably never thought of using them to mock up pipes for the roadster
|
|
#6
5th August 2012, 11:52 AM
|
|||
|
|||
|
There is nothing wrong with using the copper pipe on the smaller diameters but you need to be careful not to allow things to rub on it, its best to clip it down with rubber lined p clips. Also the plumbers merchants can supply 15mm and 22mm pipe in chrome plated copper and in polished stainless but you will need to form an end on it to stop the pipe walking off the end. So heres a locost/tightwad method I use .
We are on plumbing size pipes so compression olives are available for pennies.  Using an active flux solder an olive on the pipe. 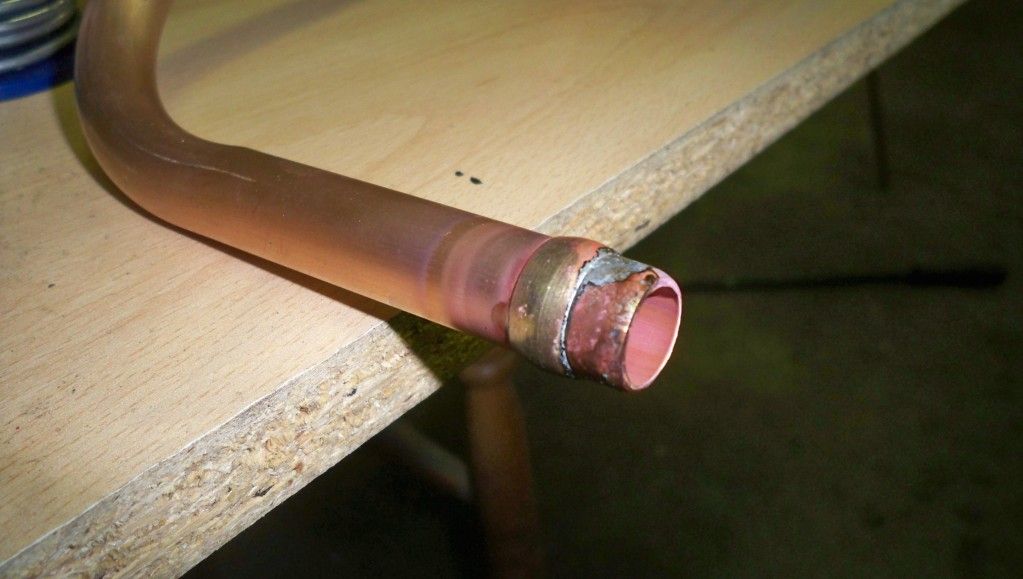 That gives you a home made bead on the pipe. 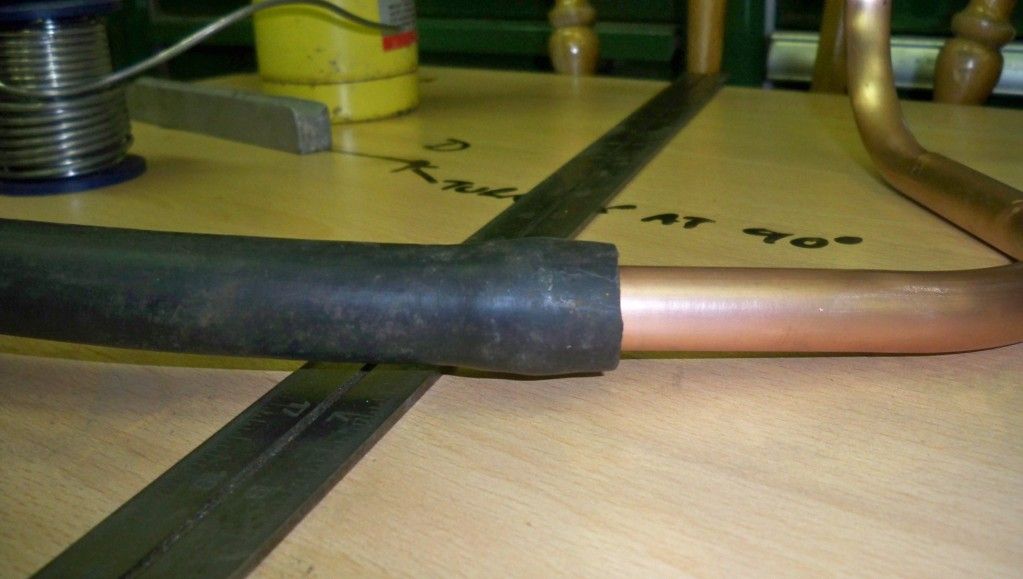 On to exhausts. Bob
__________________
When The Results Disagree With The Theory: Believe The Results And Invent A New Theory If I had two brains I,d still be a halfwit The cave http://s1116.photobucket.com/user/my...deshow/mancave The build http://www.haynes.co.uk/forums/showthread.php?t=12669
|
|
#7
5th August 2012, 12:28 PM
|
||||
|
||||
|
Thanks bob
Another great and informative thread Was just thinking I would like to make my own stainless exhaust when the time comes and was trying to work out how plan the bends for the manifold Just need a mod to come along and make this one a sticky
|
|
#8
5th August 2012, 02:21 PM
|
|||
|
|||
|
I forgot to add the bit about bending over 90 degrees. I will cover this bit in one page then crack on with the headers bit.
First thing to do is pull the 90 bend out of the port and lets say it has to angle forward to gain length before turning back to the collector. With a random piece of pipe mark the centerline of the return to the collector.  Next hold up a protractor to find the angle and lock it in at that.  Hold the angle finder on the bender as per photo, we are still working on center to center . Then pull the bend to suit the angle finder.  Perfick  The same applies for anything that goes into the bender at whatever angle. Bob
__________________
When The Results Disagree With The Theory: Believe The Results And Invent A New Theory If I had two brains I,d still be a halfwit The cave http://s1116.photobucket.com/user/my...deshow/mancave The build http://www.haynes.co.uk/forums/showthread.php?t=12669
|
|
#9
5th August 2012, 02:37 PM
|
|||
|
|||
|
You will need to make a pattern of the port flange and collector, the collector block can be clamped to the chassis .Before you drill the collector block or header flange drill the centers out to take a piece of 3 or 4mm welding wire, coathanger or the neighbours fence is also suitable
. At this stage we will go anal and make the header an equal length jobbie so chop up the wire into whatever length wire it would take to get from number one port to the collector. Find a tin or somthing the same diameter as the rad of the bender and fashion the wire to form the header as near as you can to the finished item .Spend some time with the wire before you rush into the bending and you will be able to measure the wire to get the correct centers. Bear in mind that the true pipes will need to be say 40mm or whatever size you want and they dont want to be touching each other, also consider that you might want to wrap them. Its now time to drill the holes out to 15mm. They will look odd in the small pipe but when the real ones turn up they fill all the gaps as you can see down at the collector. Its also in the ideal world best to arrive at the collector in rotation of the firing order. If its not cammed up and running mental hp dont worry to much about the equal length pipe and collector order. Also remember to buy some straight joiners in case you f@@k up, I do quite often. Here is this one in pipe but the design is down to you. 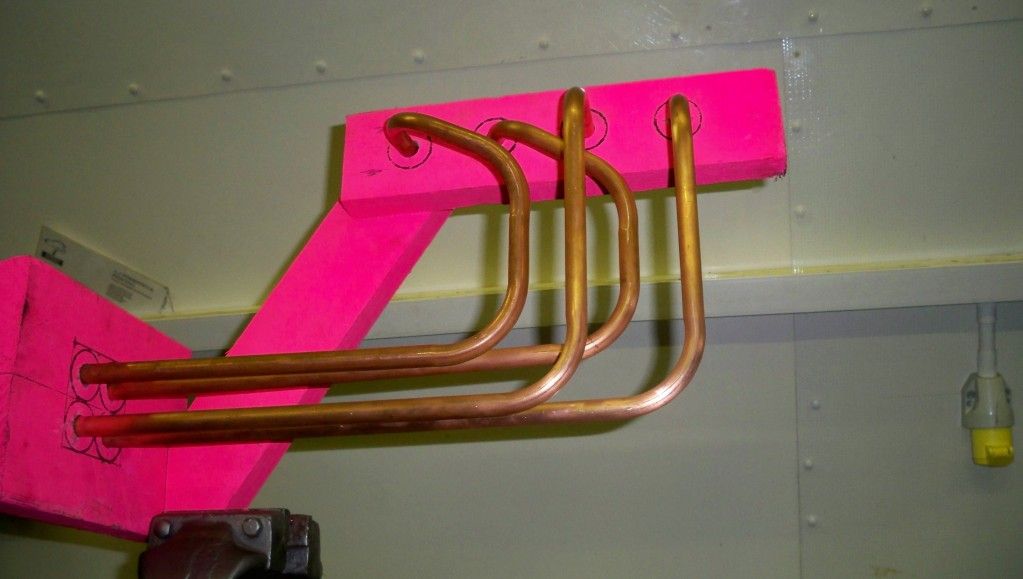 You can do what you like model building like 4 into 2 into one.  I prefer to have them knocked up in stainless because you can polish and forget but there is nothing wrong with mild steel and say ceramic coating. Will do the collectors next. I hope all this is of some use . Bob
__________________
When The Results Disagree With The Theory: Believe The Results And Invent A New Theory If I had two brains I,d still be a halfwit The cave http://s1116.photobucket.com/user/my...deshow/mancave The build http://www.haynes.co.uk/forums/showthread.php?t=12669 Last edited by robo : 5th August 2012 at 03:52 PM.
|
|
#10
5th August 2012, 06:23 PM
|
|||
|
|||
|
if you make 4-2-1 headers dont join un ballanced pairs thats the rule so 1+4 and 2+3 join first.
other wise the cyl the gets the exhaust stroke first creates high pressure wave in the exhaust that its joined to for the cyl that gets exhaust stroke next and as a 4pot will always have a fireing order where 1+2 and 3+4 next to each other in the firing order the gap is 180deg bigger with a 1+4,2+3 split and power ballance is corrected
|
 |
| Thread Tools | |
| Display Modes | |
|
|


 Hybrid Mode
