
 |
|
#1
|
|||
|
|||
|
Hi folks,has anyone got a decent pic of the front wing stay fixing,or mods they have made.
Thanks.
__________________
Cost : Little as possible. Thanks : To those who by their generosity my build has progressed. Its a handmade sports car not a flaming kit car !!! If at first you dont succeed,avoid skydiving... No parachute require to freefall,only if you want to do it twice. |
|
#2
|
||||
|
||||
|
Hi Paul,
I made a bad construction in the first place, so I re-made my wing stays in April. I ma now very happy with them. Here what I have done: http://vouchtroadster.blogspot.se/20...1_archive.html You can use the translation function directly on the blog (right menu). It is translated by Google, far from being perfect, but understandable... ... ah no, sorry, I forgot you were fluent in French  Good luck!
__________________
Sylvain Pictures of my completed Roadster https://www.flickr.com/photos/994983...7646799525542/ Build blog: http://vouchtroadster.blogspot.se/ https://cafrazx550.blogspot.com/ |
|
#3
|
|||
|
|||
|
As it happens iv just been doing mine. I painted them last night and hopefully fit them on tonight them I can get some pic's
https://www.flickr.com/photos/124541083@N02/ |
|
#4
|
|||
|
|||
|
Merci mes ami.
Je parlez merd se bon Sylvain . 
__________________
Cost : Little as possible. Thanks : To those who by their generosity my build has progressed. Its a handmade sports car not a flaming kit car !!! If at first you dont succeed,avoid skydiving... No parachute require to freefall,only if you want to do it twice. |
|
#5
|
||||
|
||||
|
I have standard book design wing stays. They've broken at the weld seam between the tube and the steel band 3 or 4 times. Each time I just redid the weld and promissed myself to build sturdier ones soon.
http://locost.lt/download/file.php?id=818&mode=view Sylvain, so how are your new ones different from standard? Thicker plates?
__________________
Albert Haynes Roadster FAQ | Haynes Builder Locations Gallery, build thread in Lithuanian / via Google Translate. |
|
#6
|
|||
|
|||
|
Recommendation was to use 5mm instead.
__________________
Cost : Little as possible. Thanks : To those who by their generosity my build has progressed. Its a handmade sports car not a flaming kit car !!! If at first you dont succeed,avoid skydiving... No parachute require to freefall,only if you want to do it twice. |
|
#7
|
||||
|
||||
|
Quote:
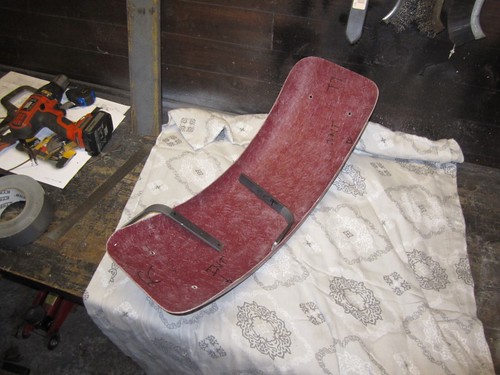 2015-04-26_10-10-25 by Voucht71, sur Flickr 2015-04-26_10-10-25 by Voucht71, sur FlickrAs the books recommends, I also made a "t" cut on the strip, so they go into the round tube, and they don't "pull" on the weld: the strips are naturally blocked in position into the tube, the welds just maintain them in place. 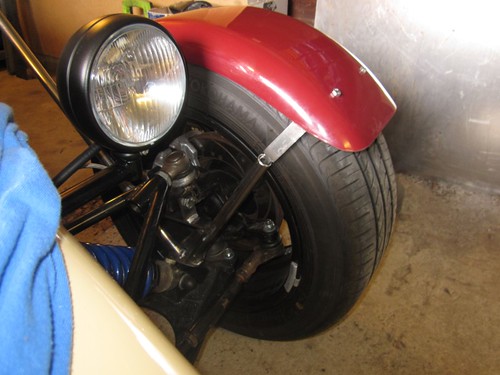 2015-04-25_10-18-37 by Voucht71, sur Flickr 2015-04-25_10-18-37 by Voucht71, sur FlickrAll other plates (WS1, 2, 3) are also 5mm thick, and I used 20mm tube and not 19mm, but I don't think it makes much difference. In order to make the tubes easier to place the lower plate WS1 (I couldn't go anywhere with the book's design), I made WS1 bigger and triangular, so I could place each tube independently on the plate on the right position, and each tube rests on the plate, and not against each other as on the book design.  Book_and_Me by Voucht71, sur Flickr Book_and_Me by Voucht71, sur FlickrIt might be overkilled, but it is steady. 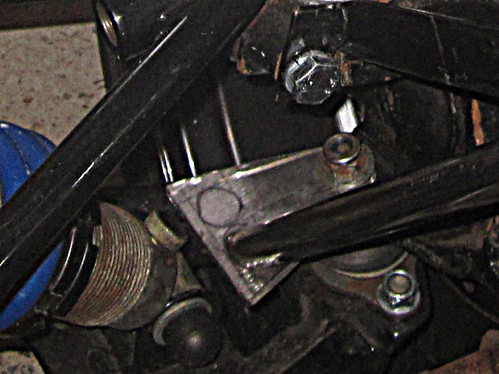 2015-04-24_11-17-41-b by Voucht71, sur Flickr 2015-04-24_11-17-41-b by Voucht71, sur Flickr
__________________
Sylvain Pictures of my completed Roadster https://www.flickr.com/photos/994983...7646799525542/ Build blog: http://vouchtroadster.blogspot.se/ https://cafrazx550.blogspot.com/ Last edited by voucht : 22nd October 2015 at 11:59 AM. |
|
#8
|
||||
|
||||
|
There is an upside, and a downside to this:
Upside: Positioning the bases of the tube this way places the rear tube further back, so the angle needed on the rear tube to go around the front brake line (13° in the book) is smaller, and I just bent the tube manually. No need to cut and re-weld as on the book's design. 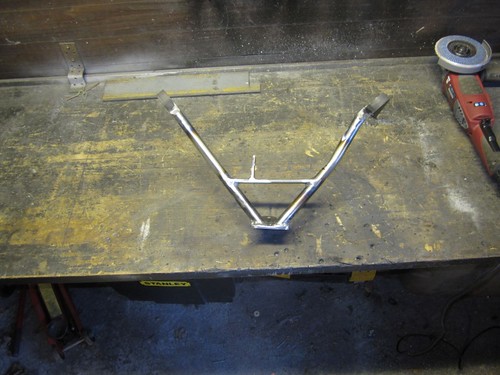 2015-04-26_11-48-09 by Voucht71, sur Flickr 2015-04-26_11-48-09 by Voucht71, sur FlickrDownside: Positioning the bases of the tube this way places them further away from each other, so, in the same way as the rear tube is further to the back, the front tube is further to the front than with the book's design. The consequence of this is that the angle you have to tighten the ball joint's nut that old the lower plate of the wing stay WS1 (space between the front tube and the rim) is much smaller. So it is long and difficult to screw the nut on, especially wit my torque wrench which is quite thick. But the wing stays are now very steady, they don't vibrate at all. So far (about 2000km), they don't show any sign of fatigue. 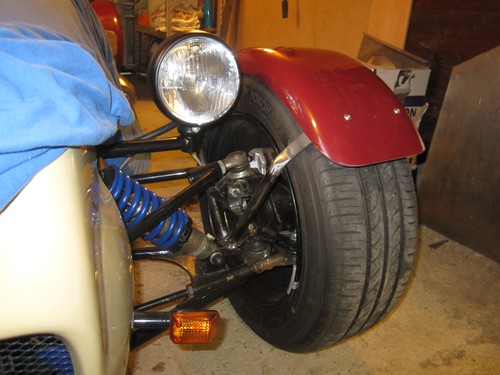 2015-04-25_12-09-28 by Voucht71, sur Flickr 2015-04-25_12-09-28 by Voucht71, sur FlickrAgain, there are a lot of pictures on my blog: http://vouchtroadster.blogspot.se/20...avant-new.html or my flickr gallery: https://www.flickr.com/photos/994983...57660114808026 Hope that will help 
__________________
Sylvain Pictures of my completed Roadster https://www.flickr.com/photos/994983...7646799525542/ Build blog: http://vouchtroadster.blogspot.se/ https://cafrazx550.blogspot.com/ |
 |
| Thread Tools | |
| Display Modes | |
|
|