 |
|
#371
|
||||
|
||||
|
Quote:
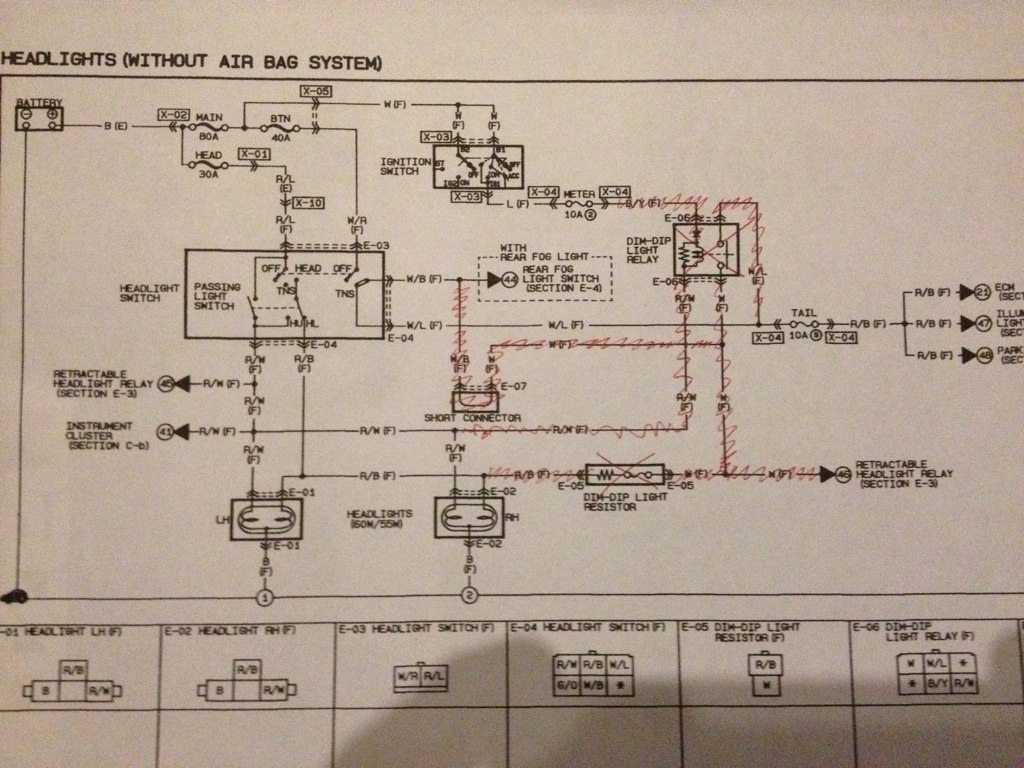
Wiring update. After getting the fuse box all sorted and neat and all the wires needed to the front of the car, I discovered I had a popped 20Amp fuse in the (ad) fan location, I stupidly assumed this was the rad fan being tired at around 10:30pm and spent an hour looking for the problem. Couldn't find the issue and went to bed. Spent another hour in the morning looking at it again and then realised it wasn't the cooling fan fuse at all! Just some f***ng random fuse that doesn't appear anywhere in the wiring diagrams and is for the fan if you have Aircon. WTF the car never came with aircon why did they fit a fuse that's some how now pops whenever it's replaced. Bit p***d off about that. Anyway I ended up checking all my wiring out sort of and couldn't find a single problem which I suppose is good. Tonight I never got into the garage till 9pm, two hours later i had fully functioning head lamps ! So I guess this little modification worked  Clocks at night  Main Beam  side lights in the garage  |
|
#372
|
|||
|
|||
|
Quote:
Regards, Wim. |
|
#373
|
||||
|
||||
|
Quote:
 All light wiring for me is now done. One trunk of 16mm split conduit takes the wiring from the steering column to the fuse box and then back out to the front, back and clocks. Worked out quite neat but have had to order more 16mm p-clips, some ballast resistors for the led side repeaters and some 6mm split conduit to finish it off. I put the pump wiring into this conduit to the rear. When the bodywork is on I'll finish the wiring at the rear. I'll take some photos of the wiring when it's finished. As it stands currently, flattened the battery leaving the ignition on!  I've made a start on the side panels for the tunnel and ordered some foam and black vinyl. I also have some carbon fibre look ABS plastic for the dash. Can't really get my head around the fact I'm thinking about interior trim! Weird! Am I really that far along? I must of missed something out!  Last edited by CTWV50 : 20th May 2014 at 01:40 AM. |
|
#374
|
||||
|
||||
|
Started tunnelling but first the back panel vinyl glueing.
 Quite like the rivets showing through.  Did the drivers side too but never got round to take pictures. I will definitely fix it all in place this week after I've convince myself I won't need to go in there again soon.  |
|
#375
|
|||
|
|||
|
Your build is coming along really nicely,
Have you decided on a suitable aeroscreen yet? I was waiting for AGM to develop his but its all gone a bit quiet.. David
__________________
Click to see my build photos on Flikr http://www.flickr.com/photos/67112582@N03/ Saturn MX5 Based Chassis, Limited Slip Diff & 2.4 Quick Rack. Build cost.... seems to be spending more on tools than car bits at the moment! (they will be handy in the future though). Car iva'd and passed 15/08/2014. Finished weight 572kg. |
|
#376
|
||||
|
||||
|
Cheers, still got the saturn one but it doesn't fit. Might chop the ends off so it does unless I can come up with an alternative.
|
|
#377
|
||||
|
||||
|
Got the interior tunnel sides buttoned up.
  Wiring to rear is secured and got carried away fitting the drivers 4 point harness  Today I removed the light and wing brackets and painted them. Starting to get difficult to put off fitting the side panels and rear tub. Weird!  |
|
#378
|
||||
|
||||
|
Tidied up the tank removing the old drain route brackets. Nervous work with a full tank of fuel!
 New drain route.    |
|
#379
|
||||
|
||||
|
Tank wiring route finalised.
 Seat trim. Might spray the seat backs as they look a bit crap.   Last edited by CTWV50 : 30th May 2014 at 11:42 AM. |
|
#380
|
||||
|
||||
|
Oh yes a picture of the front. Painted the rad fins, wing stays, light mounts, horns etc. matt black.
 black, black, black I say! Like the Japanese hair, I'm hiding in Last edited by CTWV50 : 31st May 2014 at 02:58 AM. |
 |
| Thread Tools | |
| Display Modes | |
|
|