 |
|
#31
|
||||
|
||||
|
Quote:

__________________
Any intelligent fool can make things bigger and more complex... It takes a touch of genius - and a lot of courage to move in the opposite direction. Albert Einstein http://s1199.photobucket.com/albums/aa472/JohnoSS1/ Johno |
|
#32
|
||||
|
||||
|
Quote:
 Cheers Stot
__________________
1.6 Mazda B6 : Garrett TBO339 : 420cc WRX Injectors : FMIC : Microsquirt V3 : LC-2 Wideband : Toyota COP : 1.8 ATB LSD Build Started Jan 2013 : OTR Aug 2014 : Still OTR June 2024 |
|
#33
|
||||
|
||||
|
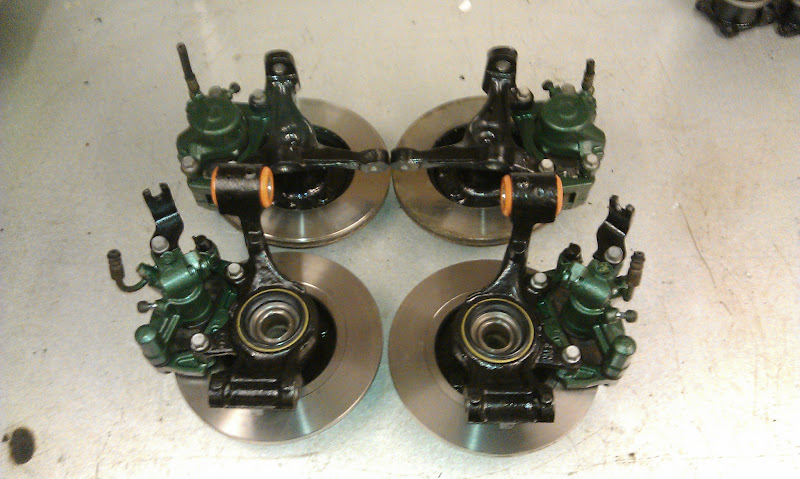
Uprights are ready to just bolt on now with all new brake seals, new rear bearings and new bushes.
   Next I need to finish welding up the chassis and get the wishbone brackets tacked up. Cheers Stot
__________________
1.6 Mazda B6 : Garrett TBO339 : 420cc WRX Injectors : FMIC : Microsquirt V3 : LC-2 Wideband : Toyota COP : 1.8 ATB LSD Build Started Jan 2013 : OTR Aug 2014 : Still OTR June 2024 Last edited by Stot : 23rd February 2013 at 10:34 PM. |
|
#34
|
|||
|
|||
|
Very nice indeed
 |
|
#35
|
||||
|
||||
|
Look what just turned up from Phil @ Talon.
  He even painted them for me.  Cheers Stot
__________________
1.6 Mazda B6 : Garrett TBO339 : 420cc WRX Injectors : FMIC : Microsquirt V3 : LC-2 Wideband : Toyota COP : 1.8 ATB LSD Build Started Jan 2013 : OTR Aug 2014 : Still OTR June 2024 |
|
#36
|
||||
|
||||
|
Made some more progress with the chassis. Trans tunnel is in and suspension brackets are on.
  One of my D12s has gone missing.  most everything else is fully welded. most everything else is fully welded.I trial fitted one of the front suspension and uprights to see how it would fit too.  Look a bit weird from that angle but it will probably make sense once I do them flat. Cheers Stot
__________________
1.6 Mazda B6 : Garrett TBO339 : 420cc WRX Injectors : FMIC : Microsquirt V3 : LC-2 Wideband : Toyota COP : 1.8 ATB LSD Build Started Jan 2013 : OTR Aug 2014 : Still OTR June 2024 |
|
#37
|
||||
|
||||
|
Some cracking progress there
 Are the wishbones roughly based on the Saturn design? If so you may have a problem with the steering arm extension hitting the lower wishbone. You can get round it by limiting the amount of steering lock as it only just hits on full lock. I know Phil made some lower wishbones with a slight bend in them to get over this as well I believe for the Voodou design I think. Any thoughts on how you are going to mount your diff yet? It's been a topic of much debate in the past on which way to mount it. Looking forward to more photos...  
__________________
Any intelligent fool can make things bigger and more complex... It takes a touch of genius - and a lot of courage to move in the opposite direction. Albert Einstein http://s1199.photobucket.com/albums/aa472/JohnoSS1/ Johno |
|
#38
|
||||
|
||||
|
Quote:
 Quote:
The next goal is to get it rolling so that I can wheel it to and from my detached garage so steering uprights and maybe handbrake next. Cheers Stot
__________________
1.6 Mazda B6 : Garrett TBO339 : 420cc WRX Injectors : FMIC : Microsquirt V3 : LC-2 Wideband : Toyota COP : 1.8 ATB LSD Build Started Jan 2013 : OTR Aug 2014 : Still OTR June 2024 Last edited by Stot : 4th March 2013 at 09:23 AM. |
|
#39
|
||||
|
||||
|
Made a start on my pedal box tonight.
 I note on the MX5 setup the furthest left lower bolt hole is covered by the pedal so needs to be repositioned. Cheers Stot
__________________
1.6 Mazda B6 : Garrett TBO339 : 420cc WRX Injectors : FMIC : Microsquirt V3 : LC-2 Wideband : Toyota COP : 1.8 ATB LSD Build Started Jan 2013 : OTR Aug 2014 : Still OTR June 2024 |
|
#40
|
|||
|
|||
|
Both skov and myself noticed on he mx5 the accelerator pedal moves a long way. It might be an idea before its installed to see if it can be modified in some way.
__________________
Click to see my build photos on Flikr http://www.flickr.com/photos/67112582@N03/ Saturn MX5 Based Chassis, Limited Slip Diff & 2.4 Quick Rack. Build cost.... seems to be spending more on tools than car bits at the moment! (they will be handy in the future though). Car iva'd and passed 15/08/2014. Finished weight 572kg. |
 |
| Thread Tools | |
| Display Modes | |
|
|