
|
|
#1
 26th July 2010, 05:59 PM
|
||||
|
||||
|
Hi all,
Even tho I have the front indicators wired up & working, I haven,t decided the final position for them ")  Any suggestions welcome of where others have fitted them to the nose, obviously I need to fit them with the IVA regs in mind , also what have others used to make the extension,s for them? By the way my front indicators are small motorcycle style ( & yes they have the correct markings on them). thanks in advance, cheers andy  
|
|
#2
26th July 2010, 06:18 PM
|
||||
|
||||
|
I was planning on using some steel tube with a nut welded inside on the end as an extension bar, so that the indicator will bolt to the tube (assuming yours have threads), then some how fix the steel tube to the front frame of the chassis in a similar way.
Something like this... 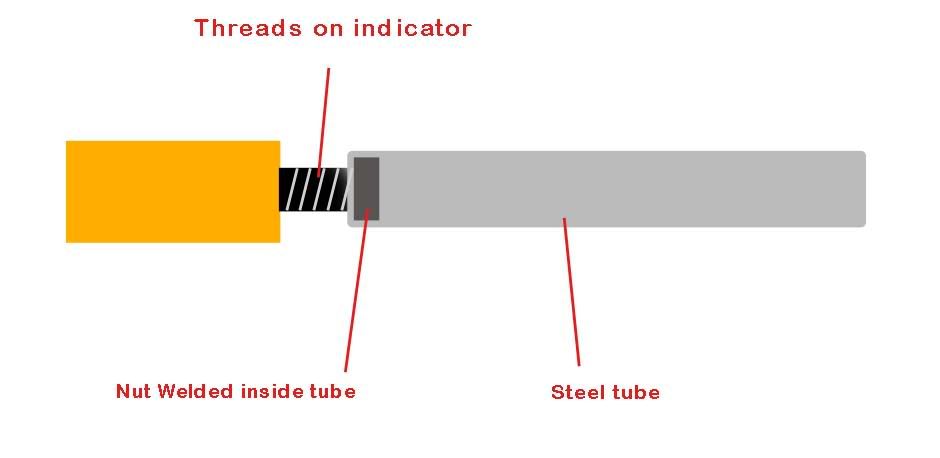 I've got some tube if you need some (came with my chassis kit for the rear alu tub, so won't be needing much of it). If you want a bit, give me a shout.
__________________
~ My Build Diary - http://davesroadster.blogspot.com/ *updated 7/6/11* Best bit so far: Getting it running Worst bit so far: Cutting steel for wishbones and engine mounts. Most annoying bit so far: Generator packing up half way through welding.
|
|
#3
26th July 2010, 06:59 PM
|
||||
|
||||
|
Thanks for that Dave, I was thinking along the same line as you, but I,d like my indicators more to the front of the nose, as the FF2 FF3 parts of the front frame are quite far back within the nose area,
Tho your diagram has given me an idea How about welding a nut in both ends of the steel tube, & a large "Penny" washer at the end that meets the nose, then use a bolt & large washer on the inside of the nose into the extension bar, only awkward thing I can see is the angle of the extension tube so that the tube is parrallel with the frontal aspect of the nose, as there isn,t a "flat" on the side of the nose, all curves & bumps etc ........hmmmmmm Thanks for the offer of the steel tube, I,m ok as I have some too. cheers andy
|
|
#4
26th July 2010, 07:16 PM
|
||||
|
||||
|
Yea, you're on the same wave length as me, just it's hard for me to picture as i haven't got the nosecone yet.
 Could always cut the end of the tube the correct angle as the nose cone (and weld the nut to the same angle), then just use a bolt that is just long enough to go through the nuts if that makes sense. 
__________________
~ My Build Diary - http://davesroadster.blogspot.com/ *updated 7/6/11* Best bit so far: Getting it running Worst bit so far: Cutting steel for wishbones and engine mounts. Most annoying bit so far: Generator packing up half way through welding.
|
|
#5
26th July 2010, 07:25 PM
|
||||
|
||||
|
Quote:
but , I,ve just realised my suggestion is flawed......as i,ll need to get the wires thru the tube so the nut/bolt at nose end won,t work "Thinking cap" is on.......me,s thinking "hollow thread " & nut .....hmmm  been a long day, maybe i,m not "thinking clearly enough"...can,t see woods for the tree,s etc cheers andy
|
|
#6
26th July 2010, 08:02 PM
|
||||
|
||||
|
You could drill a hole in the nose cone the same diamater as the tube, then fabricate a bracket to the front of the chassis to hold the tube.
__________________
~ My Build Diary - http://davesroadster.blogspot.com/ *updated 7/6/11* Best bit so far: Getting it running Worst bit so far: Cutting steel for wishbones and engine mounts. Most annoying bit so far: Generator packing up half way through welding.
|
|
#7
26th July 2010, 08:23 PM
|
||||
|
||||
|
I think bolting to the nose cone is asking for trouble! as the slightest Knock on the stork, even a small bird will crock the nosecone.
only my thoughts! Last edited by Twin : 30th April 2012 at 10:30 PM.
|
|
#8
26th July 2010, 08:38 PM
|
||||
|
||||
|
Dave,.....I like that idea
 Twin......... Yes I see your point  , but I must say that the area of the nose cone where I,m thinking of putting the indicators is very substantial indeed , but I must say that the area of the nose cone where I,m thinking of putting the indicators is very substantial indeed  . .I,ve seen Adrian H,s front indicator location, sadly, if I did the same it would mean I,d need to do more welding, but don,t want to spoil my nice shiney paintwork cheers for your suggestions. Andy
|
|
#9
26th July 2010, 10:10 PM
|
||||
|
||||
|
Ash has some good pics of his indicator extensions in this gallery at the bottom
http://s707.photobucket.com/albums/w...tuff/?start=20
__________________
Gallery 2 http://www.facebook.com/album.php?ai...4&l=a9831a9319 Gallery 3 http://www.facebook.com/album.php?ai...4&l=3f0d42c523 Gallery 4 http://www.facebook.com/album.php?ai...4&l=efb083b7df Gallery 5 http://www.facebook.com/media/set/?set=a.10150244028550325.366987.601005324&l=583fd5 cd3a Gallery 6 http://www.facebook.com/media/set/?set=a.10150550640070325.430417.601005324&type=1&l =fe779b358c
|
 |
| Thread Tools | |
| Display Modes | |
|
|


 Linear Mode

