
|
|
#121
 1st September 2010, 06:39 PM
|
||||
|
||||
|
I saw your post earlier Davy
To be honest, I had not really given the foot control a fair go .... Me legs were playing silly beggars when I first got the welder ") Inspired by your post earlier, just had to give it a try. I had a root about in my bins, found a bit of 50mm X 50mm X 3.25mm alloy box section & a bit of 5mm alloy plate. Quite badly Oxidized, been in my bins for a fair few years, I gave it a quick token rub with a wire brush & heres the results. 3.25mm thick box section  A lap joint in some 5mm plate 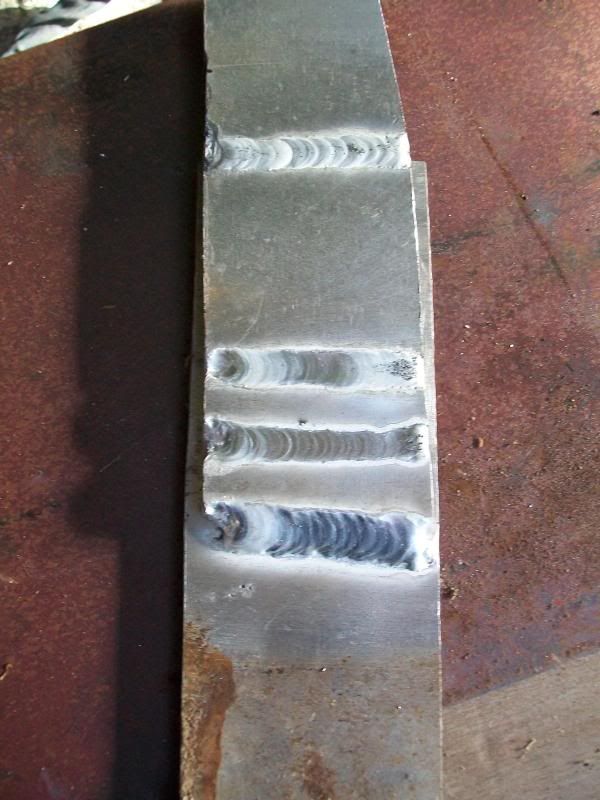 Not too bad at all in view of the fact that the material is well past it's sell by date !!?? Foot controll works really well & welder was giving a good degree of penetration. I thought it might struggle with the 5mm plate but to my surprise, coped easily & still had a fair bit of current left in reserve 
__________________
I am not a complete idiot...........Some of the parts are missing !! Ronnie  www.roadster-builders.co.uk 
|
|
#122
1st September 2010, 06:44 PM
|
||||
|
||||
|
Looking Good Ronnie,
Definitely a market for fuel tanks if your up for collecting some pennies.....  AndyH
__________________
Haynes Roadster / Saturn GRP Bodywork. Now available direct through http://www.gillhamonline.co.uk/ or contact me direct on andrew.hugill@ntlworld.com Regards..........AndyH
|
|
#123
1st September 2010, 07:04 PM
|
||||
|
||||
|
Hi Andy
I did give some thought's re fuel tanks A couple of the major drawback's for me, one would be the very high cost of alloy sheet in this neck of the wood's, the last sheet of 1.2mm cost me £47 & I dread to think how much the 2mm is per sheet now  but by far the biggest drawback is the lack of a suitable sheet metal bender but by far the biggest drawback is the lack of a suitable sheet metal bender  My own tank was made out of sepperate pieces, this meant 3 extra seams to weld & greatly increases the fabrication time, not to mention the extra Argon consumption. Been scouring ebay for a decent locost box folder for years .... Allways fetch silly money or are a gazillion miles away
__________________
I am not a complete idiot...........Some of the parts are missing !! Ronnie www.roadster-builders.co.uk Last edited by Bonzo : 1st September 2010 at 08:20 PM.
|
|
#124
1st September 2010, 08:19 PM
|
|||
|
|||
|
Wow, that's some skill you have there Ronnie, can't say I have ever seen better than that. My Chinese arc jobbie doubles up as a tig but I think it needs some accessories eg gas bottle and regulator. I hope to look in to it and give it a go when I have a bit more time. Keep up the good stuff
Enoch
|
|
#125
1st September 2010, 09:02 PM
|
||||
|
||||
|
Nice work Ronnie, one day I hope to turn out welds as neat as that. All I've done so far is stitch up some brackets for work with it welding 3mm wall 50mm dia tube to 4"x2" 1/8" angle. Its not the prettiest welding but for what these brackets need to do its fine, maybe I'll take a photo or two tomorrow and post it up for public ridicule
 . Northern Tool do a combination shear roll and folder with a 3' bed length, its the one I got last year and works well on light gauge metal, I've bent up to 3mm thick ali at 50mm wide with it today. http://www.northerntooluk.com/metal-...e_143342E.html . Northern Tool do a combination shear roll and folder with a 3' bed length, its the one I got last year and works well on light gauge metal, I've bent up to 3mm thick ali at 50mm wide with it today. http://www.northerntooluk.com/metal-...e_143342E.htmlD.
__________________
visit my website at www.cossie.davenewell.co.uk
|
|
#126
1st September 2010, 09:16 PM
|
||||
|
||||
|
looks fab ronnie. if you do decide to make a few fuel tanks, give me a shout.
__________________
~ My Build Diary - http://davesroadster.blogspot.com/ *updated 7/6/11* Best bit so far: Getting it running Worst bit so far: Cutting steel for wishbones and engine mounts. Most annoying bit so far: Generator packing up half way through welding.
|
|
#127
4th September 2010, 02:26 PM
|
||||
|
||||
|
I had a few hours at the TIG set this morning gluing the bits of my inlet fanimold together till I ran out of rods
 . Anyway here's a couple of photos of my dodgy welding, it aint pretty but the fanimold will need some attention from a die grinder and a flap wheel when its all glued together anyway. . Anyway here's a couple of photos of my dodgy welding, it aint pretty but the fanimold will need some attention from a die grinder and a flap wheel when its all glued together anyway.D.
__________________
visit my website at www.cossie.davenewell.co.uk
|
|
#128
11th September 2010, 07:32 AM
|
||||
|
||||
|
Its been a fairly quiet week at work so I've managed to get all the fanimold bits stuck together at last after a new consignment of ali welding rods arrived. I have to say I am well chuffed with the TIG welder, despite it only having a claimed 60% duty cycle it hasn't cut out once, produces nice clean welds and with the foot pedal is super controllable.
I did quite a bit of cleaning up of it all yesterday with a borrowed die grinder and carbide bit then switched to my cheapo Dremel type rotary tool to polish it all up. It was all going swimmingly till 3 pm when the rotary tool suddenly lost power, I looked down to the main unit to see it glowing and unhealthy colour and pouring with smoke. So I chopped the plug off and went out and bought another! Going in today to do some more polishing and hopefully will have a couple of photos for your delectation later. D.
__________________
visit my website at www.cossie.davenewell.co.uk
|
|
#129
11th September 2010, 08:45 AM
|
||||
|
||||
|
I missed those photos when you posted them mate
 Certainly got a nice bit of penetration going on there & I must say, I do agree with your assesment of those inverters. They do seem to have plenty of power in reserve for the heavier material .... I did slice open that bit of 5mm plate I used, a good 75-80% penetration, very good in view of the fact that I was not using that much power Look forward to viewing the completed manifold mate Been looking at that combined folder/roll/shear on the Northern Tools website, the current price is very good & I am growing ever more tempted Could almost pay as much that for one of those lightweight Clarke angle iron type folders !!
__________________
I am not a complete idiot...........Some of the parts are missing !! Ronnie www.roadster-builders.co.uk
|
|
#130
11th September 2010, 06:31 PM
|
||||
|
||||
|
Cheers Ronnie, your new website is looking interesting. I look forward to following it.
Attached should be three photos of the fanimold after initial welding and as it is currently. The third picture is a bit glary but it shows how I've built up "buttresses" around the fixing holes 'cos they were too close to the sides of the transfer tubes to allow for bolt heads. I've built them up with weld, drilled them through then I'll mill the tops flat and use cap headed bolts to fix it. There's still loads of tidying up and polishing to do but its coming along nicely. I'll leave it up to you lot to decide if its a candidate for automotive porn or would be better consigned to the scrap bin and get Ronnie to do it properly .D.
__________________
visit my website at www.cossie.davenewell.co.uk
|
 |
| Thread Tools | |
| Display Modes | |
|
|


 Linear Mode

