
|
|
|
|
#2
 15th January 2012, 06:40 PM
|
||||
|
||||
|
Hi guys,
Thanks for your comments Skov and Stew. Well I got round to fitting the ally panels, It's a bit tedious with all the drilling but it's got to be done at some point I guess. I plan to drill all the holes for the panels before I give the chassis a coat of grey primer and then top coat, probably get a coat of grey on it next weekend. 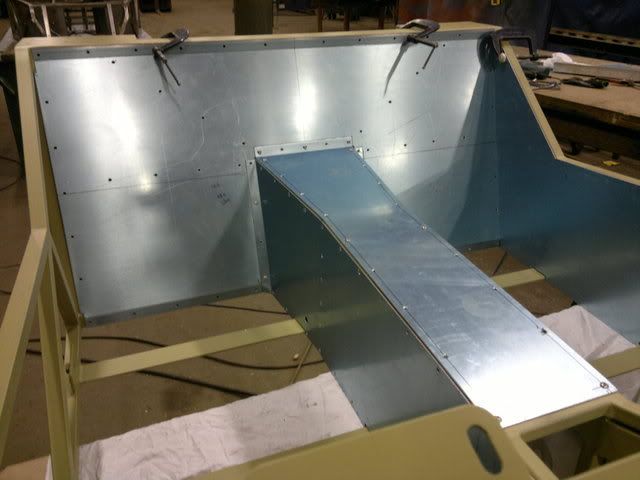 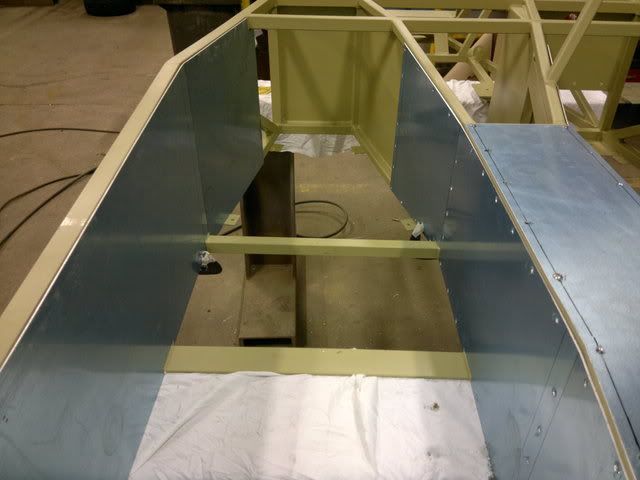  Well I guess the time is soon coming to strip my donor. The wife doesn't want me to do it as she would like to keep it......."WELL TOUGH"  http://s1199.photobucket.com/albums/...1/MX5%20Build/ Bye all...Johno....ps Stew I found how to turn the flash off at last... 
|
|
#3
15th January 2012, 11:46 PM
|
|||
|
|||
|
the build looks great. I hope my alloy panels inside look as good!
Keep posting the pictures!
__________________
Click to see my build photos on Flikr http://www.flickr.com/photos/67112582@N03/ Saturn MX5 Based Chassis, Limited Slip Diff & 2.4 Quick Rack. Build cost.... seems to be spending more on tools than car bits at the moment! (they will be handy in the future though). Car iva'd and passed 15/08/2014. Finished weight 572kg.
|
|
#4
16th January 2012, 09:30 PM
|
||||
|
||||
|
Hi David,
 Yeah will certainly keep the photos coming, if it helps anybody thats what it's all about. Theres a few of us now building MX5 based Roadsters to Spuds69 design and only hope we can do him justice for his hard work. Just read his post tonight and what can you say... I keep looking at all you guys building MX5 based cars it certainly helps out... Keep up the good work....Johno ps... I'm sure you will do a good job of your panels as I have been looking at your build photos. 
|
|
#5
14th March 2012, 08:31 PM
|
||||
|
||||
|
Hi all,
Well it's been some time since I've updated my build so had a chance today to take some photos. Came up against a little problem as I made my bottom wishbones a little too long for the MX5 build from Saturn. As I had already finished and painted my wishbones I was a little reluctant to cut them up, so I decided to design my own top adjustable wishbones and make them easier to adjust on the car in situ. Hopefully this will cure the problem but if anybody can see a problem please let me know. Here's a photo....    Well got more to come but will update when I get time.... Johno
|
|
#6
14th March 2012, 10:03 PM
|
|||
|
|||
|
Hello johno,
looking really good. Have you inserted tube into the bottom of the rear wishbones to reduce the hole size to 12mm or used a larger 14mm crush tube on the polybush. David
__________________
Click to see my build photos on Flikr http://www.flickr.com/photos/67112582@N03/ Saturn MX5 Based Chassis, Limited Slip Diff & 2.4 Quick Rack. Build cost.... seems to be spending more on tools than car bits at the moment! (they will be handy in the future though). Car iva'd and passed 15/08/2014. Finished weight 572kg.
|
|
#7
14th March 2012, 10:45 PM
|
||||
|
||||
|
Just a quicky,
You can turn out polybushes if you can keep them cool enough, i had a play this morning, i got a can of pipe freeze given, works well but its bloody expensive stuff
__________________
A few build photos... www.photobucket.com/ntsengineering
|
|
#8
15th March 2012, 08:08 PM
|
||||
|
||||
|
Hi David,
I ordered some 14mm OD by 12mm ID tube as you guys have done... easiest option I think. A 12mm bolt is plenty good enough for the job I reckon. What roughly should the ride height be for the front and back from the bottom of the chassis rails to the floor plz. anybody know for the SSC build car. Heres the link to Photobucket... sorry not many photos. http://s1199.photobucket.com/albums/aa472/JohnoSS1/
|
|
#9
18th March 2012, 10:51 PM
|
||||
|
||||
|
Quote:
Basically I could only fit the rear pass side hub to the wishbones by putting about 10˚ of camber into it. Seems the driveshaft (halfshaft) is pushing the the hub too far out. also noticed that when lifting the hub it was stopped from travelling up by the driveshaft which then bounced the other hub up so something is not right. Seems I may need to think about moving the diff slightly. Took loads of measurements to see where I went wrong but can't real account for this issue using measurements alone! http://www.haynes.co.uk/forums/showt...1417#post71417 EDIT: It's ok I found out what the issue was this morning. Last edited by CTWV50 : 19th March 2012 at 12:33 PM.
|
|
#10
2nd April 2012, 09:36 PM
|
||||
|
||||
|
Well been spending a bit of time on the build but not as much as I wished (Simon)....LOL
I was considering changing my diff mount with thinking how can I incoporate a second rubber mount with what I have already fabricated. I wasn't happy about a 10mm rubber mount holding the diff in place on a top mounted bracket. Then I read Nathans report on his test drive so that motivated me to sort it out. Had a play around with what I already have and came up with this... 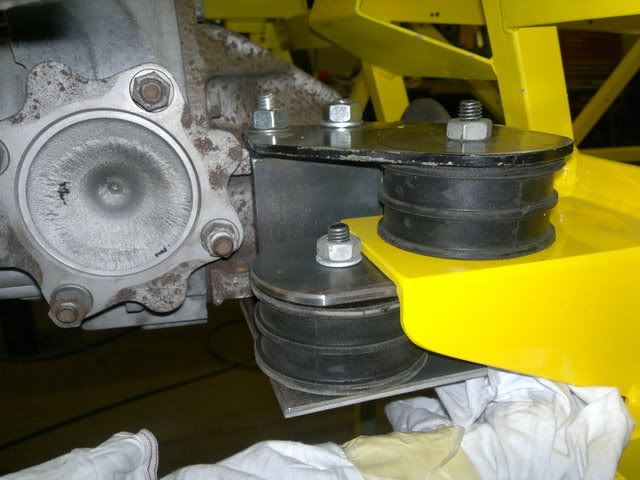 Seems more robust just a bugger to get in with it being a welded bracket to bolt to the top and bottom of the diff the same as the original frame. Also Nathan came down Sunday and delivered Lukes body kit....How about that for customer service....... Luke now a happy bunny... Damm nice fellow just doesn't speak proper Lincolnshre English....LOL Luke let me borrow his shocks and here's part of the result. 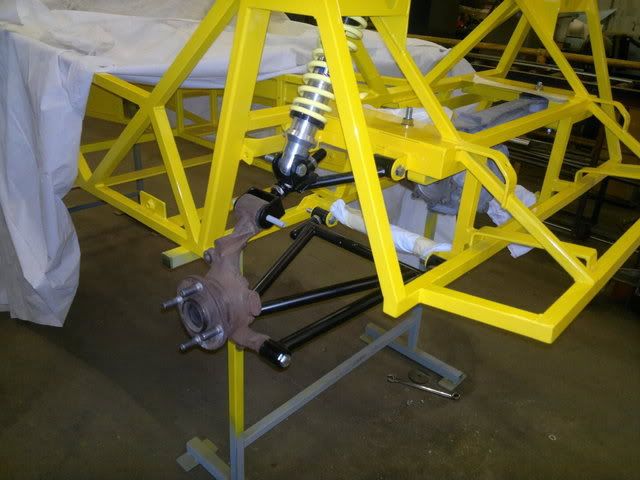 Johno
|
 |
| Thread Tools | |
| Display Modes | |
|
|


 Hybrid Mode
