
|
|
|
|
#1
 11th August 2012, 07:55 PM
|
||||
|
||||
|
Well I altered my rear top wishbone yesterday.
Forum member Robo made a valid comment on them some time back and I've only just got round to altering them. At the time I made the adjuster out of 18mm coarse pitch studding which was OK for mocking up but no good for road use. After I made them I was not happy as I knew that thread in a shaft was not a good idea and Robo's comment only reinforced this. Basically he said "think Tobelerone" which is a good perspective as the coarse thread pitch along with thread all the way along the adjuster was a bad idea (failure everywhere). Well I wanted to keep the top adjustable wishbone idea and tackle the adjuster...... Here's my latest version.....  I started off with a 18mm fine pitched bolt rated at 8.8. This had the head cut off and a thread machined the same end... 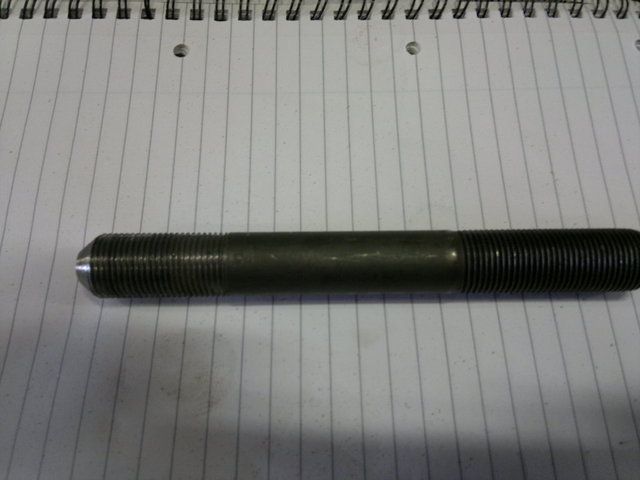 The part of the bolt which was to be welded to the yolk was prepped for weld. The yolk was also uprated to a 10mm back plate with 6mm side plates. Before the bolt was tacked to the yolk a Stainless half nut was fitted along with a machined half nut. The bolt was then welded to the yolk. The machined half nut was then welded to the back plate once it was tightened as far as it would go.... 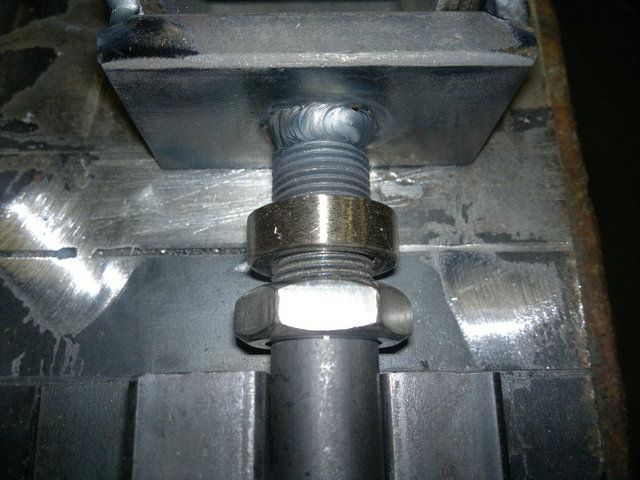 Here is the finished result... 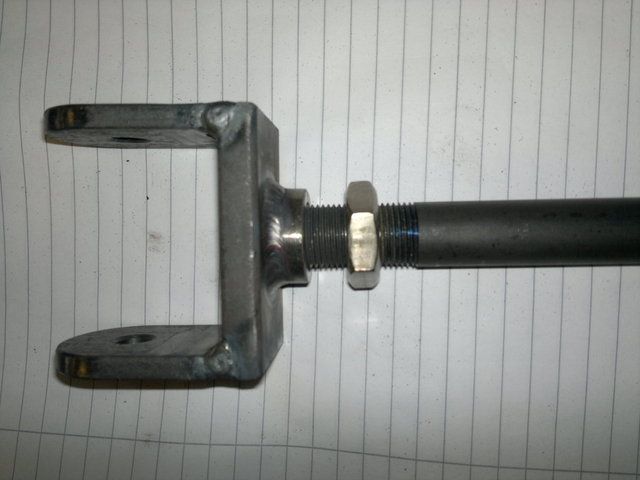 The idea of the machined nut is to reinforce the bolt along its length without putting another weld further along. This will also help to strengthen the weld under the machined half nut without creating a further failure point. Well that's the idea behind my thinking. The amount of thread between yolk and wishbone is quite small so hopefully this will help as well. The shank of the bolt is now inside the wishbone which gives a lot better fitment and strength. I'm more happier with it now but if anybody has an issue with it please let me know.... Thanks Johno Will post a picture tomorrow of the finished item... Last edited by Johno : 11th August 2012 at 07:58 PM. 
|
|
#2
11th August 2012, 08:20 PM
|
||||
|
||||
|
Stop posting the welding porn, puts mine to shame
 Your build is coming on brilliantly, I can't wait to see the final result.
|
|
#4
12th August 2012, 06:36 PM
|
||||
|
||||
|
Quote:
Well I like doing things the hard way..... At least i can say I made that (unless it fails and it's somebody else's fault)  will see how it works out Johno
|
|
#5
12th August 2012, 06:19 PM
|
||||
|
||||
|
Quote:
Sorry Steve will show all the welding posts from now on with an 18 certificate ...... Trust me there's a lot of better of welders on this forum than what I can do.... Yeah I can't wait to see what it turns out like too as I'm making it up as I go along now....LOL Well here's a photo of the finished adjuster painted and in place... 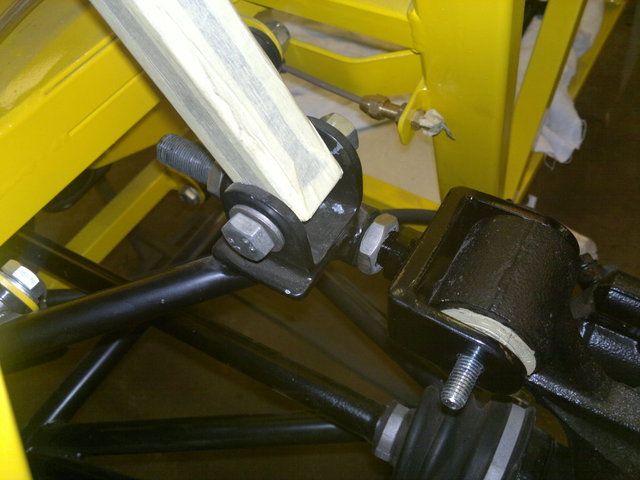 Just got to add a couple of washers and a nylock to finish it off and it's done. Well I guess it's the wiring loom next and it's routing which I'm not looking forward to. Bye for now....Johno
|
 |
| Thread Tools | |
| Display Modes | |
|
|


 Hybrid Mode
